
How to enable remote desktop RDP in Win11 system? This must be a concern for many users. Remote Desktop Protocol (RDP) is a very useful feature that allows users to control other computers through remote connections. In Win11 system, enabling RDP is very simple. With some simple settings, you can easily connect remotely and operate other devices conveniently and quickly. Next, PHP editor Apple will introduce you in detail how to enable remote desktop RDP in Win11 system, so that you can easily enjoy the convenience of remote office.
Remote Desktop Protocol (RDP) is a protocol for remote access and control of computers. In Win11 system, enabling remote desktop RDP allows users to remotely connect to other computers through the network and perform operations on the remote computer. The following will introduce how to enable remote desktop RDP in Win11 system.
Step one: Open system settings. Click the "Start" button of the Win11 system, and then click the "Settings" icon to enter the system settings interface.
Step 2: Enter the remote desktop settings. In the system settings interface, click the "System" option on the left, and then click the "Remote Desktop" option on the right.
Step 3: Enable Remote Desktop In the remote desktop settings interface, find the "Remote Desktop" option and switch it to "On". This will enable Remote Desktop RDP functionality.
Step 4: Configure remote desktop settings In the remote desktop settings interface, you can perform some configurations on remote desktop RDP. For example, you can select the devices that allow remote connections, you can set the security of remote connections, etc. Configure accordingly according to personal needs.
Step 5: Set user permissions In the remote desktop settings interface, click the "Advanced Settings" option, and then click the "Remote" tab. Here, you can set the users allowed to connect remotely. Click the "Select Users" button and select the users you want to allow remote connections.
Step 6: Save settings After completing the above settings, click the "Apply" button in the upper right corner of the remote desktop settings interface, and then click the "OK" button. This will save the settings for Remote Desktop RDP.
At this point, the remote desktop RDP of the Win11 system has been successfully enabled. Now you can connect to your computer using Remote Desktop RDP through a Remote Desktop client on another device and work on the remote computer.
It should be noted that enabling Remote Desktop RDP will increase computer security risks. Therefore, before enabling Remote Desktop RDP, make sure your computer has the latest security patches installed and take other necessary security measures to protect your computer from potential security threats.
To summarize, the method to enable remote desktop RDP in Win11 system includes opening system settings, entering remote desktop settings, enabling remote desktop, configuring remote desktop settings, setting user permissions and saving settings. With these simple steps, you can easily enable Remote Desktop RDP and enjoy the convenience of accessing and controlling your computer remotely.
The above is the detailed content of How to activate the remote desktop RDP function of Win11?. For more information, please follow other related articles on the PHP Chinese website!
 win11激活密钥永久2023Oct 18, 2023 pm 02:55 PM
win11激活密钥永久2023有:1、Windows 11 家庭版,3KHY7-WNT83-DGQKR-F7HPR-844BM、7HNRX-D7KGG-3K4RQ-4WPJ4-YTDFH、TX9XD-98N7V-6WMQ6-BX7FG-H8Q99、PVMJN-6DFY6-9CCP6-7BKTT-D3WVR等等。
 解决win11无法安装打印机驱动的方法Jan 30, 2024 pm 03:57 PM
打印机是我们日常生活中都会使用到的,如果我们的电脑没有打印机驱动就不能直接诶的使用打印机,也有很多的win11用户们找不到打印机驱动程序怎么办?
 如何解决Win11 23H2更新速度慢的问题?如何解决Win11 23H2更新卡顿的问题?Jan 30, 2024 pm 04:54 PM
近期很多的用户们都想给自己的电脑升级到Win1123H2版本,可也有不少的用户们在升级的过程中发现速度很慢,甚至是卡死的情况,那么这要怎么办?下面就让本站来为用户们来仔细的介绍一些Win1123H2更新卡死的解决方法吧。Win1123H2更新卡死解决方法由于版本升级较大,升级文件较大。建议在网络较好的环境下进行在线检查和下载,以确保升级速度更快。如果你想要快一点升级到Win1123H2,小编建议你可以直接下载系统升级,速度相对来说快很多。推荐系统1、Windows1123H220in1镜像纯净版
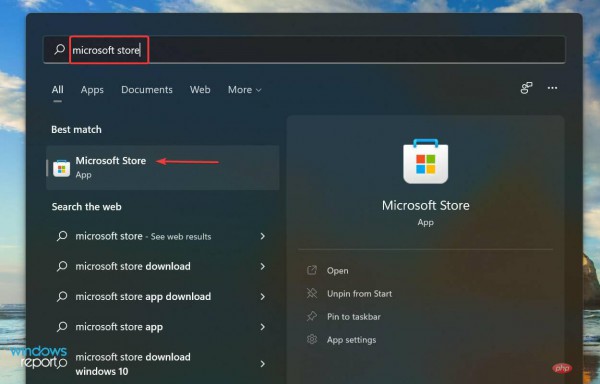 Win11 HEVC扩展安装指南:如何正确安装HEVC视频扩展Jan 30, 2024 pm 02:12 PM
HEVC视频扩展是专业的视频网页浏览插件,能够帮助用户将高清的视频压缩并提升到高质量画质。那就有用户问了Win11系统怎么安装HEVC视频扩展?下面就和小编一起来看看详细教程。1、从MicrosoftStore购买并安装HEVC扩展按Windows+S启动搜索菜单,在顶部的文本字段中输入MicrosoftStore,然后单击出现的相关搜索结果。单击HEVCVideoExtension的搜索结果。完成付款以在Windows11中下载HEVC扩展程序。获得VLC媒体播放器后,无需在Windows11
 如何关闭win11自带杀毒软件Nov 28, 2023 pm 02:04 PM
关闭win11自带杀毒软件步骤如下:1、点击任务栏上的开始图标,在显示的应用中,点击打开设置;2、左侧点击隐私和安全性,右侧点击Windows安全中心;3、点击打开Windows安全中心;4、病毒和威胁防护设置下,将实时保护、云提供的保护和自动提交样本等选项关闭即可。
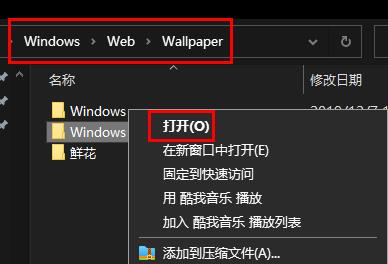 寻找win11壁纸的默认文件夹路径及分享详情Jan 30, 2024 pm 03:15 PM
很多的用户们在使用电脑的时候都会更换壁纸,相信也有不少的用户们在询问win11壁纸在哪个文件夹?系统自带的壁纸在C盘下的Wallpaper,用户们自己存的壁纸在c盘的Themes文件夹,下面就让本站来为用户们来仔细的介绍一下win11默认壁纸路径分享吧。win11默认壁纸路径分享一、系统自带壁纸:1、首先进入我的电脑,然后依次打开路径:C:WindowsWebWallpaper。二、用户自存壁纸:1、用户自己安装的壁纸都会保存在:C:Users(用户)xx(当前用户名)AppDataLocalM
 Win11系统如何禁用通知Jan 30, 2024 pm 04:54 PM
Win11系统如何关闭消息提醒在使用Win11系统时,我们经常会收到各种消息提醒,比如系统更新、软件安装、邮件通知等。虽然这些消息提醒对于我们及时了解信息很有帮助,但有时候也会给我们带来一些干扰。如果你希望在特定情况下关闭Win11系统的消息提醒,下面是一些方法供你参考。方法一:使用系统设置关闭消息提醒1.点击Win11系统的“开始”按钮,然后点击“设置”图标。2.在设置窗口中,点击“系统”选项。3.在系统设置页面中,点击“通知和动作”选项。4.在通知和动作页面中,你可以看到各种消息提醒的开关。
 删除win11右键菜单栏的多余选项方法详解Jan 30, 2024 pm 02:21 PM
win11鼠标右键菜单栏东西太多怎么删除?详情鼠标右键菜单栏是我们快速打开软件或者程序的快捷方式,在这里不少的用户们表示右键菜单栏东西太多了,下面就让本站来为用户们来仔细的介绍一下win11鼠标右键菜单栏东西太多删除方法吧。win11鼠标右键菜单栏东西太多删除方法3、确定要删除的项目:在适当的位置下,您将看到列出的右键菜单处理程序的子键。浏览这些子键以确定您想删除的特定项目。4、删除项目:右键单击要删除的子键,然后选择删除。在弹出的确认对话框中,点击是以确认删除操作。5、重启资源管理器:按下Ct


Hot AI Tools

Undresser.AI Undress
AI-powered app for creating realistic nude photos

AI Clothes Remover
Online AI tool for removing clothes from photos.

Undress AI Tool
Undress images for free

Clothoff.io
AI clothes remover

AI Hentai Generator
Generate AI Hentai for free.

Hot Article

Hot Tools

Dreamweaver CS6
Visual web development tools

Dreamweaver Mac version
Visual web development tools

mPDF
mPDF is a PHP library that can generate PDF files from UTF-8 encoded HTML. The original author, Ian Back, wrote mPDF to output PDF files "on the fly" from his website and handle different languages. It is slower than original scripts like HTML2FPDF and produces larger files when using Unicode fonts, but supports CSS styles etc. and has a lot of enhancements. Supports almost all languages, including RTL (Arabic and Hebrew) and CJK (Chinese, Japanese and Korean). Supports nested block-level elements (such as P, DIV),

Notepad++7.3.1
Easy-to-use and free code editor

Zend Studio 13.0.1
Powerful PHP integrated development environment


