


This article will introduce the relevant content of Mac virtual machine network configuration, hoping to solve your current problem. Please continue reading and follow this site to get started now!
Virtual machine mac network settings
First, plug the network card converter connected to the network cable into the computer. Then, open your Mac’s System Preferences and select Network Options. Next, add a new network connection in the network settings interface. Create a wired network with this network card as the interface. It should be noted that it is not feasible to use WiFi and wired networks at the same time. Therefore, be sure to turn off WiFi when creating a wired network.
Observe the network adapter icon in the lower right corner of the virtual machine and check if there is a green flashing light. If the icon is gray, the virtual machine's network is disabled. Right-click the adapter icon and check the "Connected" and "Connect at startup" options in the settings.
After opening the virtual machine on your computer, click the "File" option in the upper left corner, select "Open" and find the virtual machine that needs to modify the MAC address in the window that opens, and finally click the Open button at the bottom.

How to set up a wired network connection for mac dual system and virtual machine
Step one: I bought a Thunderbolt Gigabit Ethernet adapter online converter, you can also connect usb, connect the converter to mac here. Step 2: Connect one end of the network cable to the external network interface, plug the other end into the converter's network cable interface, and observe whether the indicator light is on.
I purchased a Thunderbolt Gigabit Ethernet adapter online, and it also came with USB connectivity. Now I connect the adapter to my Mac computer. I connected one end of the network cable to the external network interface, then plugged the other end into the adapter's network cable interface and observed whether the indicator light came on.
First, open the Dock of your Mac computer, find the System Preferences icon and click to open it. Next, click the network icon in the preferences interface. In order to connect to the network, we can consider purchasing a network converter for macOS. Using a network converter, connect the network cable to the converter and make sure the switch is on.
First, right-click the network icon on the lower right side of the computer and select Network and Internet Settings from the pop-up list. Next, open the settings window and click on the WLAN option on the left. Then, click Change Adapter Options on the right.
First, connect the Ethernet cable to the computer, you can use a converter to connect. Next, on your Mac, click the Apple icon in the upper left corner and select System Preferences. In System Preferences, select Network Options. If the network interface is locked, it needs to be unlocked before operation. In the lower left corner of the network interface, click the " " sign to add a new network connection.
First, connect the twisted pair cable and USB Ethernet card to the Macbook. Then, open System Preferences, which can be found in Applications if it was removed from the Dock. Next, find "Network" under the Internet and Wireless category, and open it to make the corresponding settings.
Mac shared virtual machine network
1. If you set up a wired network connection in the virtual machine environment, you cannot use the driver. Because the virtual machine itself comes with its own driver, there is no need to install or update it. Installing or updating drivers in a virtual machine environment will have adverse consequences! Friends, please keep this in mind. Therefore, you can only set it up from the mac system.
2. Virtual machine-select the menu "Edit"-"Virtual Network Editor" to set VMnet1 to host-only mode and VMnet8 to NAT mode. Click to restore the default settings. Select to open the Network Sharing Center from this machine, select Local Area Connection, if it is a wireless network, you can select the wireless network.
3. After that, right-click the network currently used by the computer and click Properties in the pop-up menu. In the WLAN properties window, switch to the Shared tab and set the parameters according to the content in the red box below. As shown in the picture, start the virtual machine and click Virtual Machine - Settings in the top tools menu.
Conclusion: The above is all the network configuration of Mac virtual machines compiled by this site for you. Thank you for taking the time to read the content of this site. I hope it will be helpful to you. Don’t forget to learn more related content. Find it on this site.
The above is the detailed content of Mac network settings in virtual machine. For more information, please follow other related articles on the PHP Chinese website!

 ip与mac绑定什么意思Mar 09, 2023 pm 04:44 PM
ip与mac绑定是指将特定的IP地址与特定的MAC地址关联起来,使得只有使用该MAC地址的设备才能够使用该IP地址进行网络通信。ip与mac绑定可以防止被绑定的主机的IP地址不被假冒,前提条件:1、MAC地址是唯一的,并且不可假冒;只能绑定与路由器直接相连的网络上的主机(也就是主机的网关在路由器上)。
 mac版下载是什么意思Mar 06, 2023 am 09:52 AM
mac版下载的意思是当软件在选择安装时,选择MAC版下载;Windows版和MAC版是两个不同的操作系统,所以大多数软件在选择安装的同时需要选择Windows版还是MAC版。
 mac鼠标滚轮相反怎么办Mar 16, 2023 pm 05:44 PM
mac鼠标滚轮相反的解决办法:1、打开mac电脑,点击屏幕的苹果标志,然后选择“系统偏好设置”;2、在“系统偏好设置”窗口中,选择“鼠标”;3、在“鼠标”窗口中,将“滚动方向:自然”前面的勾去掉即可。
 修复文件共享在 MacOS Ventura 中不起作用Apr 13, 2023 am 11:34 AM
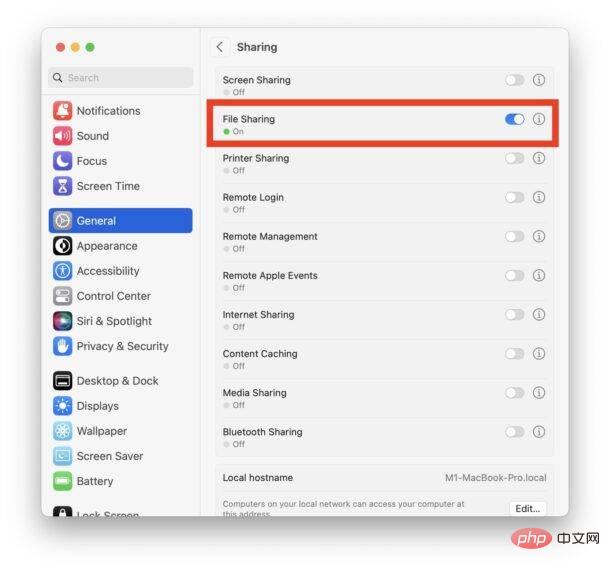
修复 SMB 文件共享在 MacOS Ventura 中不起作用的问题从 Apple 菜单打开 Mac 上的“系统设置”应用程序转到“常规”,然后转到“共享”找到“文件共享”的开关并将其关闭通过转到 Apple 菜单并选择重新启动来重新启动 Mac重新启动后,返回共享系统设置面板并将“文件共享”重新设置为打开位置像往常一样恢复文件共享,它应该按预期工作如果 MacOS Ventura Mac 与另一台 Mac 或设备之间的文件共享突然再次停止工作,您可能需要在几天后或随机重复此过程。
 如何防止 Mac 在显示器关闭时进入睡眠状态 (MacOS Ventura)Apr 13, 2023 pm 12:31 PM
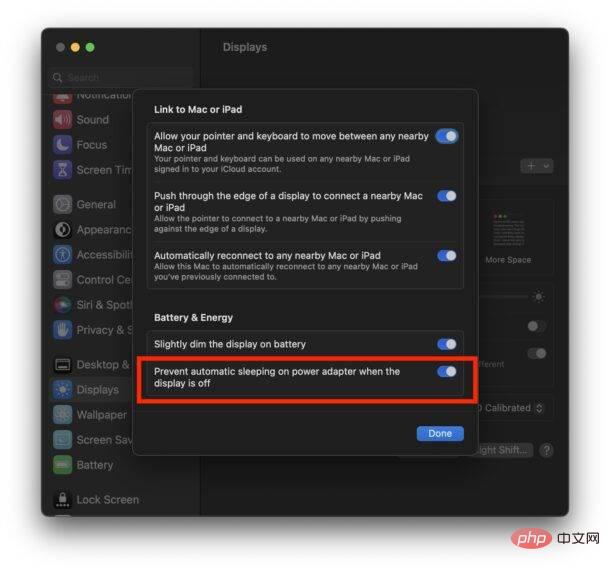
显示器关闭时如何防止 Mac 休眠如果您希望 Mac 显示器能够在整个计算机不进入睡眠状态的情况下关闭,请在此处进行适当的设置调整:下拉 Apple 菜单并转到“系统设置”转到“显示”点击“高级...”切换“防止显示器关闭时电源适配器自动休眠”的开关现在 Mac 显示屏可以关闭,同时防止 Mac 本身进入睡眠状态。这可能主要与 Mac 笔记本电脑用户相关,但即使是那些没有 MacBook 的用户也可能会发现该功能很有用。
 mac克隆是什么意思Jan 31, 2023 am 10:33 AM
mac克隆全称mac地址克隆,是固化在网卡上串行EEPROM中的物理地址,通常有48位长。mac克隆一般应用在路由器上,用户在用电脑直接拨号上网,后来又加了个路由器,通过路由器来实现多台电脑同时上网,这时要用到mac地址克隆了,就是把当前的电脑的mac地址克隆到路由器中去,因为运营商是把你的电脑mac地址绑定你的账号的,所以得克隆以后才能用。
 mac的shift键是哪个键Mar 13, 2023 pm 02:20 PM
mac的shift键是fn键上方、caps lock键下方的一个键,该键在键盘最左侧,由右下往上数第2个键;shift键是键盘中的上档转换键,可以通过“Ctrl+Shift”组合键来切换输入法。
 mac解压rar用什么软件Mar 03, 2023 pm 04:18 PM
mac解压rar的软件:1、The Unarchiver,是一款完全免费、小巧,而且非常易于使用的压缩、解压缩小工具;2、Keka,是一款免费、实用的压缩、解压缩工具,支持解压缩RAR格式的压缩包;3、360压缩大师,是一款免费的压缩、解压缩软件,完全支持RAR文件解压;4、MacZip,支持包括RAR在内的超过20种压缩格式的解压;5、BetterZip;6、FastZip。


Hot AI Tools

Undresser.AI Undress
AI-powered app for creating realistic nude photos

AI Clothes Remover
Online AI tool for removing clothes from photos.

Undress AI Tool
Undress images for free

Clothoff.io
AI clothes remover

AI Hentai Generator
Generate AI Hentai for free.

Hot Article
Hot Tools

SublimeText3 Mac version
God-level code editing software (SublimeText3)

SublimeText3 Linux new version
SublimeText3 Linux latest version

SecLists
SecLists is the ultimate security tester's companion. It is a collection of various types of lists that are frequently used during security assessments, all in one place. SecLists helps make security testing more efficient and productive by conveniently providing all the lists a security tester might need. List types include usernames, passwords, URLs, fuzzing payloads, sensitive data patterns, web shells, and more. The tester can simply pull this repository onto a new test machine and he will have access to every type of list he needs.

WebStorm Mac version
Useful JavaScript development tools

SublimeText3 English version
Recommended: Win version, supports code prompts!

