


Tutorial on combining Flow with IPFS to create NFT contracts and mint tokens

php editor Yuzai brings you a tutorial on using Flow and IPFS to create NFT contracts and mint token operations. Flow is a blockchain-based smart contract platform, while IPFS is a distributed file system. Combining the two allows you to create your own non-fungible tokens (NFTs) and mint them. This tutorial will introduce in detail how to use Flow and IPFS to implement this process, helping you better understand and master the creation and minting of NFT. Let’s get started!
Since then, NFT has begun to grow, with Rarible, OpenSea, Foundation, Sorare and other platforms emerging one after another. These platforms have millions of dollars of traffic every month. Despite the bumps and bumps, most of it is still happening on the Ethereum blockchain. But after experiencing CryptoKitties, the team at Dapper Labs set out to build a new general-purpose blockchain that is very suitable for NFT usage scenarios. Their goal in doing this is to solve the problems seen with many NFTs on Ethereum while providing a better experience for developers and collectors in the space. Their new blockchain, Flow, has proven that it can be implemented and attract some big names. , such as the NBA, UFC, and even Dr. Seuss are using Flow.
We previously discussed ways to use IPFS to create NFTs on the blockchain and explored liability issues in the NFT space and how IPFS can help. Now, let’s talk about how to create IPFS-enabled NFTs on the Flow blockchain. One of the first major applications of the Flow blockchain was NBA Top Shot. We will re-establish a simple NFT minting process and store the NFT metadata and underlying assets on IPFS.
Since we love piñatas, our NFT will no longer be an NBA highlight video, but a tradable video of piñatas.

This tutorial has 3 articles
Creating contracts and minting tokens (this article is the first one)
Creating an application to view NFTs created through this contract.
Create a marketplace to transfer NFTs to others, while also transferring the underlying assets on IPFS.
Tutorial on creating NFT contracts and minting tokens using Flow and IPFS
Environment settings
We need to install Flow CLI. There are some good installation instructions in Flow's documentation:
macOS
brew install flow-cli
Linux
sh -ci “$(curl -fsSL https://storage.googleapis.com/flow-cli/install.sh)"
Windows
iex “& { $(irm ‘https://storage.googleapis.com/flow-cli/install.ps1') }”We will store assets on IPFS document. We use Pinata to simplify operations. You can register for a free account here and get an API key. The Pinata API was used in the second article of this tutorial, but in this article we use the Pinata website.
We also need to install NodeJS and a text editor, which can help highlight the syntax of the Flow smart contract (which is written in a language called Cadence) code. Visual Studio Code has a plugin that supports Cadence syntax.
Let’s create a directory for the project:
mkdir pinata-party
Go into that directory and initialize a new flow project:
cd pinata-partyflow project init
Now, use your favorite code editor Open the project in (if you use Visual Studio Code, you can install the Cadence plug-in) and let's start working.
You will see a flow.json file, we will use it soon. First, create a folder called cadence. Within this folder, add another folder called contracts. Finally, create a file named PinataPartyContract.cdc in the contracts folder.
Explain that all the work we do now on the Flow blockchain will be done on the simulator. However, deploying a project to the testnet or mainnet is as simple as updating the configuration in the flow.json file. We will now set this file to the simulator environment, and then we can start writing our contract.
Update the contract object in flow.json, the code is as follows:
"contracts": { "PinataPartyContract": "./cadence/contracts/PinataPartyContract.cdc"}Then, update the deployments object in the file, the code is as follows:
"deployments": { "emulator": { "emulator-account": ["PinataPartyContract"] }}This is telling Flow The CLI uses the simulator to deploy our contract, which is also referencing (on the simulator) the contract we are about to write...
Contract
Flow has an excellent article on creating NFT contracts Tutorial. He's a great reference, but as Flow themselves pointed out, they haven't solved the problem of NFT metadata yet. They want to store metadata on-chain. This is a good idea, and they will definitely come up with a reasonable solution. However, we now want to mint some tokens with metadata, and we want to associate the corresponding media files (objects). Metadata is just one component. We also need to indicate the media file that the token ultimately represents.
If you are familiar with NFTs on the Ethereum blockchain, you may know that the underlying assets of many tokens are stored on traditional cloud servers, which is possible but has drawbacks. We have written about the addressability of IPFS content and the disadvantages of storing blockchain data on traditional cloud platforms. It boils down to two main points:
Assets should be verifiable
It should be very Easy transfer of maintenance responsibilities
IPFS解决了这两点。而 Pinata 则以一种简单的方式将该内容长期保存在 IPFS 上。这正是我们的 NFT 关联的资料所需要的?我们要确保能够证明拥有 NFT 的所有权,并确保我们能控制对标的资产(IPFS)--媒体文件或其他内容,确保不是复制品。
考虑到这一点,让我们写一份合约,它可以铸造 NFT,将元数据关联到 NFT,并确保元数据指向存储在 IPFS 上的标的资产。
打开PinataPartyContract.cdc,编写一下代码:
pub contract PinataPartyContract { pub resource NFT { pub let id: UInt64 init(initID: UInt64) { self.id = initID } }}第一步是定义合约,后面会添加更多的内容,但我们首先定义PinataPartyContract,并在其中创建一个resource。资源是存储在用户账户中并通过访问控制措施进行访问。在这里,NFT资源最终用来代表 NFT 所拥有的东西。NFT 必须是唯一的,id属性允许我们标识代币。
接下来,我们需要创建一个资源接口,我们将用它来定义哪些能力可以提供给其他人(即不是合约所有者)。
pub resource interface NFTReceiver { pub fun deposit(token: @NFT, metadata: ) pub fun getIDs(): [UInt64] pub fun idExists(id: UInt64): Bool pub fun getMetadata(id: UInt64) : }把这个代码放在 NFT resource 代码的下面。这个NFTReceiver资源接口用来定义对资源有访问权的人,就可以调用以下方法:
deposit
getIDs
idExists
getMetadata
接下来,我们需要定义代币收藏品( Colletion )接口。把它看成是存放用户所有 NFT 的钱包。
pub resource Collection: NFTReceiver { pub var ownedNFT: @ pub var metadataObjs: } init () { self.ownedNFT <- {} self.metadataObjs = {} } pub fun withdraw(withdrawID: UInt64): @NFT { let token <- self.ownedNFT.remove(key: withdrawID)! return <-token } pub fun deposit(token: @NFT, metadata: ) { self.ownedNFT[token.id] <-! token } pub fun idExists(id: UInt64): Bool { return self.ownedNFT[id] != nil } pub fun getIDs(): [UInt64] { return self.ownedNFT.keys } pub fun updateMetadata(id: UInt64, metadata: ) { self.metadataObjs[id] = metadata } pub fun getMetadata(id: UInt64): { return self.metadataObjs[id]! } destroy() { destroy self.ownedNFT }}这个资源里有很多东西,说明一下。首先,有一个变量叫ownedNFT。这个是很直接的,它可以跟踪用户在这个合约中所有拥有的 NFT。
接下来,有一个变量叫metadataObjs。这个有点特殊,因为我们扩展了 Flow NFT 合约功能,为每个 NFT 存储元数据的映射。这个变量将代币 id 映射到其相关的元数据上,这意味着我们需要在设置代币 id 之前,将其设置为元数据。
然后我们初始化变量。定义在 Flow 中的资源中的变量必需初始化。
最后,我们拥有了 NFT Collection 资源的所有可用函数。需要注意的是,并不是所有这些函数大家都可以调用。你还记得在前面,NFTReceiver资源接口中定义了任何人都可以访问的函数。
我尤其想指出 deposit函数。正如我们扩展了默认的 Flow NFT 合约以包含 metadataObjs映射一样,我们正在扩展默认的 deposit函数,以接受额外的 metadata参数。为什么要在这里做这个?因为需要确保只有 token 的 minter 可以将该元数据添加到 token 中。为了保持这种私密性,将元数据的初始添加限制在铸币执行中。
合约代码就快完成了。因此,在 Collection资源的下面,添加以下内容:
pub fun createEmptyCollection(): @Collection { return <- create Collection()}pub resource NFTMinter { pub var idCount: UInt64 init() { self.idCount = 1 } pub fun mintNFT(): @NFT { var newNFT <- create NFT(initID: self.idCount) self.idCount = self.idCount + 1 as UInt64 return <-newNFT }}首先,我们有一个函数,在调用时创建一个空的 NFT Collection。这就是第一次与合约进行交互的用户如何创建一个存储位置,该位置映射到定义好的 Collection资源。
之后,我们再创建一个资源(resource)。它很重要的,因为没有它,我们就无法铸造代币。NFTMinter资源包括一个idCount,它是递增的,以确保我们的 NFT 不会有重复的 id。它还有一个功能,用来创造 NFT。
在NFTMinter资源的下方,添加主合约初始化函数;
init() { self.account.save(<-self.createEmptyCollection(), to: /storage/NFTCollection) self.account.link<&>(/public/NFTReceiver, target: /storage/NFTCollection) self.account.save(<-create NFTMinter(), to: /storage/NFTMinter)}这个初始化函数只有在合约部署时才会被调用。它有三个作用。
为收藏品(Collection)的部署者创建一个空的收藏品,这样合约的所有者就可以从该合约中铸造和拥有 NFT。
Collection资源发布在一个公共位置,并引用在一开始创建的NFTReceiver接口。通过这个方式告诉合约,在NFTReceiver上定义的函数可以被任何人调用。
NFTMinter资源被保存在账户存储中,供合约的创建者使用。这意味着只有合约的创造者才能铸造代币。
合约全部代码可在这里找到。
现在合约已经准备好了,让我们来部署它,对吗?我们也许应该在Flow Playground上测试一下。到那里,点击左侧侧栏的第一个账号。将示例合约中的所有代码替换为我们的合约代码,然后点击部署。如果一切顺利,你应该在屏幕底部的日志窗口中看到这样的日志。
16:48:55 Deployment Deployed Contract To: 0x01
现在我们已经准备好将合约部署到本地运行的模拟器上。在命令行中,运行:
flow project start-emulator
现在,如果模拟器的运行正确和flow.json文件的正确配置,我们可以部署合约。只需运行这个命令:
flow project deploy
如果一切顺利,你应该看到这样的输出:
Deploying 1 contracts for accounts: emulator-accountPinataPartyContract -> 0xf8d6e0586b0a20c7
现在已经在 Flow 模拟器上上线了一个合约,但我们想铸造一个 NFT 代币。
铸造 NFT
在教程的第二篇文章中,我们将通过一个应用程序和用户界面使铸币过程更加友好。为了看到所铸造的内容,并展示元数据如何在 Flow 上与 NFT 一起工作,我们将使用 Cadence 脚本和命令行。
在 pinata-party项目的根目录下创建一个新的目录,我们把它叫做 transactions。创建好文件夹,在里面创建一个名为MintPinataParty.cdc 的新文件。
为了编写出交易,先需要提供给 NFT 的元数据一个引用文件。为此,我们将通过 Pinata 上传一个文件到 IPFS。这个教程中,我将上传一个孩子在生日派对上砸 pinata 的视频。你可以上传任何你想要的视频文件。你真的可以上传任何你喜欢的资产文件,并将其与你的 NFT 关联起来,在本教程系列的第二篇文章将期待视频内容。一旦你准备好你的视频文件,在这里上传。
当你上传文件后,你会得到一个 IPFS 哈希(通常被称为内容标识符或 CID)。复制这个哈希值,因为我们将在铸币过程中使用它。
现在,在你的MintPinataParty.cdc文件中,添加以下内容:
import PinataPartyContract from 0xf8d6e0586b0a20c7transaction { let receiverRef: & let minterRef: &PinataPartyContract.NFTMinter prepare(acct: AuthAccount) { self.receiverRef = acct.getCapability<&>(/public/NFTReceiver) .borrow() ?? panic("Could not borrow receiver reference") self.minterRef = acct.borrow<&pinatapartycontract.nftminter>(from: /storage/NFTMinter) ?? panic("could not borrow minter reference") } execute { let metadata : = { "name": "The Big Swing", "swing_velocity": "29", "swing_angle": "45", "rating": "5", "uri": "ipfs://QmRZdc3mAMXpv6Akz9Ekp1y4vDSjazTx2dCQRkxVy1yUj6" } let newNFT <- self.minterRef.mintNFT() self.receiverRef.deposit(token: <-newNFT, metadata: metadata) log("NFT Minted and deposited to Account 2's Collection") }}这是一个非常简单的交易代码,这在很大程度上要归功于 Flow 所做的工作,但让我们来看看它。首先,你会注意到顶部的导入语句。如果你还记得,在部署合约时,我们收到了一个账户地址。它就是这里引用的内容。因此,将0xf8d6e0586b0a20c7替换为你部署的账户地址。
接下来我们对交易进行定义。在我们的交易中,我们首先要做的是定义两个参考变量,receiverRef和minterRef。在这种情况下,我们既是 NFT 的接收者,又是 NFT 的挖掘者。这两个变量是引用我们在合约中创建的资源。如果执行交易的人对资源没有访问权,交易将失败。
接下来,我们有一个prepare函数。该函数获取试图执行交易的人的账户信息并进行一些验证。它会尝试 借用两个资源 NFTMinter和 NFTReceiver上的可用能力。如果执行交易的人没有访问这些资源的权限,验证无法通过,这就是交易会失败的原因。
最后是execute函数。这个函数是为我们的 NFT 建立元数据,铸造 NFT,然后在将 NFT 存入账户之前关联元数据。如果你注意到,我创建了一个元数据变量。在这个变量中,添加了一些关于 token 的信息。由于我们的代币代表的是一个事件,即一个 piñata 在派对上被打碎,并且因为我们试图复制你在 NBA Top Shot 中看到的大部分内容,所以我在元数据中定义了一些统计数据。孩子挥棒打 piñata 的速度,挥棒的角度和等级。我只是觉得这些统计数字有意思。你可以用类似的方式为你的代币定义任何有意义的信息。
你会注意到,我还在元数据中定义了一个uri属性。这将指向 IPFS 哈希,它承载着我们与 NFT 相关的标的资产文件。在这种情况下,它是 piñata 被击中的真实视频。你可以用你之前上传文件后收到的哈希值来替换。
我们用ipfs://作为哈希的前缀,有几个原因。这是 IPFS 上文件的标识符,可以使用 IPFS 的桌面客户端和浏览器扩展。也可以直接粘贴到 Brave 浏览器中(Brave 浏览器现在提供了对 IPFS 内容的原生支持)。
调用 mintNFT函数来创建代币。然后调用deposit函数将其存入我们的账户。这也是我们传递元数据的地方。如果你还记得,我们在 deposit函数中定义了一个关联变量,将元数据添加到关联的 token id 中。
最后,我们只需要日志记录代币已被铸造和存入账户的信息。
现在我们差不多可以执行代码发送交易铸造 NFT 了。但首先,我们需要准备好我们的账户。在项目根目录下的命令行中,创建一个新的签名私钥。
运行以下命令。
flow keys generate
这将返回你一个公钥和一个私钥, 请始终保护好你的私钥。
我们将需要私钥来签署交易,所以我们可以把它粘贴到flow.json文件中。我们还需要指定签名算法。下面是flow.json文件中的accounts 的内容:
"accounts": { "emulator-account": { "address": "YOUR ACCOUNT ADDRESS", "privateKey": "YOUR PRIVATE KEY", "chain": "flow-emulator", "sigAlgorithm": "ECDSA_P256", "hashAlgorithm": "SHA3_256" }},如果你打算在 github 或任何远程 git 仓库上存储这个项目的任何内容,请确保你不包含私钥。你可能想.gitignore你的整个flow.json。尽管我们只是使用本地模拟器,但保护你的密钥是个好做法。
现在可以发送交易,简单的运行这个命令:
flow transactions send --code ./transactions/MintPinataParty.cdc --signer emulator-account
在flow.json中引用编写的交易代码文件和签名账户。如果一切顺利,你应该看到这样的输出:
Getting information for account with address 0xf8d6e0586b0a20c7 ...Submitting transaction with ID 4a79102747a450f65b6aab06a77161af196c3f7151b2400b3b3d09ade3b69823 ...Successfully submitted transaction with ID 4a79102747a450f65b6aab06a77161af196c3f7151b2400b3b3d09ade3b69823
最后,验证 token 是否在我们的账户中,并获取元数据。做到这一点,我们要写一个非常简单的脚本,并从命令行调用它。
在项目根目录,创建一个名为 scripts的新文件夹。在里面,创建一个名为CheckTokenMetadata.cdc的文件。在该文件中,添加以下内容:
import PinataPartyContract from 0xf8d6e0586b0a20c7pub fun main() : { let nftOwner = getAccount(0xf8d6e0586b0a20c7) // log("NFT Owner") let capability = nftOwner.getCapability<&>(/public/NFTReceiver) let receiverRef = capability.borrow() ?? panic("Could not borrow the receiver reference") return receiverRef.getMetadata(id: 1)}这个脚本可以被认为是类似于以太坊智能合约上调用只读方法。它们是免费的,只返回合约中的数据。
在脚本中,导入部署的合约地址。然后定义一个 main函数(这是脚本运行所需的函数名)。在这个函数里面,我们定义了三个变量:
nftOwner:拥有 NFT 的账户。由于使用部署了合约的账户中铸造了 NFT,所以在我们的例子中,这两个地址是一样的。这一点不一定,要看你将来的合约设计。
capability:需要从部署的合约中 借用的能力(或功能)。请记住,这些能力是受访问控制的,所以如果一个能力对试图借用它的地址不可用,脚本就会失败。我们正在从NFTReceiver资源中借用能力。
receiverRef:这个变量只是简单地记录我们的能力。
现在,我们可以调用(可用的)函数。在这种情况下,我们要确保相关地址确实已经收到了我们铸造的 NFT,然后我们要查看与代币相关的元数据。
让我们运行的脚本,看看得到了什么。在命令行中运行以下内容:
flow scripts execute ./scripts/CheckTokenMetadata.cdc
你应该会看到元数据输出的类似这样的输出。
{"name": "The Big Swing", "swing_velocity": "29", "swing_angle": "45", "rating": "5", "uri": "ipfs://QmRZdc3mAMXpv6Akz9Ekp1y4vDSjazTx2dCQRkxVy1yUj6"}恭喜你!你成功创建了一个 Flow 智能合约,铸造了一个代币,并将元数据关联到该代币,并将该代币的底层数字资产存储在 IPFS 上。作为教程的第一部分,还算不错。
接下来,我们有一个关于构建前端 React 应用的教程,通过获取元数据和解析元数据,让你显示你的 NFT。
本翻译由Cell Network赞助支持。
来源:
https://medium.com/pinata/how-to-create-nfts-like-nba-top-shot-with-flow-and-ipfs-701296944bf
The above is the detailed content of Tutorial on combining Flow with IPFS to create NFT contracts and mint tokens. For more information, please follow other related articles on the PHP Chinese website!

 Tokenized Treasuries Near $6B Milestone, Led by BlackRockApr 19, 2025 am 11:44 AM
The value of blockchain-based U.S. Treasuries is closing in on a new milestone, with total holdings approaching $6 billion.
 title: Canary Capital Is Launching a TRX-Tracking ETFApr 19, 2025 am 11:42 AM
Canary Capital is looking to launch an exchange-traded fund (ETF) tracking the price of Tron's native token, TRX, according to a filing.
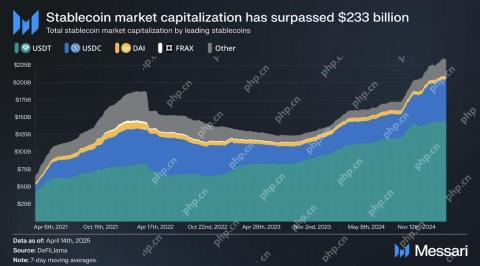 Solana Stablecoin Market Cap Hits Record $12.73 Billion as Sui Supply Reaches $800M with $60M InflowsApr 19, 2025 am 11:40 AM
The stablecoin market has surpassed a total capitalization of $233 billion. Within this sector, Solana's stablecoins have reached a new all-time high market capitalization of $12.73 billion
 Canary Capital Files for Staking TRX ETF, Targeting Launch Before Spot Bitcoin ETFsApr 19, 2025 am 11:38 AM
Canary Capital is looking to get the U.S. Securities and Exchange Commission's sign-off for an exchange-traded fund that would track the Tron token TRX and has a staking component.
 MoonPay CEO Ivan Soto-Wright calls on US lawmakers to leave a path open to state-level regulators when passing legislation on stablecoinsApr 19, 2025 am 11:36 AM
In an April 18 X post, Soto-Wright said he wanted Congress to “keep state-regulated issuers in the game” when it comes to stablecoin regulation, referencing efforts in the House of Representatives and Senate to create a federal regulatory framework.
 Michael Saylor Dissects the Philosophy and Technological Potential of Bitcoin in '21 Truths of Bitcoin'Apr 19, 2025 am 11:34 AM
Saylor's ideas centre on the fixed 21 million coin supply of Bitcoin. He presents this shortage as a revolutionary economic idea rather than only a technical one.
 Official Trump (TRUMP) memecoin unlocked 40 million tokens, worth around $300 millionApr 19, 2025 am 11:32 AM
The TRUMP memecoin has gained significant popularity on the Solana network primarily due to its direct affiliation with the U.S. President Donald Trump.
 TRUMP (TRUMP) memecoin unlocks 40 million tokens, worth around $300 millionApr 19, 2025 am 11:30 AM
The TRUMP memecoin has gained significant popularity on the Solana network primarily due to its direct affiliation with the U.S. President Donald Trump.

Hot AI Tools

Undresser.AI Undress
AI-powered app for creating realistic nude photos

AI Clothes Remover
Online AI tool for removing clothes from photos.

Undress AI Tool
Undress images for free

Clothoff.io
AI clothes remover

AI Hentai Generator
Generate AI Hentai for free.

Hot Article
Hot Tools

Notepad++7.3.1
Easy-to-use and free code editor

SublimeText3 Mac version
God-level code editing software (SublimeText3)

Dreamweaver Mac version
Visual web development tools

WebStorm Mac version
Useful JavaScript development tools

Zend Studio 13.0.1
Powerful PHP integrated development environment

