


TensorFlow is a popular machine learning framework used for training and deploying various neural networks. This article discusses how to use TensorFlow to build a simple neural network and provides sample code to get you started.
The first step in building a neural network is to define the structure of the network. In TensorFlow, we can use the tf.keras module to define the layers of a neural network. The following code example defines a fully connected feed-forward neural network with two hidden layers and an output layer: ```python import tensorflow astf model = tf.keras.models.Sequential([ tf.keras.layers.Dense(units=64, activation='relu', input_shape=(input_dim,)), tf.keras.layers.Dense(units=32, activation='relu'), tf.keras.layers.Dense(units=output_dim, activation='softmax') ]) ``` In the above code, we use the `Sequential` model to build the neural network. The `Dense` layer represents a fully connected layer, specifying the number of neurons (units) and activation function (activation) of each layer. The input shape of the first hidden layer is given by `input_shape
import tensorflow as tf

model = tf.keras.Sequential([
    tf.keras.layers.Dense(64, activation='relu', input_shape=(784,)),
    tf.keras.layers.Dense(64, activation='relu'),
    tf.keras.layers.Dense(10, activation='softmax')
])
In this example, we use the Sequential model to define our neural network. It is a simple stacking model where each layer builds on the previous one. We define three layers, the first and second layers are both fully connected layers with 64 neurons, and they use the ReLU activation function. The shape of the input layer is (784,) because we will be using the MNIST handwritten digits dataset, and each image in this dataset is 28x28 pixels, which expands to 784 pixels. The last layer is a fully connected layer with 10 neurons that uses a softmax activation function and is used for classification tasks such as digit classification in the MNIST dataset.
We need to compile the model and specify the optimizer, loss function and evaluation metrics. Here is an example:
model.compile(optimizer='adam',
              loss='categorical_crossentropy',
              metrics=['accuracy'])
In this example, we use the Adam optimizer to train our model using cross-entropy as the loss function for a multi-class classification problem. We also specified accuracy as an evaluation metric to track the model's performance during training and evaluation.
Now that we have defined the structure and training configuration of the model, we can read the data and start training the model. We will use the MNIST handwritten digits dataset as an example. The following is a code example:
from tensorflow.keras.datasets import mnist

(train_images, train_labels), (test_images, test_labels) = mnist.load_data()

train_images = train_images.reshape((60000, 784))
train_images = train_images.astype('float32') / 255

test_images = test_images.reshape((10000, 784))
test_images = test_images.astype('float32') / 255

train_labels = tf.keras.utils.to_categorical(train_labels)
test_labels = tf.keras.utils.to_categorical(test_labels)

model.fit(train_images, train_labels, epochs=5, batch_size=64)
In this example, we use the mnist.load_data() function to load the MNIST dataset. We then flattened the training and test images to 784 pixels and scaled the pixel values to be between 0 and 1. We also one-hot encode the labels in order to convert them into a classification task. Finally, we use the fit function to train our model, using training images and labels, specifying training for 5 epochs, using 64 samples for each epoch.
After training is complete, we can use the evaluate function to evaluate the performance of the model on the test set:
test_loss, test_acc = model.evaluate(test_images, test_labels)
print('Test accuracy:', test_acc)
In this example, we call evaluate with the test image and label function and print the results to show the accuracy of the model on the test set.
This is a simple example of how to build and train a neural network using TensorFlow. Of course, in real applications, you may need more complex network structures and more complex data sets. However, this example provides a good starting point to help you understand the basic usage of TensorFlow.
The complete code example is as follows:
import tensorflow as tf
from tensorflow.keras.datasets import mnist

# Define the model architecture
model = tf.keras.Sequential([
    tf.keras.layers.Dense(64, activation='relu', input_shape=(784,)),
    tf.keras.layers.Dense(64, activation='relu'),
    tf.keras.layers.Dense(10, activation='softmax')
])

# Compile the model
model.compile(optimizer='adam',
              loss='categorical_crossentropy',
              metrics=['accuracy'])

# Load the data
(train_images, train_labels), (test_images, test_labels) = mnist.load_data()

train_images = train_images.reshape((60000, 784))
train_images = train_images.astype('float32') / 255

test_images = test_images.reshape((10000, 784))
test_images = test_images.astype('float32') / 255

train_labels = tf.keras.utils.to_categorical(train_labels)
test_labels = tf.keras.utils.to_categorical(test_labels)

# Train the model
model.fit(train_images, train_labels, epochs=5, batch_size=64)

# Evaluate the model
test_loss, test_acc = model.evaluate(test_images, test_labels)
print('Test accuracy:', test_acc)
The above is an example code for using TensorFlow to build a neural network, which defines a layer containing two hidden layers and an output layer. Fully connected feed-forward neural network, trained and tested using the MNIST handwritten digits dataset, and using the Adam optimizer and cross-entropy loss function. The final output is the accuracy on the test set.
The above is the detailed content of How to build a neural network using TensorFlow. For more information, please follow other related articles on the PHP Chinese website!

 解析二元神经网络的功能和原理Jan 22, 2024 pm 03:00 PM
二元神经网络(BinaryNeuralNetworks,BNN)是一种神经网络,其神经元仅具有两个状态,即0或1。相对于传统的浮点数神经网络,BNN具有许多优点。首先,BNN可以利用二进制算术和逻辑运算,加快训练和推理速度。其次,BNN减少了内存和计算资源的需求,因为二进制数相对于浮点数来说需要更少的位数来表示。此外,BNN还具有提高模型的安全性和隐私性的潜力。由于BNN的权重和激活值仅为0或1,其模型参数更难以被攻击者分析和逆向工程。因此,BNN在一些对数据隐私和模型安全性有较高要求的应用中具
 探究RNN、LSTM和GRU的概念、区别和优劣Jan 22, 2024 pm 07:51 PM
在时间序列数据中,观察之间存在依赖关系,因此它们不是相互独立的。然而,传统的神经网络将每个观察看作是独立的,这限制了模型对时间序列数据的建模能力。为了解决这个问题,循环神经网络(RNN)被引入,它引入了记忆的概念,通过在网络中建立数据点之间的依赖关系来捕捉时间序列数据的动态特性。通过循环连接,RNN可以将之前的信息传递到当前观察中,从而更好地预测未来的值。这使得RNN成为处理时间序列数据任务的强大工具。但是RNN是如何实现这种记忆的呢?RNN通过神经网络中的反馈回路实现记忆,这是RNN与传统神经
 计算神经网络的浮点操作数(FLOPS)Jan 22, 2024 pm 07:21 PM
FLOPS是计算机性能评估的标准之一,用来衡量每秒的浮点运算次数。在神经网络中,FLOPS常用于评估模型的计算复杂度和计算资源的利用率。它是一个重要的指标,用来衡量计算机的计算能力和效率。神经网络是一种复杂的模型,由多层神经元组成,用于进行数据分类、回归和聚类等任务。训练和推断神经网络需要进行大量的矩阵乘法、卷积等计算操作,因此计算复杂度非常高。FLOPS(FloatingPointOperationsperSecond)可以用来衡量神经网络的计算复杂度,从而评估模型的计算资源使用效率。FLOP
 模糊神经网络的定义和结构解析Jan 22, 2024 pm 09:09 PM
模糊神经网络是一种将模糊逻辑和神经网络结合的混合模型,用于解决传统神经网络难以处理的模糊或不确定性问题。它的设计受到人类认知中模糊性和不确定性的启发,因此被广泛应用于控制系统、模式识别、数据挖掘等领域。模糊神经网络的基本架构由模糊子系统和神经子系统组成。模糊子系统利用模糊逻辑对输入数据进行处理,将其转化为模糊集合,以表达输入数据的模糊性和不确定性。神经子系统则利用神经网络对模糊集合进行处理,用于分类、回归或聚类等任务。模糊子系统和神经子系统之间的相互作用使得模糊神经网络具备更强大的处理能力,能够
 改进的RMSprop算法Jan 22, 2024 pm 05:18 PM
RMSprop是一种广泛使用的优化器,用于更新神经网络的权重。它是由GeoffreyHinton等人在2012年提出的,并且是Adam优化器的前身。RMSprop优化器的出现主要是为了解决SGD梯度下降算法中遇到的一些问题,例如梯度消失和梯度爆炸。通过使用RMSprop优化器,可以有效地调整学习速率,并且自适应地更新权重,从而提高深度学习模型的训练效果。RMSprop优化器的核心思想是对梯度进行加权平均,以使不同时间步的梯度对权重的更新产生不同的影响。具体而言,RMSprop会计算每个参数的平方
 浅层特征与深层特征的结合在实际应用中的示例Jan 22, 2024 pm 05:00 PM
深度学习在计算机视觉领域取得了巨大成功,其中一项重要进展是使用深度卷积神经网络(CNN)进行图像分类。然而,深度CNN通常需要大量标记数据和计算资源。为了减少计算资源和标记数据的需求,研究人员开始研究如何融合浅层特征和深层特征以提高图像分类性能。这种融合方法可以利用浅层特征的高计算效率和深层特征的强表示能力。通过将两者结合,可以在保持较高分类准确性的同时降低计算成本和数据标记的要求。这种方法对于那些数据量较小或计算资源有限的应用场景尤为重要。通过深入研究浅层特征和深层特征的融合方法,我们可以进一
 蒸馏模型的基本概念Jan 22, 2024 pm 02:51 PM
模型蒸馏是一种将大型复杂的神经网络模型(教师模型)的知识转移到小型简单的神经网络模型(学生模型)中的方法。通过这种方式,学生模型能够从教师模型中获得知识,并且在表现和泛化性能方面得到提升。通常情况下,大型神经网络模型(教师模型)在训练时需要消耗大量计算资源和时间。相比之下,小型神经网络模型(学生模型)具备更高的运行速度和更低的计算成本。为了提高学生模型的性能,同时保持较小的模型大小和计算成本,可以使用模型蒸馏技术将教师模型的知识转移给学生模型。这种转移过程可以通过将教师模型的输出概率分布作为学生
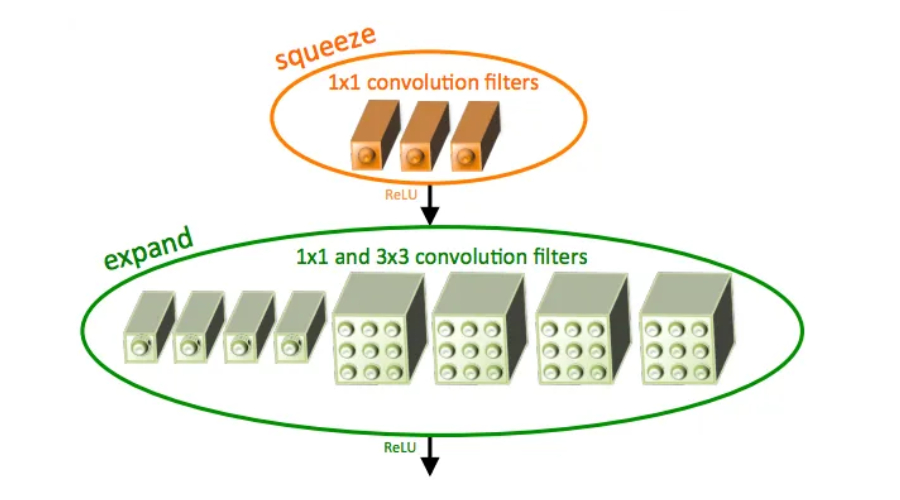 SqueezeNet简介及其特点Jan 22, 2024 pm 07:15 PM
SqueezeNet是一种小巧而精确的算法,它在高精度和低复杂度之间达到了很好的平衡,因此非常适合资源有限的移动和嵌入式系统。2016年,DeepScale、加州大学伯克利分校和斯坦福大学的研究人员提出了一种紧凑高效的卷积神经网络(CNN)——SqueezeNet。近年来,研究人员对SqueezeNet进行了多次改进,其中包括SqueezeNetv1.1和SqueezeNetv2.0。这两个版本的改进不仅提高了准确性,还降低了计算成本。SqueezeNetv1.1在ImageNet数据集上的精度


Hot AI Tools

Undresser.AI Undress
AI-powered app for creating realistic nude photos

AI Clothes Remover
Online AI tool for removing clothes from photos.

Undress AI Tool
Undress images for free

Clothoff.io
AI clothes remover

AI Hentai Generator
Generate AI Hentai for free.

Hot Article
Hot Tools

ZendStudio 13.5.1 Mac
Powerful PHP integrated development environment

Safe Exam Browser
Safe Exam Browser is a secure browser environment for taking online exams securely. This software turns any computer into a secure workstation. It controls access to any utility and prevents students from using unauthorized resources.

DVWA
Damn Vulnerable Web App (DVWA) is a PHP/MySQL web application that is very vulnerable. Its main goals are to be an aid for security professionals to test their skills and tools in a legal environment, to help web developers better understand the process of securing web applications, and to help teachers/students teach/learn in a classroom environment Web application security. The goal of DVWA is to practice some of the most common web vulnerabilities through a simple and straightforward interface, with varying degrees of difficulty. Please note that this software

SublimeText3 English version
Recommended: Win version, supports code prompts!

VSCode Windows 64-bit Download
A free and powerful IDE editor launched by Microsoft

