


Today, this site will share with you the relevant content about connecting a Mac to a projector. If we can solve the problem you are facing now, please be sure to pay attention to this site. Get started now!
How to connect MacBookPro2021 to a projector
To connect the Apple computer and projector to the same network, you can take the following steps: 1. Connect your Apple computer and projector to the same network. 2. Open the Lebo Screen Mirroring app on the projector and record the device name. 3. Connect to the projector through the air-drop function of Apple computer. 4. Another method is to install a screen projector on the projector and turn on the hotspot function. 5. Use an Apple computer to connect to the hotspot created by the screen projector. In this way, you can successfully project content from your Apple computer to the projector.
If your Mac is equipped with a Thunderbolt2 or Thunderbolt3 interface, you will need a MiniDisplayPort to HDMI adapter or a Thunderbolt2/3 to HDMI adapter. You can plug the adapter into a port on your Mac and make sure it's plugged in securely. This way, you can connect your projector.
The method to connect an Apple Mac computer to the projector is as follows: First, connect the projector to the power source and turn on the power switch. Next, prepare an adapter cable and plug one end into your projector's display port (usually HDMI or VGA) and the other end into the corresponding port on your Mac computer (if you need an adapter cable, make sure you buy the right one). Next, open your Mac computer and find the "Display" option in the system settings. Here, you can choose to set up the projector as an extended display or a mirrored display, adjusting it to your needs. After completing the above steps, the system will automatically identify and display the projector content.
One way is to use a USB-C Digital AV Multiport Adapter or a USB-C VGA Multiport Adapter to connect your monitor to a USB-C port on your Mac. If you're connecting a monitor, TV, or projector that has an HDMI connector, you can plug your device's HDMI cable directly into an HDMI port on your Mac.

Setting method of plugging an Apple computer into a projector
1. The following are the steps for connecting an Apple computer to a projector: Connect the projector to an Apple computer: First, Make sure your Mac and projector are turned off. Then, plug the projector's power plug into the power outlet and plug the projector's PC port into the VGA socket on your Apple computer.
Connect the Apple computer and projector to the same network. Open Lebo Screencast on the projector and record the device name. Connect to the projector through the air-drop function of your Apple computer. Alternatively, you can install a screen projector on the projector and turn on the hotspot, and then let the Apple computer connect to the hotspot of the projector.
First, we need to ensure that the connection between the projector and Mac is normal. You can try a different cable or use another projector or display to check the connection. If there are no issues with the connection, you can next try adjusting your display settings.
After moving the mouse over the projector desktop, you will see the desktop of your own computer. At this point, you can drag the content on your desktop to the projector desktop.
How to connect an Apple Mac computer to a projector
1. Step 1: Check the projector connection First, make sure the connection between your Mac and projector is normal. You can try changing the cable, or try connecting to another projector or display to make sure there are no issues with the connection. 2. Step 2: Adjust display settings If there are no issues with the connection, next try adjusting your display settings. You can find display options in your Mac's System Preferences. Here you can adjust settings such as resolution, screen aspect ratio, etc. to suit your projector's requirements. 3. Step 3: Check projector settings Additionally, you can check the settings of the projector itself. Make sure the projector's input source is correctly set to your Mac to ensure proper signal transmission. You can find these setting options in your projector's menu. By checking and adjusting the above steps, you should be able to
connect your Apple computer and projector to the same network. Open Lebo Screencast on the projector and record the device name. Connect to the projector through the air-drop function of your Apple computer. Alternatively, you can install a screen projector on the projector and turn on the hotspot, and then let the Apple computer connect to the hotspot of the projector.
3. Check the ports on your Mac - Determine what types of ports are on your Mac. Many older MacBook and MacBook Pro computers only have VGA ports, while newer MacBooks and MacBook Pros are equipped with Thunderbolt2 or Thunderbolt3 ports.
4. In the "Display" option, select "Display". Then, click the "Find" button to connect the projector. During this process, you will be asked for your credentials to share your screen. If you are unsure of your credentials, refer to your projector's operating manual.
5. Screen casting via Miracast: Turn on the Miracast function on the computer, then turn on the "Wireless Display" or "Miracast" function on the TV, wait for the connection to be successful, and then cast the screen.
6. Move the mouse over and you will see your own computer's desktop, which is your MAC's own desktop. What you are projecting now is the projector's desktop. You can drag content from your desktop to the projector desktop.
How to project to the monitor on mac
Connect the projector and Mac computer. Connect the projector to your Mac computer. If the projector is connected based on VGA, a VGA to DVI or HDMI converter is required. Select a monitor. Open the Apple menu, select System Preferences, and then select the Displays option.
Step 1: Check the projector connection First, we need to check whether the connection between the mac and the projector is normal. You can try a different cable or another projector or display to make sure the connection is correct. Step 2: Adjust display settings If there are no problems with the connection, next try adjusting the display settings.
How to cast Mac screen to monitor? The method is as follows: Click the "" icon on the top menu bar, select "System Preferences" from the drop-down menu; after entering the "System Preferences" page, select "Displays"; click the "Add Display" button under the Mac name; screen monitor connection.
Then, plug the projector's power plug into the power socket, and plug the projector's PC port into the VGA socket of the Apple computer. Power on the Apple computer and enable screen sharing: After the Apple computer starts, open the system settings. In the Display options, select Display. Then, click the "Find" button to connect the projector.
First, connect the external monitor to the power supply, and then connect the data cable to your Mac (don’t forget to buy an adapter cable when buying a monitor, because the display ports provided by Mac now are generally HDMI or thunderbolt) , then turn on the monitor and the system will automatically recognize it.
Conclusion: The above is a summary of answers related to Mac Apple computers connected to projectors compiled by this site. I hope it will be helpful to you! If your problem is solved, please share it with more friends who care about this problem~
The above is the detailed content of Guide to connecting a projector using a Mac. For more information, please follow other related articles on the PHP Chinese website!

 Second Release Candidate of MacOS Sequoia 15.4 Available for TestingApr 30, 2025 am 10:26 AM
Apple has released a second Release Candidate (RC) build of macOS Sequoia 15.4 for its beta testing program. This follows the initial release candidate builds of Sequoia 15.4, iOS 18.4, and iPadOS 18.4, released just days prior. Release Candidates a
 Easily Create MacOS Virtual Machines with VirtualBuddyApr 30, 2025 am 10:14 AM
VirtualBuddy: Easily virtualize macOS and Linux on Apple Silicon Mac VirtualBuddy provides a simple and fast way to virtualize macOS (and Linux) on any Apple Silicon Mac, providing developers, enthusiasts, and curious users with a way to easily run multiple instances of macOS. VirtualBuddy is fast, performs well, and it is free and open source, so you can easily explore the virtual machine world without any commitment, just prepare enough disk storage and bandwidth to set up a macOS or Linux virtual machine. Whether it is testing different versions
 12 Things to Check Before Buying Second-hand MacBookApr 30, 2025 am 10:01 AM
Buying a used Mac on a budget? This guide ensures you avoid a lemon. We'll cover essential checks before you buy, including diagnostics you can perform on the spot. Remember to bring a bootable macOS USB drive and headphones. Step 1: Physical Insp
 How Long Does Updating MacOS Take? Why Is MacOS Update Taking So Long?Apr 30, 2025 am 09:53 AM
How long does it take to update the MacOS system software? Why does it take so long to update? Many Mac users will have this question when they see the software update of the new MacOS system. Both of these questions are very reasonable, and it is important to remember that the answers may vary. However, with modern MacOS, you can make a fairly accurate estimate of the time it takes to install updates to your MacOS system. Let's dive into this topic so you can better understand and prepare to install MacOS updates on your Mac. How long does it take for MacOS updates to be downloaded, installed and completed? MacOS updates can take between 15-20 minutes to several hours to complete, especially if you are considering downloading updates and installing updates to completion
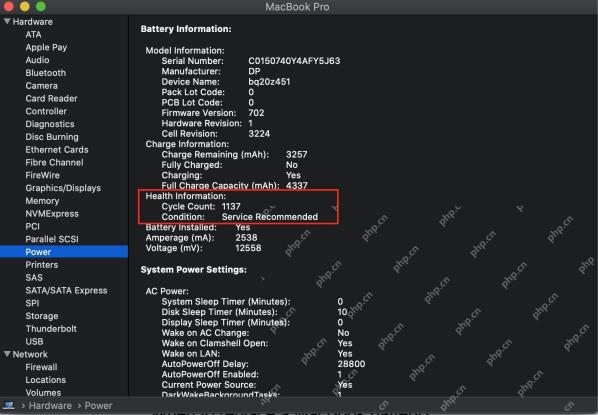 How Long Do MacBook Batteries Last? Here's How You Can Check ItApr 30, 2025 am 09:50 AM
Understanding MacBook Battery Life: Maximizing Your Mac's Power Concerned about your MacBook's battery performance, or planning a purchase? This guide clarifies MacBook battery lifespan and offers tips for extending it. Most Mac batteries endure appr
 Fixing Safari for Mac Error “This webpage was reloaded because a problem occurred”Apr 30, 2025 am 09:45 AM
Although the Safari browser under the Mac system is excellent, it is not perfect. Safari users occasionally encounter situations where the page refreshes and displays an error message "This page has reloaded because of a problem". You may also see variant information like "repeated problems". Since the error message is quite general, you may be wondering the root cause of the error in Safari and how to fix this on your Mac. Causes causing Safari for Mac to have a "This web page reloaded because a problem occurred" error Usually, if there is a memory problem, a website crash, or an incompatible with Safari, a software error, or other similar issues, you will see this error message in Safari on your Mac
 Get Googly Eyes in Your Mac Menu Bar to Follow Your Cursor AroundApr 30, 2025 am 09:42 AM
Nostalgic Mac users may remember an interesting application in the classic Mac OS system: it will place a pair of moving eyes in the Mac menu bar and move with your cursor. While classic Mac OS is long gone, you can still experience this fun on a modern Mac, just use an app called "Googly Eyes". Google Eyes resides in your Mac menu bar, and its pupils will follow your cursor like an older version of the app. When clicking on the mouse/trackpad, the little eyes will blink. Will this revolutionize your computing experience? Probably not. But is it interesting? Absolutely fun! Sometimes, just being fun is enough, right? So, enjoy it, in your Ma
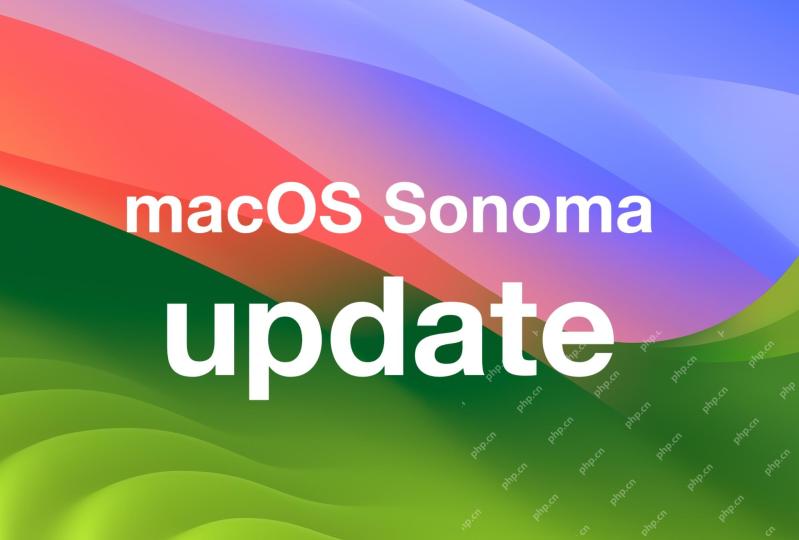 MacOS Sonoma 14.7.5 & MacOS Ventura 13.7.5 Security Updates ReleasedApr 30, 2025 am 09:40 AM
Apple has released macOS Sonoma 14.7.5 and macOS Ventura 13.7.5 security updates for Mac users running Sonoma and Ventura operating systems. These updates focus on security patches and do not include other new features available in the latest macOS Sequoia 15.4 update (sequoia 15.4 update is released simultaneously). Additionally, you'll find software updates for new and older iPhones and iPads, as well as updates for Apple TV, Apple Watch, and Apple Vision Pro


Hot AI Tools

Undresser.AI Undress
AI-powered app for creating realistic nude photos

AI Clothes Remover
Online AI tool for removing clothes from photos.

Undress AI Tool
Undress images for free

Clothoff.io
AI clothes remover

Video Face Swap
Swap faces in any video effortlessly with our completely free AI face swap tool!

Hot Article
Hot Tools

Dreamweaver Mac version
Visual web development tools

VSCode Windows 64-bit Download
A free and powerful IDE editor launched by Microsoft

SublimeText3 Chinese version
Chinese version, very easy to use

MinGW - Minimalist GNU for Windows
This project is in the process of being migrated to osdn.net/projects/mingw, you can continue to follow us there. MinGW: A native Windows port of the GNU Compiler Collection (GCC), freely distributable import libraries and header files for building native Windows applications; includes extensions to the MSVC runtime to support C99 functionality. All MinGW software can run on 64-bit Windows platforms.

SecLists
SecLists is the ultimate security tester's companion. It is a collection of various types of lists that are frequently used during security assessments, all in one place. SecLists helps make security testing more efficient and productive by conveniently providing all the lists a security tester might need. List types include usernames, passwords, URLs, fuzzing payloads, sensitive data patterns, web shells, and more. The tester can simply pull this repository onto a new test machine and he will have access to every type of list he needs.

