
 Backend DevelopmentPython TutorialConveniently install and manage Python libraries on Ubuntu systems using pip3

Install pip3 on Ubuntu system to easily manage Python libraries
When developing using Python, it is often necessary to introduce various third-party libraries to extend functions. In order to easily manage these libraries, we can use pip3 to install and upgrade. This article will introduce how to install and use pip3 on Ubuntu system.
Step One: Update the Software Package List
Before we begin, we should first update the system’s software package list. Open the terminal and use the following command to update:
sudo apt update
Step 2: Install pip3
Ubuntu system has Python2 and Python3 installed by default, but their package manager uses pip by default, not pip3. In order to use pip3 to manage Python libraries, we need to install pip3 first.
Run the following command in the terminal to install pip3:
sudo apt installpython3-pip
During the installation process, the system will ask whether to continue installing related dependency packages. Please type "Y" and press Enter to continue. Install.
After the installation is completed, you can use the following command to verify whether the installation is successful:
pip3 --version
If the installation is successful, the version number information of pip3 will be displayed.
Step 3: Use pip3 to install the Python library
After installing pip3, we can use it to easily install and upgrade the Python library. The following are some commonly used pip3 commands:
1. Install library
To install a Python library, just run the following command in the terminal:
pip3 install 库名
For example, to install the numpy library, Just run the following command:
pip3 install numpy
2. Upgrade the library
To upgrade the installed library, you can use the following command:
pip3 install --upgrade 库名
For example, to upgrade the numpy library, just run the following Command:
pip3 install --upgrade numpy
3. Uninstall the library
If you want to uninstall an installed library, you can use the following command:
pip3 uninstall 库名
For example, to uninstall the matplotlib library, just run the following command :
pip3 uninstall matplotlib
Step 4: Use virtual environment
In order to maintain the independence between projects, we can use virtual environments to manage the dependencies of each project.
1. Install virtual environment
To install virtual environment tools, you can use the following command:
pip3 install virtualenv
2. Create a virtual environment
In the root directory of the project, use the following command Create a new virtual environment:
virtualenv 环境名
For example, to create a virtual environment named env, just run the following command:
virtualenv env
3. Activate the virtual environment
Before creating the virtual environment After creating the environment, we need to activate it to use the Python libraries within it. Run the following command to activate the virtual environment:
source 环境名/bin/activate
For example, to activate a virtual environment named env, just run the following command:
source env/bin/activate
After activating the virtual environment, you can use the pip3 command to install it and manage project dependencies.
Step 5: Exit the virtual environment
When the project development is completed, we can use the following command to exit the virtual environment:
deactivate
Summary:
By installing and using pip3, We can easily manage Python libraries and maintain independence between projects through virtual environment tools. I hope this article will help you install pip3 and manage Python libraries on your Ubuntu system.
Reference materials:
1.https://pip.pypa.io/en/stable/quickstart/
2.https://packaging.python.org/guides/installing-using -pip-and-virtual-environments/
The above is the detailed content of Conveniently install and manage Python libraries on Ubuntu systems using pip3. For more information, please follow other related articles on the PHP Chinese website!

 pip如何升级python版本Nov 28, 2023 pm 04:03 PM
pip升级python版本步骤:1、下载新版本的Python,选择适合你操作系统的安装程序;2、运行安装程序,按照提示进行安装;3、检查Python版本,输入“python --version”命令检查是否是最新版本的Python;4、更新pip,在升级Python的过程中,pip通常也会被更新到最新版本。
 pip卸载包命令是什么Nov 27, 2023 pm 03:45 PM
pip卸载包的命令是“pip uninstall”,其基本用法是“pip uninstall package_name”,其中,`package_name`是要卸载的包的名称。除了基本的卸载命令外,pip还提供了一些可选的参数和选项,以满足不同的需求。
 如何更新pip版本Nov 27, 2023 pm 05:43 PM
更新pip版本方法有使用pip自身更新、使用操作系统自带的包管理工具、使用Python包管理工具、手动安装最新版本。详细介绍:1、使用pip自身更新:打开终端或命令提示符(Windows用户),执行以下命令来检查当前pip版本:pip --version。如果输出版本号,则可以继续下一步;否则需要安装pip,执行pip install --upgrade命令下载安装最新版即可。
 pip如何安装whl文件Dec 05, 2023 pm 03:03 PM
pip安装whl文件步骤:1、找到与你的Python版本和操作系统相对应的whl文件;2、将下载的whl文件移动到Python的Scripts目录下;3、打开命令行界面,以管理员身份运行cmd;4、在命令行中输入“pip install 文件名.whl”命令来安装whl文件;5、等待安装完成,如果成功安装,可以在Python文件中导入相应的库来验证是否安装成功。
 卸载pip的方法有哪些Nov 24, 2023 pm 02:03 PM
卸载pip的方法有:1、在命令行中输入“pip uninstall”命令,按回车键执行;2、在命令行中输入“python -m pip uninstall”命令,按回车键执行;3、直接在Python的Scripts目录下删除“pip.exe”和“pip3.exe”这两个文件;4、通过以管理员身份运行命令行或者使用sudo命令来获取管理员权限,然后执行上述的卸载命令。
 pip如何安装指定版本Dec 07, 2023 pm 02:01 PM
pip安装指定版本步骤:1、确定想要安装的Python包的确切版本号,在PyPI网站上查找特定包的版本信息;2、在终端或命令提示符中,使用“pip install example_package==1.2.3”命令安装特定版本的Python包即可。
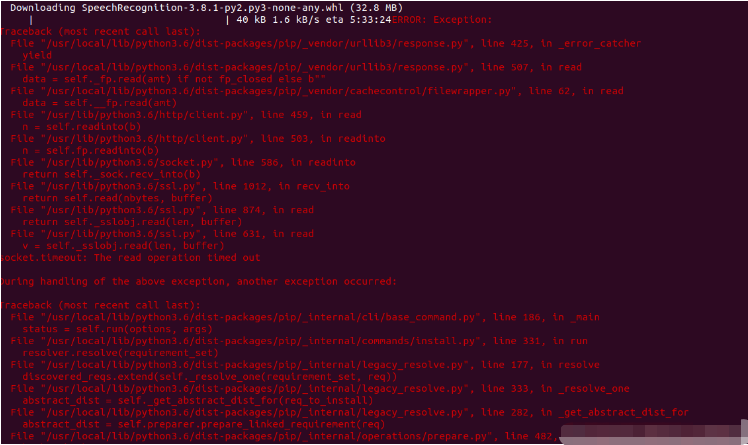 Linux下使用pip安装SpeechRecognition连接超时如何解决May 24, 2023 pm 04:19 PM
Linux下使用pip安装SpeechRecognition经常会看到代码importspeechrecognitionassr这类的语句,查阅相关资料需要利用pip来安装SpeecchRecognition。首先在Linux下安装pip,然后通过命令pipinstallSpeechRecognition进行安装。总是会出现一大段红字(大致意思连接第三方库网络超时),红字内容大致如下:网上查了好多资料,有的说是改变一下字母大小写然后在还原以前的就可以,测试了一下无效!!!找了好久最终找到了解决办
 python3怎么安装pip3Nov 28, 2023 pm 04:58 PM
python3安装pip3方法:1、通常情况下,pip3已经随着Python3的安装而自动安装了;2、打开命令行工具,输入“python3 -m pip install --upgrade pip”命令下载get-pip.py文件,运行“python3 get-pip.py”命令安装pip3即可。


Hot AI Tools

Undresser.AI Undress
AI-powered app for creating realistic nude photos

AI Clothes Remover
Online AI tool for removing clothes from photos.

Undress AI Tool
Undress images for free

Clothoff.io
AI clothes remover

AI Hentai Generator
Generate AI Hentai for free.

Hot Article
Hot Tools

EditPlus Chinese cracked version
Small size, syntax highlighting, does not support code prompt function

ZendStudio 13.5.1 Mac
Powerful PHP integrated development environment

VSCode Windows 64-bit Download
A free and powerful IDE editor launched by Microsoft

SublimeText3 Mac version
God-level code editing software (SublimeText3)

Dreamweaver Mac version
Visual web development tools

