


Many friends have questions about virtual Mac online upgrade. This article will answer it in detail and provide reference. I hope it can help everyone! Let’s take a look!
How to upgrade mac system
Before performing these steps, it is recommended that you back up your Mac first. You can select System Settings or System Preferences from the Apple menu in the corner of the screen. If you selected "System Settings," click "General" on the left side of the window. Then click "Software Update" on the right.
First, after entering the desktop of Apple computer, click the "Launchpad" icon at the bottom of the screen. In the launcher window, find and click the "App Store" icon to open the Apple App Store. In the Store window, switch to the Updates option to view available app updates.
Before upgrading, it is very important to know your MacOS system version. We can check the current system version by opening the "System Information" application on the Mac computer and clicking the "Software" option in the left navigation menu. This step ensures that we download and install the correct upgrade program to avoid unnecessary errors.
Open the logo icon in the upper left corner of the Apple computer, enter the "About This Mac" interface, click "Software Update" and select "Upgrade Now" to upgrade the system.
Can I directly upgrade the system using a mac installed in a virtual machine on win7?
Yes. However, it is generally recommended to create a new Win10 virtual machine directly and reinstall Win10. In order to avoid upgrading for too long and it is still difficult to use.
Can. But it is ruled out that the virtual machine software can still support the new system after you upgrade.
On mac, you cannot directly upgrade win7 to win10. Instead, you need to reinstall the Apple operating system and follow these steps to install Windows 10: 1. Open Launchpad. 2. Go to the "Other" folder. 3. Open "Boot Camp Assistant". 4. In Boot Camp Assistant, check the first and third options. 5. Click the "Continue" button. With these steps, you will be able to reinstall Windows 10 and run it on your mac. Keep in mind that during this process, you need to back up all important data beforehand as reinstallation will result in data loss.
Searching for the latest system software on macOS is feasible. After searching, you may get two relatively accurate matching results, the free one is the system itself, and the paid one is a system enhancement software. After clicking to open, click the "Download" button, and the system will automatically install it.
Upgrading hardware is the most direct way to improve Mac performance. You may consider purchasing a new hard drive, memory module, or processor to improve the performance of your Mac. While this may require some extra budget, it's a worthwhile investment if you hope to continue using your Mac.

How to upgrade the mac system to the latest version?
1. Before upgrading, it is very important to know your MacOS system version. We can check the current system version by opening the "System Information" application on the Mac computer and clicking the "Software" option in the left navigation menu. This step ensures that we download and install the correct upgrade program to avoid unnecessary errors.
2. First, after entering the desktop of your Apple computer, click the Launchpad icon on the Dock bar at the bottom of the screen. Then, in the launcher window, click App Store. After opening the App Store window, click Switch to Updates. At this time, if new updates are available, they will be displayed in the window.
3. Before performing these steps, it is recommended that you back up your Mac first. You can select System Settings or System Preferences from the Apple menu in the corner of the screen. If you selected "System Settings," click "General" on the left side of the window. Then click "Software Update" on the right.
4. First, you need to click the Apple icon in the upper left corner of the desktop and select "About This Mac"; then you need to click "Software Update" at the bottom of the overview dialog box; next you need to click on "Software Update" in the pop-up dialog box. You can see the current low-level system, click "Upgrade Now" on the right, and wait until it is completed to upgrade to the latest system.
5. The specific steps are as follows: First open the Mac computer, click the Apple icon pointed by the red arrow; then click the System Preferences pointed by the red arrow; select Software Update pointed by the red arrow; enter the update page, When you see content that needs to be updated, click on the red arrow to upgrade immediately.
How to upgrade the Apple computer Mac system?
First, you need to click the Apple icon in the upper left corner of the desktop and select "About This Mac", as shown in the figure below. Next, you need to click "Software Update" at the bottom of the overview dialog box, as shown in the figure below. Next, you need to see the current low-level system in the pop-up dialog box, and click "Upgrade Now" on the right.
Before upgrading, it is very important to know your MacOS system version. We can check the current system version by opening the "System Information" application on the Mac computer and clicking the "Software" option in the left navigation menu. This step ensures that we download and install the correct upgrade program to avoid unnecessary errors.
First, after entering the desktop of Apple computer, click the "Launchpad" icon at the bottom of the screen. In the launcher window, find and click the "App Store" icon to open the Apple App Store. In the Store window, switch to the Updates option to view available app updates.
First open the Mac computer and enter the home screen, then open the "System Preferences" function, then click the "Software Update" button, after entering, open the "macOS Catalina Upgrade" option, and then click the "Upgrade Now" button, next Just follow the on-screen instructions to start the upgrade.
How to upgrade the Apple Mac system to the latest version?
1. Before upgrading, it is very important to know your own MacOS system version. We can check the current system version by opening the "System Information" application on the Mac computer and clicking the "Software" option in the left navigation menu. This step ensures that we download and install the correct upgrade program to avoid unnecessary errors.
2. Before performing these steps, it is recommended that you back up your Mac first. You can select System Settings or System Preferences from the Apple menu in the corner of the screen. If you selected "System Settings," click "General" on the left side of the window. Then click "Software Update" on the right.
3. First, you need to click the Apple icon in the upper left corner of the desktop and select "About This Mac", as shown in the figure below. Next, you need to click "Software Update" at the bottom of the overview dialog box, as shown in the figure below. Next, you need to see the current low-level system in the pop-up dialog box, and click "Upgrade Now" on the right.
4. After entering the desktop of Apple computer, click the Launcher icon on the Dock bar at the bottom of the screen. Click on AppStore. Click to switch to updates. If there are multiple updates prompted and you want to view them one by one, you can click More at the back. Updates starting with MacOS are system updates. Click the update button.
5. The specific steps are as follows: First open the Mac computer, click the Apple icon pointed by the red arrow; then click the System Preferences pointed by the red arrow; select Software Update pointed by the red arrow; enter the update page, When you see content that needs to be updated, click on the red arrow to upgrade immediately.
Conclusion: The above is all the content about virtual mac online upgrade compiled by this site for you. Thank you for taking the time to read the content of this site. I hope it will be helpful to you. For more related content, don’t forget to check out Search this site.
The above is the detailed content of Upgrade virtual mac system online. For more information, please follow other related articles on the PHP Chinese website!

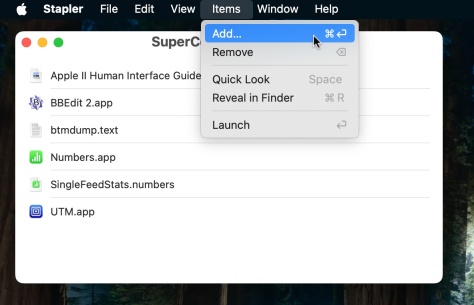 Launch All Apps & Documents Related to a Project with Stapler for MacMay 13, 2025 am 10:37 AM
Longtime Mac users may recall a handy old shareware application for the Classic Macintosh called Stapler, which essentially helped manage projects by grouping a series of apps and documents into a single document that when opened would then launch al
 How to Get Apple Intelligence on Your iPhone, iPad, or MacMay 13, 2025 am 10:32 AM
Apple Intelligence is a set of AI features that Apple is rolling out in beta, and will debut to a larger set of Apple device owners in the fall. Apple Intelligence offers many features from writing and creating text and emails, to taking actions and
 MacOS Sonoma 14.6.1 & Ventura 13.6.9 Released with Bug FixesMay 13, 2025 am 10:25 AM
If you feel like you have spent a significant amount of your time updating system software on your Apple devices lately, you’re in for a treat; another round of system software updates! This time around, Apple has released MacOS Sonoma 14.6.1 alon
 MacOS Sequoia 15 Beta 6 Available for TestingMay 13, 2025 am 10:23 AM
Apple has issued the 6th beta version of MacOS Sequoia for users enrolled in the developer beta testing program. Usually a matching public beta build arrives soon after, which in this case dev beta 6 would be versioned as public beta 4. MacOS Sequoia
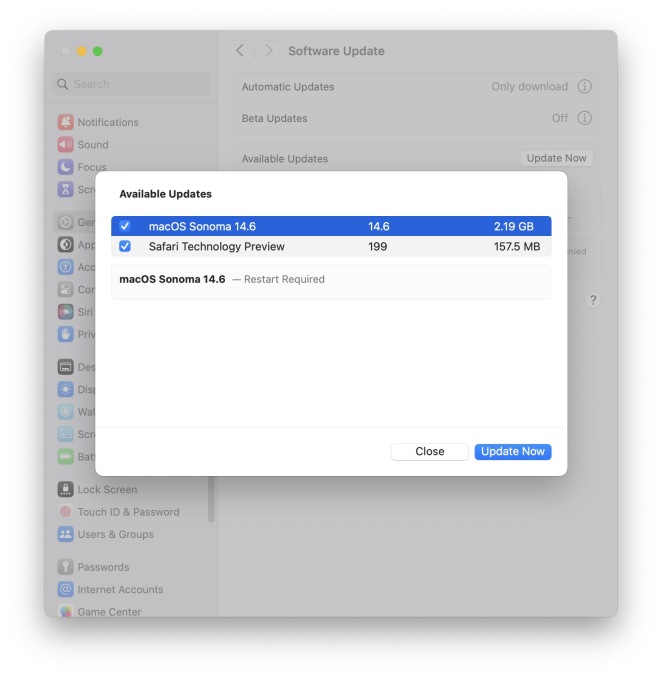 MacOS Sonoma 14.6 Update Released with Bug Fixes & Security UpdatesMay 13, 2025 am 10:20 AM
Apple has released macOS Sonoma 14.6 for Mac users running the Sonoma operating system. The MacOS Sonoma 14.6 software update primarily focuses on bug fixes and security updates for most Macs, however it does include a nice new feature specifically
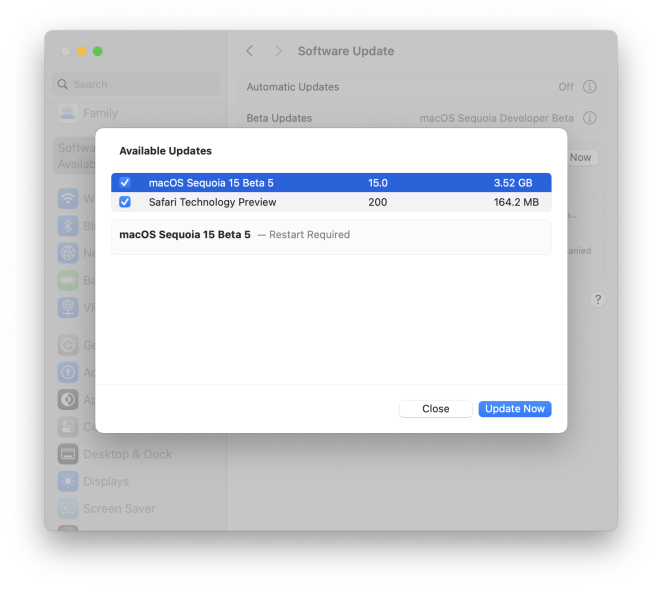 MacOS Sequoia 15 Beta 5 Available to DownloadMay 13, 2025 am 10:06 AM
MacOS Sequoia beta 5 is now available for users enrolled in the developer beta testing program to download and install onto their Macs. MacOS Sequoia beta 5 carries the build of 24A5309e, and usually a new developer beta build is soon followed by a m
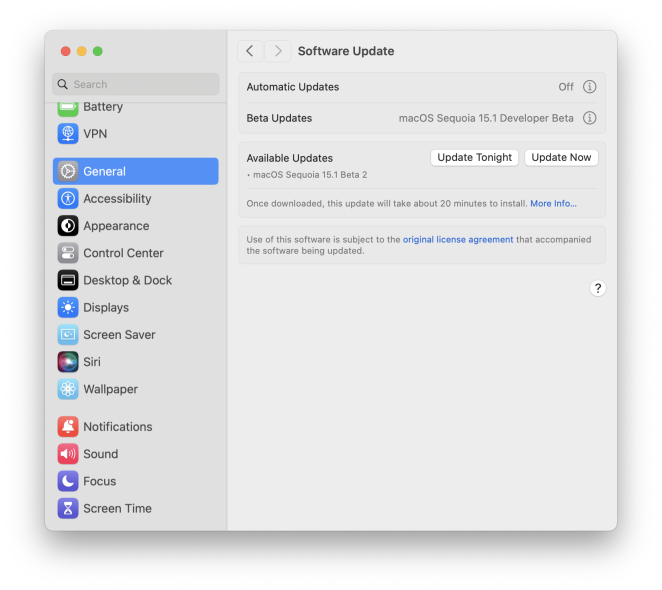 Beta 2 of iOS 18.1, MacOS Sequoia 15.1, & iPadOS 18.1 Released with Apple IntelligenceMay 13, 2025 am 09:49 AM
Apple has released the second beta of iOS 18.1, iPadOS 18.1, and MacOS Sequoia 15.1, each with support for Apple Intelligence AI features, on supported devices anyway. The release of these new beta updates is unusual in that they’re concurrent wit
 How to Uninstall VMWare Fusion on MacMay 13, 2025 am 09:44 AM
You might be aware that VMWare Fusion Pro is now free to download and install, and perhaps you installed it on a Mac to test virtual machines or to play around with, and now you’ve decided you no longer need VMware on the Mac. But VMware Fusion P


Hot AI Tools

Undresser.AI Undress
AI-powered app for creating realistic nude photos

AI Clothes Remover
Online AI tool for removing clothes from photos.

Undress AI Tool
Undress images for free

Clothoff.io
AI clothes remover

Video Face Swap
Swap faces in any video effortlessly with our completely free AI face swap tool!

Hot Article
Hot Tools

PhpStorm Mac version
The latest (2018.2.1) professional PHP integrated development tool

DVWA
Damn Vulnerable Web App (DVWA) is a PHP/MySQL web application that is very vulnerable. Its main goals are to be an aid for security professionals to test their skills and tools in a legal environment, to help web developers better understand the process of securing web applications, and to help teachers/students teach/learn in a classroom environment Web application security. The goal of DVWA is to practice some of the most common web vulnerabilities through a simple and straightforward interface, with varying degrees of difficulty. Please note that this software

SublimeText3 Chinese version
Chinese version, very easy to use

SecLists
SecLists is the ultimate security tester's companion. It is a collection of various types of lists that are frequently used during security assessments, all in one place. SecLists helps make security testing more efficient and productive by conveniently providing all the lists a security tester might need. List types include usernames, passwords, URLs, fuzzing payloads, sensitive data patterns, web shells, and more. The tester can simply pull this repository onto a new test machine and he will have access to every type of list he needs.

Dreamweaver Mac version
Visual web development tools

