

 System TutorialMACHow to increase the capacity of Black Apple system disk (Steps to expand the capacity of Black Apple system disk)
Introduction: This article will introduce how to expand the mac black apple system disk. I hope it will be helpful to everyone.
How to add an extra hard drive to a black Apple system
To expand Mac space, you can use Time Machine or Disk Utility to back up the system, then delete the partition and repartition it before restoring the system. For 7G processing, this partition can be deleted and merged into the previous partition. In addition, the partition can be formatted as exFAT and used as a partition for exchanging files between Mac and Windows. This makes more efficient use of your Mac's storage space.
Allocate at least 60GB of space on your hard drive on your computer. If you plan to carry out entertainment and other activities under Black Apple, the more space, the better. If you only develop software and other activities under Black Apple, then the space requirements can be adjusted at will.
I solved the dual-system problem by installing win8 on the first hard disk and installing os x10 on the second hard disk using clover boot. In this way, switching is convenient and the two guides do not interfere with each other, and deletion and upgrade are also more convenient.
First, open the computer, right-click the computer on the desktop and select Manage. In Computer Management, find Disk Management, right-click the target disk and select Compress Volume.
This is subpackaged and compressed. Double-click part1 to decompress it to generate a single image. Depending on whether it is a U disk version, whether the hard disk assistant can be used to write to the hard disk will be analyzed in more specific circumstances.
When installing the Mac system as a whole, you need to select a hard disk as the installation disk and create a new EFI partition. When creating it yourself using a partitioning tool, the EFI partition size should be larger than 200M to ensure that the system starts normally.

Black Apple has 2 more partitions after installation
1. Black Apple is a separate Apple system. It can be installed on the same or two hard drives at the same time as the Windows system. Two startup guides coexist. You can only choose which system to use at startup.
The following situations may occur during the installation process: 1. The original boot partition is deleted; 2. The system is installed directly without processing the deleted partition; 3. The original boot partition is hidden when installing the system. Some boot partitions; it is recommended to open the disk manager and check the current disk status.
Allow at least 60GB of space on your hard drive on your computer to install Black Apple. If you plan to conduct activities such as entertainment under the Black Apple, it is recommended to allocate more space. And if you only conduct software development and other activities under Black Apple, you can freely adjust the partition space as needed.
4. In Computer Management, select Disk Management. Right-click the disk to be compressed and select the compressed volume in the pop-up list options. In the pop-up dialog box, enter the size of the partition disk you want as required, and click Compress.
How much hard disk space is required to install the Black Apple system?
1. Divide the installation disk into approximately 10G (can be deleted later), and the system disk over 20G. The empty system is about 20G, and subsequent versions require about 50G to be reserved. There are slight differences depending on the version and computer model.
2. Allocate space to MacOS to compress the original Windows disk space (more than 200g, depending on personal circumstances). The MacOS system needs to be in GPT format. If the compressed partition is in MBR format, it needs to be converted to GPT first. Yes, currently most Intel platform computers can install Apple MacOS system.
3. It is generally recommended that the system disk of Black Apple is 40G, but if it is just a system disk, 32G is also feasible. I suggest you go to the Vision Black Apple forum and ask the experts there or climb up the stairs to read some of the information, which will be helpful to you.
4. It is still about 11g now. If you don't install too many software, 20g should be enough. Also, if you use iTunes to manage music, it will copy all music files to the system disk. The system will take about 10g after installation. If you have a lot of music, reserve some more space. .
5. It seems that you don’t fully understand how Black Apple takes up hard drive space. The C area of your win system, as big as Aidu, has nothing to do with Black Apple. It is recommended that the partition where you want to install Black Apple should not be smaller than 20G. 40G is best.
When installing Black Apple, I encountered a failure to erase the volume and insufficient disk space...
These problems occurred before. It should be that the hard disk partition table or hard disk mode is incorrect.
Start the computer from the USB flash drive and use DiskGenius to search the lost partition table to recover the partition and the original files will be restored.
Because you are entering a recovery disk, and the recovery disk is based on mac. You can't erase yourself. So it cannot be erased. If you want to completely erase it, press option mand r on boot, download the network recovery disk via wifi, and then you can erase it.
Black Apple Installation
1. The first thing you need is a driver object that supports the Apple system and find the BOOT assistant. Boot from a new USB flash drive. This is for driver support. I found the disk management in the Windows system and carved out a partition for use by the Apple system, which is about 80G.
2. Let’s take a look at how the editor did it for detailed steps~ How to install and download the U boot software on a black Apple system U disk, and then it is best to prepare a 10GB U disk for production. U-boot download address Open the U-boot software, select the U disk you inserted, and then click [Start Making].
3. If your computer meets the above conditions, you can consider installing Black Apple. Regarding which version of Black Apple to choose, it is generally recommended to choose the currently more stable version.
4. Install TransMac4 and register. Insert the USB flash drive. Run TransMac as administrator. Right-click your USB flash drive in the device list on the left and click RestorewithDiskImage in the right-click menu.
5. Methods/steps for installing Black Apple Mac OS , it is possible that your data is not protected.
Conclusion: The above is all the content about mac black apple system disk expansion compiled by this site for you. Thank you for taking the time to read the content of this site. I hope it will be helpful to you. Don’t forget more related content. Find it on this site.
The above is the detailed content of How to increase the capacity of Black Apple system disk (Steps to expand the capacity of Black Apple system disk). For more information, please follow other related articles on the PHP Chinese website!

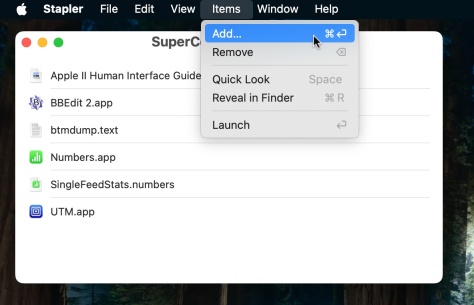 Launch All Apps & Documents Related to a Project with Stapler for MacMay 13, 2025 am 10:37 AM
Longtime Mac users may recall a handy old shareware application for the Classic Macintosh called Stapler, which essentially helped manage projects by grouping a series of apps and documents into a single document that when opened would then launch al
 How to Get Apple Intelligence on Your iPhone, iPad, or MacMay 13, 2025 am 10:32 AM
Apple Intelligence is a set of AI features that Apple is rolling out in beta, and will debut to a larger set of Apple device owners in the fall. Apple Intelligence offers many features from writing and creating text and emails, to taking actions and
 MacOS Sonoma 14.6.1 & Ventura 13.6.9 Released with Bug FixesMay 13, 2025 am 10:25 AM
If you feel like you have spent a significant amount of your time updating system software on your Apple devices lately, you’re in for a treat; another round of system software updates! This time around, Apple has released MacOS Sonoma 14.6.1 alon
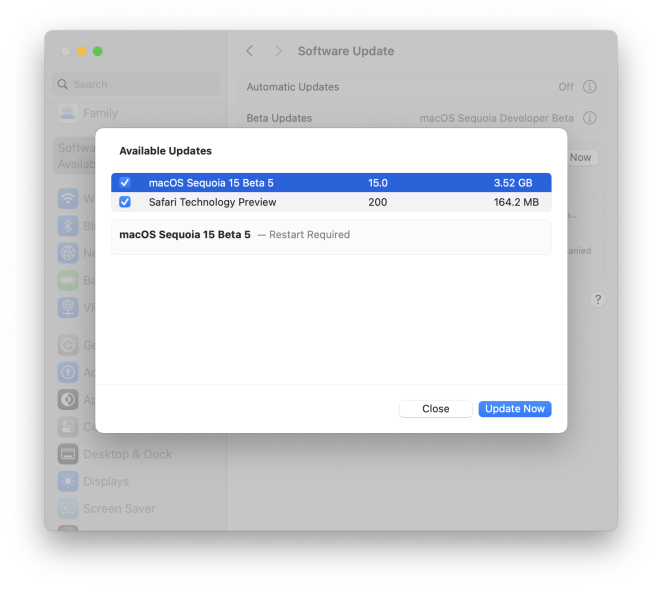
 MacOS Sequoia 15 Beta 6 Available for TestingMay 13, 2025 am 10:23 AM
Apple has issued the 6th beta version of MacOS Sequoia for users enrolled in the developer beta testing program. Usually a matching public beta build arrives soon after, which in this case dev beta 6 would be versioned as public beta 4. MacOS Sequoia
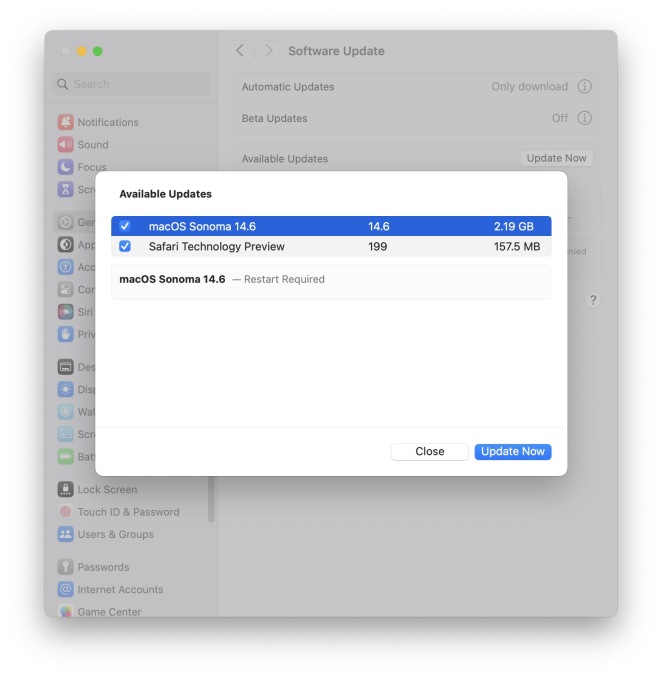 MacOS Sonoma 14.6 Update Released with Bug Fixes & Security UpdatesMay 13, 2025 am 10:20 AM
Apple has released macOS Sonoma 14.6 for Mac users running the Sonoma operating system. The MacOS Sonoma 14.6 software update primarily focuses on bug fixes and security updates for most Macs, however it does include a nice new feature specifically
 MacOS Sequoia 15 Beta 5 Available to DownloadMay 13, 2025 am 10:06 AM
MacOS Sequoia beta 5 is now available for users enrolled in the developer beta testing program to download and install onto their Macs. MacOS Sequoia beta 5 carries the build of 24A5309e, and usually a new developer beta build is soon followed by a m
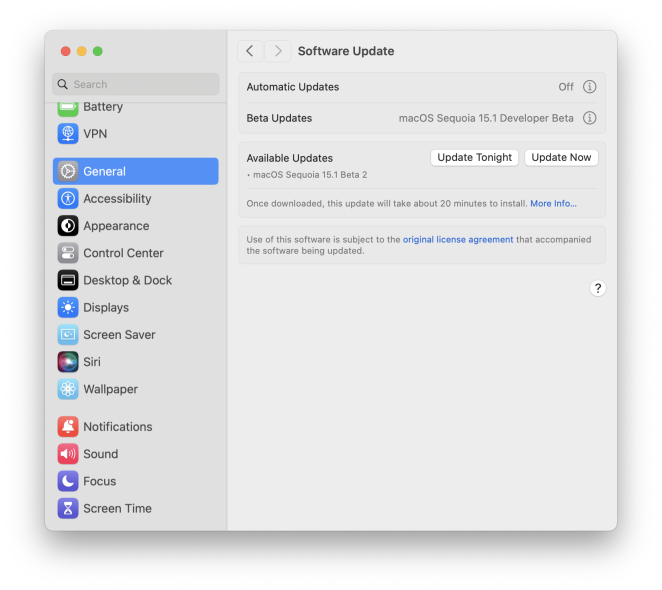 Beta 2 of iOS 18.1, MacOS Sequoia 15.1, & iPadOS 18.1 Released with Apple IntelligenceMay 13, 2025 am 09:49 AM
Apple has released the second beta of iOS 18.1, iPadOS 18.1, and MacOS Sequoia 15.1, each with support for Apple Intelligence AI features, on supported devices anyway. The release of these new beta updates is unusual in that they’re concurrent wit
 How to Uninstall VMWare Fusion on MacMay 13, 2025 am 09:44 AM
You might be aware that VMWare Fusion Pro is now free to download and install, and perhaps you installed it on a Mac to test virtual machines or to play around with, and now you’ve decided you no longer need VMware on the Mac. But VMware Fusion P


Hot AI Tools

Undresser.AI Undress
AI-powered app for creating realistic nude photos

AI Clothes Remover
Online AI tool for removing clothes from photos.

Undress AI Tool
Undress images for free

Clothoff.io
AI clothes remover

Video Face Swap
Swap faces in any video effortlessly with our completely free AI face swap tool!

Hot Article
Hot Tools

MinGW - Minimalist GNU for Windows
This project is in the process of being migrated to osdn.net/projects/mingw, you can continue to follow us there. MinGW: A native Windows port of the GNU Compiler Collection (GCC), freely distributable import libraries and header files for building native Windows applications; includes extensions to the MSVC runtime to support C99 functionality. All MinGW software can run on 64-bit Windows platforms.

Safe Exam Browser
Safe Exam Browser is a secure browser environment for taking online exams securely. This software turns any computer into a secure workstation. It controls access to any utility and prevents students from using unauthorized resources.

DVWA
Damn Vulnerable Web App (DVWA) is a PHP/MySQL web application that is very vulnerable. Its main goals are to be an aid for security professionals to test their skills and tools in a legal environment, to help web developers better understand the process of securing web applications, and to help teachers/students teach/learn in a classroom environment Web application security. The goal of DVWA is to practice some of the most common web vulnerabilities through a simple and straightforward interface, with varying degrees of difficulty. Please note that this software

Dreamweaver Mac version
Visual web development tools

EditPlus Chinese cracked version
Small size, syntax highlighting, does not support code prompt function

