


telent usage?
It is a remote connection command under windos, such as tllent xxx.xxx.xxx.xxx
open
Use openhostname to establish a Telnet connection to the host.
close
Use the command close command to close an existing Telnet connection.
display
Use the display command to view the current settings of the Telnet client.
send
Use the send command to send commands to the Telnet server. The following commands are supported:
ao
Give up the output command.
ayt
"Are you there" command.
esc
Send the current escape character.
ip
Interrupt process command.
synch
Perform Telnet synchronization operation.
brk
Send signal.
Commands other than those listed in the above table will be sent to the Telnet server in the form of strings. For example, sendabcd will send the string abcd to the Telnet server so that the string appears in the Telnet session window.
quit
Use the quit command to exit the Telnet client.
set
Use the set command with one of the following parameters to configure the Telnet client for the current session.
bsasdel
Backspace will be sent as a delete.
codeset option
Only available when the language is set to Japanese. Sets the current code set as an option, which can be one of the following options:
• Shift JIS
• Japanese EUC
• JIS Kanji
• JIS Kanji (78)
• DEC Kanji
• NEC Kanji
The same code set should be set on the remote computer. By default, the Telnet client uses raster fonts. Before using these code sets to access a remote computer, you must configure the Telnet client to use TrueType fonts to ensure that characters are displayed correctly.
crlf
New line mode: Causes the Return key to send 0x0D, 0x0A.
delasbs
Delete will be sent as the backspace key.
escapecharacter
Convert from Telnet session mode to Telnet command mode. While in Telnet command mode, pressing Enter will return you to Telnet session mode.
localecho
Open localecho.
logfilename
Specifies the name of the file to which Telnet logs are written for this session. If you do not specify a path to the file, the file will be created in the current directory. Specifying a log file also starts logging.
logging
Start the log of this session.
mode {console | stream}
Operation mode.
ntlm
Start NTLM authentication.
term {ansi | vt100 | vt52 | vtnt}
The type of terminal you want Telnet Client to emulate.
?
Display help information for set.
unset
Use the unset command to turn off options previously set using the set command.
status
Use the status command to determine whether the computer running the Telnet client has successfully connected.
?/help
Display "help" information.
FTP: File Transfer Protocol. Let’s talk about its function first, which is mainly to transfer files from a computer running an FTP server. Can be used interactively. It should be noted here that only machines with the tcp/ip protocol installed can use the ftp command.
Command format: ftp [-v][-d][-i][-n][-g][-s:filename][-a][-w:windowsize][computer]
Let’s talk about their meanings.
-v Do not display remote server responses
-n Disable automatic login on first connection
-i Turn off interactive prompts during multiple file transfers
-d allows debugging and display of all ftp commands passed between the client and the server
-g does not allow the use of file name wildcards. File name wildcards mean that they are allowed in local files and path names. Use wildcard characters
-s:filename to specify the text file containing the ftp command. These commands will be run automatically after the ftp command is started. There cannot be spaces in the added parameters.
-a When binding a data connection, use any local port
-w:windowsize Ignore the default 4096 transmission buffer
computer Specifies the remote computer to connect to ip address
Haha, after understanding the above, let me talk about some specific commands. I personally feel that although the tools are very convenient to use now, knowing these commands is still very useful in many places, like now Command prompt under nt
1) ?
Description: Display the description of the ftp command. You can add parameters later, which means adding the name of the command that needs to be explained. If not added, a list containing all commands will be displayed.
2) append
Description: Use the current file type setting to append the local file to the remote computer. The approximate format is
append local-file [remote-file] where local-file means specifying the local file to be added.
remote-file means to specify that local-file should be appended to the remote computer file. If this is omitted, the local file name will be used as the remote file name.
3)ascii
Description: By default, the file transfer type is set to ASCII
4)bell
Description: Ringing switch, meaning It is whether there is a ringing sound reminder after the file transfer is completed. The default is off.
5)binary
Description: Set the file transfer type to binary.
6)bye
Instructions: End the ftp session with the remote computer, that is, disconnect safely and exit ftp.
7)cd
Instructions: Change the working directory on the remote computer. Such as cd data where data is the directory of the remote computer to be entered.
8)close
Description: End the ftp session with the remote server and return to the command interpreter.
9)dir
Description: Display the remote file and subdirectory list. For example, dir data local-file
where data is the directory specified to view the list. If not specified, it is the current directory. local-file specifies the local file to save the list. If not specified, it will be output on the screen.
10)debug
Description: The debugging switch, when turned on, prints each command sent to the remote computer. The command is preceded by——>
The default is off of.
11)disconnnect
Description: Disconnect from the remote computer, but still maintain the ftp command prompt.
12) get
Description: Use the current file transfer type to copy the remote file to the local computer.
For example, get remote-file local-file
remote-file specifies the file to be copied, local-file specifies the file name on the local computer,
is not specified If so, the remote-file will have the same name.
13)glob
Description: File name wildcard switch
14)hash
Description: Convert the hash mark of each transmitted data block and print it (#).The size of the data block is 2048 bytes. It is closed by default,
15)help
Description: Display the explanation of the ftp command, such as help commmand where command is the command you want to explain. If you do not add the command parameter, A list of all commands will be displayed
16)!
Description: I almost forgot that the function of this command is to run the specified command on the local computer. For example! command where command is the command you want to run. If you do not add the command parameter, the local command prompt will be displayed. At this time, you can return to ftp by entering the exit command.
17)lcd
Instructions: Change the local directory of the local computer. By default, it is the directory where ftp is started. Don’t think this is useless, in order to transfer files when you use ftp Don’t you often change the directories of local and remote computers?
For example, lcd [directory] where [directory] specifies the directory of the local computer to be entered. If you do not add this parameter, the directory of the local computer will be displayed. Working directory.
18)literal
Description: Send negotiation parameters to the remote ftp server, report.
Such as literary argument [...] where argument is specified to be sent Negotiation parameters for the remote server.
19)ls
Description: Display the files and subdirectories of the remote directory.
For example, ls remote-directory local-file
where remote-directory It refers to the directory of the list to be viewed. If not specified, the current working directory is displayed. local-file specifies the local file to save the list. If not specified, it will be output on the screen.
20) mdelete
Description: Delete files on the remote computer. Such as mdelete remote-file ...
remote-file must be a file that needs to be deleted. You can delete multiple files.
21)mdir
Description: Display the file and subdirectory list of the remote directory , it allows specifying multiple files.
Such as mdir remote-file ... local-file
I think everyone should understand what the parameters mean? If you don’t understand, just look at the previous similar commands Bar.
22) mget
Description: Use the current file transfer type to copy multiple remote files to the local computer.
Such as mget remote-files...
In fact, multiple remote-files can be specified, which specifies the remote files to be copied to the local computer.
23)mkdir
Instructions: Create a remote directory.
For example, mkdir directory. This command is the same as md directory in the command prompt under nt. No more details.
##24)mlsDescription: Display the file and directory abbreviations of the remote directory. TableFor example, mls remote-file ... local-fileThe remote-file parameter must be added, and ''-'' is the current working directory of the remote computer. 25)mput Description: Use the current file transfer type to copy local files to the remote computer.For example, mput local-files...26) open Description: Connect to the specified ftp server, such as open computer port, where computer is generally the IP address of the remote computer, and port goes without saying that it is the designated port. 27)prompt Description: Conversion prompt. When multiple files are transferred, the ftp prompt can selectively retrieve or save files. If the prompt is turned off, the mget and mput commands will transfer all The file is open by default. 28) put Description: Use the current file transfer type to copy local files to the remote computer, such as put local -file remote-filewhere local-file is the local file specified to be copied, remote-file is the file name on the remote computer specified to be copied, if not specified, it is the same as the local file. The file name on the computer has the same name.29)pwdInstructions: Display the current directory on the remote computer.30)quitInstructions :End the ftp session with the remote computer and exit ftp.31)quote Description: Send protocol and report to the remote ftp server. Expect ftp single code response. The function of this command is the same as Literal is the same. 32) recv Description: Use the current file transfer type to copy the remote file to the local computer. It has the same effect as the get command. 33)remotehelpDescription: Display the help of the remote command. The usage of this command is the same as help,!, you can refer to its usage.
34)rename
Description: Change the file name on the remote computer .
This command is the same as ren in the nt command prompt, such as rename filename newfilename
35)rmdir
Description: Delete the remote directory.
This The command is the same as rm of nt command prompt, such as rmdir directory
36)send
Description: Use the current file transfer type to copy local files to the remote computer. Functions of send and put commands Same.
Such as send local-file remote-file
37)status
Description: Display the current status of ftp connection and conversion
38)trace
Description: Convert packet tracing, when running the ftp command, trace will display the reason why there is no packet.
39)type
Description: Set or display the file transfer type.
For example, type [type-name]
where type-name means The file transfer type, the default is ASCII, if this parameter is not added, the current transfer type will be displayed.
40) user
Description: Specify the user connected to the remote computer.
For example, user user-name [passwd] [account]
Needless to say, user-name is the user name used to log in to the computer.
passwd is the password for the specified user-name. If not specified, ftp will prompt for a password.
account is the account designated to log in to the computer. If not specified, ftp will prompt for the account number.
41) verbose
Description: Convert redundancy mode. If it is turned on here, all ftp responses will be displayed. When the file transfer is completed, the transmission efficiency and statistical information will be displayed. The default situation is open.
Haha, this is the introduction of the command, you can familiarize yourself with it. In fact, there are many ftp software now, which are very convenient, but it is impossible for you to say that these commands are useless. Just like under windows, the command prompt is still retained._ Especially sometimes, there are many things that ftp software cannot do.? What? place.
How to enter the Huawei ONU device interface?
There are three methods:
1: TELNET, remote login, enter user name and password;
2: Use data cable connection to log in;
3: Use a network cable to connect directly; connect the network cable to the 0/1/1 port of the device, set the computer IP to: 10.11.104.1, use TELNET command 0 to log in to 10.11.104.2.
crt8.0 Chinese version installation steps?
CRT 8.0 is a software used to remotely control, manage and connect network devices. The following are the installation steps for the Chinese version of CRT 8.0: 1. Download the installer: Download the CRT 8.0 installer from the official website or authorized channels. 2. Execute the installation program: Double-click the installation program to run the installation wizard. 3. Installation License Agreement: Read and accept the license agreement, click "Agree" to continue. 4. Select the installation type: Select "Full Installation" to install all features of CRT 8.0. Or select Custom Installation to choose specific features and components. 5. Select the installation directory: Select a suitable installation directory. You can use the default directory or specify another directory, and then click "Next". 6. Select the Start menu folder: Select the folder location of CRT 8.0 in the Start menu. You can use the default folder location or create a new folder. 7. Select Create desktop icon: Choose whether to create a shortcut to CRT 8.0 on the desktop. 8. Select additional tasks: Select whether to create a desktop icon or quick launch icon during the installation process, and click Next. 9. Prepare for installation: Confirm the installation settings. After the settings are completed, click "Install" to start the installation process. 10. Wait for the installation: Wait for the installer to copy the files and components to your computer. This process may take several minutes. 11. Installation Complete: When the "Installation Complete" message appears, it means that CRT 8.0 has been successfully installed on your computer. 12. Start CRT 8.0: Check the "Open CRT Now" option and click the "Finish" button to start the CRT 8.0 software. 13. Enter license information: When starting CRT 8.0 for the first time, you may be asked to enter license information. If you have a valid license, follow the prompts to enter the information and activate the software. These are the installation steps for the Chinese version of CRT 8.0. I hope they will be helpful to you.
Why does my computer service not have telnet?
Go back to the control panel management tool "Services" or services.msc and you can see telnet. 2. Through "Control Panel"-->"Management Tools"-->"Services" Or after services.msc enters the service list, find telnet and you can see that it is disabled. At this time, you need to right-click on "Disabled" and select "Properties" and change "Disabled" to "Manual", and then Then right-click on the status bar and select "Start".
3. Many services under win7 must add the corresponding user to the group before they can be used, otherwise they cannot be used. Therefore, you need to add your User added. In this way, you can use the telnet service. 4. Under MS-Dos, enter telnet and then enter? /h You can see the telnet help and related setting information, such as setting the echo set localecho. You're done.
How to use the port?
Usage of port: Port is the outlet for communication between the device and the outside world.
Ports can be divided into virtual ports and physical ports
Virtual port refers to the port inside the computer or switch router, which is invisible.
Physical ports are also called interfaces, which are visible ports, RJ45 network ports on computer backplanes, RJ45 ports on switches, routers, hubs, etc. Phones using RJ11 sockets also fall into the category of physical ports.
The role of ports:
The role in intrusion
Someone once compared the server to a house, and compared the ports to doors leading to different rooms (services). It's a nice metaphor if you don't take the details into account. If an intruder wants to occupy this house, he must break in (physical intrusion is another matter). So for the intruder, it is important to know how many doors are opened in the house, what kind of doors they are, and what is behind the door. It's important.
Intruders usually use a scanner to scan the ports of the target host to determine which ports are open. From the open ports, the intruder can know roughly what services the target host provides, and then guess what services may exist. Vulnerabilities, so port scanning can help us better understand the target host. For administrators, scanning the open ports of the local machine is also the first step to take security precautions.
How to start the system service using DOS command?
Tools/Materials
Computer
XP System
Method/Step
1. First understand how to operate under DOS , how to check the started system services, first open the "Run" program from the start menu, then enter the cmd command in the run edit box, confirm, and enter the command prompt window (similar to DOS mode under XP system).
2. After opening the DOS window, enter the "net start /?" command at the flashing cursor behind C:\Documents and Settings\Administrator. This command is to view the system service help description and parameters. Condition.
3. After pressing Enter, it will prompt "The syntax of this command is: NET START [service]", which introduces the method and parameters of starting the service.
4. Now that you know the syntax, give it a try and view the list of all started services in the current system, then enter net start and press Enter.
5. The currently started system services are listed. There are many started services, divided into upper and lower pictures, until "Command completed successfully". Checking the currently started system services is complete. Here is how to start the Telnet single service.
6. The above is just to view all currently started services. Here we will introduce how to specifically start a single system service, such as the Telnet service. This is a system remote control service. Only by starting it can you control other Computer. Operation steps: Open "Run" from the start menu, then enter the cmd command and confirm.
7. After entering the DOS window, enter the start Telnet remote control command. The command syntax is "net start telnet" and press Enter. Net start is the command to start the service, and the following parameter is telnet. When the commands are put together, it starts the remote control service in the service list.
8. If it prompts "System error 1058 occurred, the service cannot be started. The reason may be that it has been disabled or the device associated with it has not been started." That means the system service has been disabled.
9. To undisable it, open the "Control Panel" from the Start menu, then find and open the "Administrative Tools" item in the Control Panel, enter the Administrative Tools window, and find "Services" ”, double-click to open.
10. Enter the system service editor window, drag the scroll bar, find the "Telnet" item, double-click it to open its properties window.
11. Under the "General" interface of the properties window, find the "Startup Type" item. It is currently set to "Disabled". This is disabled, so the Telnet service cannot be started. Change it to "Manual", then press "Apply" to save, press "OK" to exit the window, and the setting is completed.
12. Return to the DOS command window, follow the previous method, enter the net start telnet to start the remote service command again, and then press Enter.
13. This time the prompt is "The Telnet service is starting. The Telnet service has been started successfully." Needless to say, I know from the literal meaning that Telnet has been started successfully.
14. In order to determine whether the Telnet service has been successfully started, check the currently started system service list by entering the net start command and pressing Enter.
15. Open the list of all started services, search carefully in the list, and find the "Telnet" item, which means that starting Telnet with the DOS command has been successful.
Notes
Note: When using DOS commands, there must be no errors in letters and symbols. Where there are spaces, be sure to leave spaces, otherwise an error will occur.
The above is the detailed content of How to use telnet?. For more information, please follow other related articles on the PHP Chinese website!

 Black Boxes on Desktop Icons: Find Powerful Tips to RemoveMay 12, 2025 pm 08:07 PM
Encountering black squares instead of desktop icons in Windows 11/10? This comprehensive guide offers several straightforward solutions to restore your icons to their original appearance. Quick Navigation: Black Squares on Desktop Icons Solution 1:
 CapCut Project File Location: How to Find, Recover, and ShareMay 12, 2025 pm 08:06 PM
This MiniTool guide offers a complete walkthrough for managing CapCut projects, covering location, recovery, and sharing. Mastering these steps ensures efficient project handling. Quick Navigation: CapCut Project File Location on PC Backing Up CapC
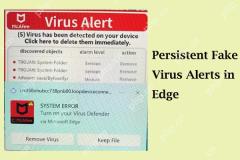 Persistent Fake Virus Alerts in Edge: How to Identify & AvoidMay 12, 2025 pm 08:05 PM
Edge browser fake virus warning: a guide to identifying, handling and prevention Many users report encountering fake virus warnings in Microsoft Edge browser. These warnings usually appear in the form of pop-ups, claiming that malware or viruses are detected, attempting to induce users to download malware or take harmful actions. This article will guide you on how to identify, deal with, and prevent such false warnings. How to identify fake virus warnings in Edge browser? False virus warnings usually have the following characteristics: Use emergency and panic language: Try to force users to act by creating panic. Use fake company logos: Imitate the logo of well-known security software or Microsoft. Regular companies will not issue warnings in this way. Request to dial
 Effective Ways to Fix EVERSPACE 2 Crashing/Not LaunchingMay 12, 2025 pm 08:03 PM
EVERSPACE 2 Crash Problem and Solutions Have you encountered a crash problem while playing EVERSPACE 2? If this problem bothers you, this MiniTool article will help you. This article will explain common causes and effective solutions to EVERSPACE 2 crashes. Quick navigation: EVERSPACE 2 Startup Crash How to fix EVERSPACE 2 crash Summarize EVERSPACE 2 Startup Crash The EVERSPACE 2 crash problem has always been the focus of players. Many players have reported different types of crashes, including crashes at startup, sudden exits during the game, and interactions with Unreal Engine
 Apex Integrity Error 0x8000001: 3 Useful Methods HereMay 12, 2025 pm 08:02 PM
Encountering the Apex Legends integrity error 0x8000001, causing game crashes? This guide provides effective solutions. Let's explore the fixes. Apex Integrity Error 0x8000001: A Crashing Problem Many Apex Legends players report encountering the &quo
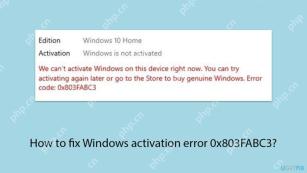 How to fix Windows activation error 0x803FABC3?May 12, 2025 pm 06:00 PM
Windows activation is a critical process in Windows 11 that verifies your operating system copy is genuine, enabling full functionality like personalization fea
 How to Use Copilot in Microsoft OneDrive? Everything You NeedMay 11, 2025 pm 08:02 PM
Unlock the Power of Microsoft OneDrive Copilot: Your AI-Powered File Assistant This MiniTool guide unveils the capabilities of Copilot in OneDrive, a revolutionary AI assistant designed to streamline your file management and boost productivity. Expl
 A Guide to Fix A Supported Game Is Required to Use This FeatureMay 11, 2025 pm 08:01 PM
Troubleshooting the NVIDIA GeForce Experience "Supported Game Required" Error Encountering the "A supported game is required to use this feature" error in NVIDIA GeForce Experience while using game filters, screen recording, or ad


Hot AI Tools

Undresser.AI Undress
AI-powered app for creating realistic nude photos

AI Clothes Remover
Online AI tool for removing clothes from photos.

Undress AI Tool
Undress images for free

Clothoff.io
AI clothes remover

Video Face Swap
Swap faces in any video effortlessly with our completely free AI face swap tool!

Hot Article
Hot Tools

SublimeText3 Mac version
God-level code editing software (SublimeText3)

Dreamweaver CS6
Visual web development tools

WebStorm Mac version
Useful JavaScript development tools

PhpStorm Mac version
The latest (2018.2.1) professional PHP integrated development tool

mPDF
mPDF is a PHP library that can generate PDF files from UTF-8 encoded HTML. The original author, Ian Back, wrote mPDF to output PDF files "on the fly" from his website and handle different languages. It is slower than original scripts like HTML2FPDF and produces larger files when using Unicode fonts, but supports CSS styles etc. and has a lot of enhancements. Supports almost all languages, including RTL (Arabic and Hebrew) and CJK (Chinese, Japanese and Korean). Supports nested block-level elements (such as P, DIV),

