

Detailed explanation of how to add a notebook memory stick

Users of notebooks have all had this experience. After using the notebook for several years, it will become stuck, especially when you open a few more softwares. Can you still play well when the notebook becomes stuck? I want to get a new laptop but I don’t think it’s necessary. How to solve it? Add a memory module interface to a notebook. For this reason, the editor has brought you a graphic tutorial on adding a memory module to a notebook.
Laptops have appeared in our lives in modern society. They are responsible for both work and study. However, some users’ laptops have older versions and actually have lower memory. In order to After using it fully, I came up with the idea of adding a memory stick to the notebook. Now, the editor will tell you how to add a memory stick to the notebook.
How to add a memory module to a notebook
Preparation work:
Prepare the necessary tools, screwdrivers, pay attention to a set, and tighten the screws like this It will not damage the threads when it is removed, making it easy to remove later.

Memory Picture-1
If you have anti-electricity gloves, wear them to prevent static electricity on the human body Destroy motherboard components. If not, clean your hands without sweat or other debris

Memory bar diagram-2
Shut down the computer and remove the battery. Note here that you must remove the battery before starting work, otherwise the mainboard may be damaged due to the charged mainboard.

Notebook Picture-3
You can purchase memory sticks in physical stores or online. Be careful to buy memory modules with the same frequency as your own model. Nowadays, the price of memory sticks is not very expensive, and there is a downward trend. Generally, 2g is around 80RMB.
Pay attention to distinguishing between memory sticks for notebooks and desktops.

Memory Bar Diagram-4
Start:
Shut down the notebook and turn it over. You will see a back cover. Use a screwdriver to unscrew the screws as shown in the picture and open the back cover. Take good care of the screws.

Notebook Picture-5
After opening it, find the location of the memory card slot. Most laptops have two card slots, one on the top and one on the bottom. If you only see one, it is most likely that it is installed directly on the card slot on the top, blocking the one below. Remove the memory module on the top first.

Notebook Picture-6
Be careful when installing the memory stick and move slowly to avoid damaging the electronics element. Pay attention to the fixing hooks on both sides of the card slot, gently open it, insert the memory module, and lock it. Don't worry about which side is up, it has a gap and can only be put in if it is correct.

Add memory module Figure-7
After both memory modules are installed, close the back cover and tighten screws. Turn on the computer and enter: Control Panel - System and Security - System. You can see the current memory size. If it is larger than before, the installation is successful.

Memory Map-8
In addition, it should be reminded that 32-bit system 4g can sometimes only display about 2.8g of memory. If you want to make full use of memory, it is recommended to change the system to 64-bit if it is 4g or above.
The above is how to add a memory module to a notebook.
The above is the detailed content of Detailed explanation of how to add a notebook memory stick. For more information, please follow other related articles on the PHP Chinese website!

 How to Change Default View in File Explorer (Windows 11)May 09, 2025 pm 02:02 PM
Customize Your Windows 11 File Explorer: A Guide to Setting and Saving Your Preferred View Tired of File Explorer's default view? This guide shows you how to easily change and permanently save your preferred folder view in Windows 11, whether it's l
 Fedora 42 Joins the Windows Subsystem for LinuxMay 09, 2025 am 03:01 AM
Pushing the boundaries of Linux: exploring unusual applications. Purely for fun, of course. Posts 7 Technically, you can create a WSL image for any compatible Linux distribution. However, officially supported images offer a significantly smoother e
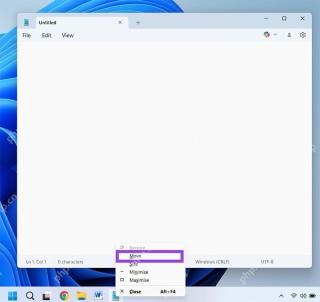 How to Move a Window When You Can't Click on the Title BarMay 09, 2025 am 01:03 AM
When applications unexpectedly extend beyond your screen's edges, accessing their title bars becomes impossible. This is especially common with dual monitors but can occur on single displays as well. This guide offers solutions for regaining control
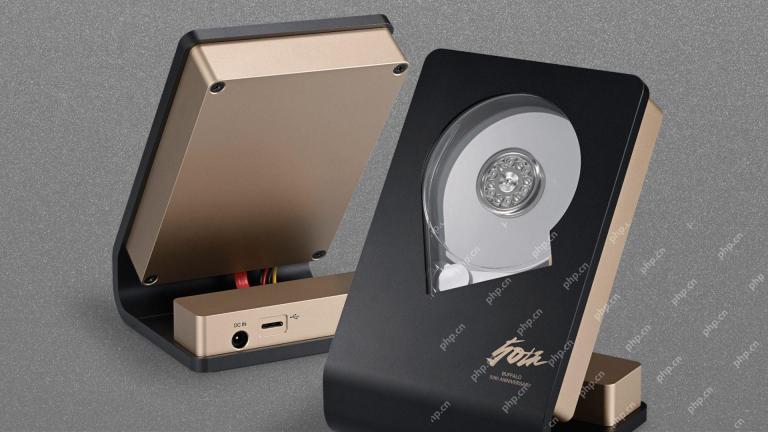 This Limited-Edition 'Skeleton” HDD Shows You How It Writes BytesMay 08, 2025 pm 09:04 PM
The HD-SKL, a limited-edition hard drive, is a modern take on Buffalo's 1998 Skeleton Hard Disk. The original, a 4.3GB drive with a clear acrylic case, was produced in a limited run of 500 units. While Buffalo cites its 1978 Melco 3533 turntable as
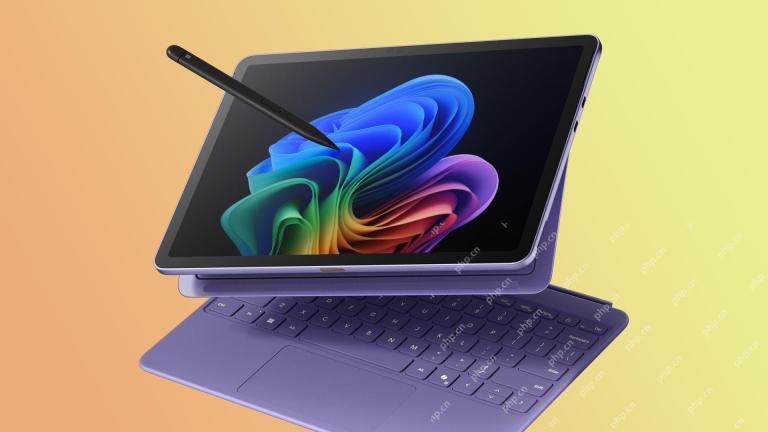 The New Surface Pro Doesn't Feel ProMay 08, 2025 am 06:01 AM
The new Surface Pro: A step back? Microsoft's latest Surface Pro offers connectivity via two USB-C ports, supporting charging, USB 3.2 data transfer, and DisplayPort 1.4a (up to two 4K monitors at 60Hz). However, the device ships without a power ad
 Microsoft Challenges the MacBook Air With New Surface LaptopMay 08, 2025 am 03:02 AM
Microsoft's latest Surface Laptop aims to rival the MacBook Air, but with some notable compromises. The absence of a Surface Connect port marks a significant departure from previous models, reflecting the growing prevalence of Thunderbolt and USB do
 Solve the problem that the svn plugin in eclipse always prompts for password inputMay 07, 2025 pm 05:03 PM
1. Background Recently, when using the svn plug-in to manage remote warehouse code in eclipse, prompts to enter passwords are always prompted to enter passwords, which is particularly annoying. After hard work, I finally solved the problem and shared it with you~ 2. Analysis of the password mechanism of the svn plug-in and the cause of the problem. When we use the svn plug-in for the first time and enter the password, a file that saves the password will be generated, and then the svn plug-in will read the username and password information by default every time. When eclipse is started, the configuration information will be automatically read into the program cache. After the password of svn is modified, it is impossible to log in again, and there is no prompt to re-enter the password. At this time, we can delete the relevant configuration files and let the svn plugin prompt us to re-enter the password. However, ec
 How to restore the win8 system details stepsMay 07, 2025 pm 05:00 PM
The steps to start system restore in Windows 8 are: 1. Press the Windows key X to open the shortcut menu; 2. Select "Control Panel", enter "System and Security", and click "System"; 3. Select "System Protection", and click "System Restore"; 4. Enter the administrator password and select the restore point. When selecting the appropriate restore point, it is recommended to select the restore point before the problem occurs, or remember a specific date when the system is running well. During the system restore process, if you encounter "The system restore cannot be completed", you can try another restore point or use the "sfc/scannow" command to repair the system files. After restoring, you need to check the system operation status, reinstall or configure the software, and re-back up the data, and create new restore points regularly.


Hot AI Tools

Undresser.AI Undress
AI-powered app for creating realistic nude photos

AI Clothes Remover
Online AI tool for removing clothes from photos.

Undress AI Tool
Undress images for free

Clothoff.io
AI clothes remover

Video Face Swap
Swap faces in any video effortlessly with our completely free AI face swap tool!

Hot Article
Hot Tools

Safe Exam Browser
Safe Exam Browser is a secure browser environment for taking online exams securely. This software turns any computer into a secure workstation. It controls access to any utility and prevents students from using unauthorized resources.

SublimeText3 Linux new version
SublimeText3 Linux latest version

DVWA
Damn Vulnerable Web App (DVWA) is a PHP/MySQL web application that is very vulnerable. Its main goals are to be an aid for security professionals to test their skills and tools in a legal environment, to help web developers better understand the process of securing web applications, and to help teachers/students teach/learn in a classroom environment Web application security. The goal of DVWA is to practice some of the most common web vulnerabilities through a simple and straightforward interface, with varying degrees of difficulty. Please note that this software

SublimeText3 English version
Recommended: Win version, supports code prompts!

Dreamweaver Mac version
Visual web development tools

