


Introduction: This article will introduce you to the relevant content of Mac clipping font folder settings. I hope it will be helpful to you. Please read on.
Where to modify the font displayed by mac?
In the Display tab, you can find the settings for the default font. Click the drop-down menu next to it and select your preferred font. You can view available fonts by scrolling or clicking on the arrows. Once selected, a preview pane will display the effect.
The modification steps are as follows: First, download the installation package of the required font on another computer. Then copy the installation package to your Macbook. Next, open the font installation package on your Macbook and install it according to the default path. After that, enter the Macbook's input method settings, select the font you just installed, and click Confirm. Finally, exit the settings to complete the font settings.
3. The setting steps are as follows: Open System Preferences. Find Displays in System Preferences and click on it.
First, click the [Apple] icon in the upper left corner, then find and click the [System Preferences] option in the pop-up menu bar. Then, find and click the [Display] icon in the [System Preferences] window that opens.
First turn on the computer, enter the desktop, find the "Launchpad" icon in the program dock, and open it. Then on the page that opens, find the "Other" folder and open it. Next, find and open the "Font Book" icon in the opened folder page.

How to add clipping subtitles to Alibaba Puhui
To open the clipping, first open the clipping application on the mobile phone desktop. Select text Select the text option after importing the video on the main page. Click New Text and then click the New Text button. When you select a font, a list of font styles will appear on the page, including Happy Font, Litchi Style, Variety Style, etc.
First, change the Alibaba Puhui font file back to its original name. Then, replace the original font folder with the renamed font file: ianyingPro, UserData, Resources, Font. Finally, open the clipping application to complete the operation.
Open the clipping app, click to start creating, select the video that needs to be cropped, click Add to enter the creation interface; click [Text], select [New Text], and enter text.
In the clip, you can add subtitles by clicking New Text. When adding subtitles, you can choose different styles and animation effects. Cutting provides 16 different fonts for you to choose from. In addition, the video clip also has an automatic recognition function, and you can convert the sounds in the video into text subtitles.
First open the clip on your phone and click to start creating. Select the video to which you want to add subtitles and click Add. Then click on the text option at the bottom, and then click on New Text. Enter the subtitles you want to add, return to the interface and click the check mark to confirm. Finally, drag the subtitle length button to set the duration for the subtitles to appear.
Start creating Open the clip and enter the main page and click [Start creating]. Add video After selecting the video to be edited, click [Add]. Enter text and click [Text].
The clipping export file, subtitles and video files are saved in different folders
1. You can change the file saving location. The first step is to open the clipping software, then find the settings icon in the upper right corner of the clipping homepage, and click to open the icon. In the second step, after opening the settings icon, we find the "Global Settings" option in the drop-down list and click to open it.
2. Step one: Enter the editing software page and click Export. (As shown in the picture below) Step 2: On the file management page, click Video. (As shown in the picture below) Step 3: Enter the video page and click Camera. (As shown in the picture below) Step 4: After selecting the video, click the icon in the lower right corner and then click details.
3. After entering the PC version of the cutout, click to start creating. After the video editing is completed, click the export button in the upper right corner. Then change the video name and click Browse to select the location to save the video. Set video parameters and click Export. Once the export is complete, click Close to export the video to the selected folder.
4. The clipping folder is in: C:\Users\Administrator\AppData\Local\JianyingPro\. Cutting is a mobile video editing tool with comprehensive editing functions, support for variable speed, various filters and beautification effects, and rich music library resources.
How to import materials from the cloud in Clip Screen?
1. First open Clip Screen, click Start Creation to import the video or photo you want to edit. Please click to enter the picture description. We have taken a cute photo as an example to demonstrate the copy function, and the same is true for video copy. After selecting the material, click OK.
2. How to upload the cutting draft template to the cloud space? First click on the template in the local draft of the clip. In the pop-up interface, then click the "" icon in the template. In the pop-up interface, click Upload in the pop-up box at the bottom of the page.
3. Open the clip and click [Start Creation] in the middle to enter the interface for selecting the video to be edited. After entering, when you click [Material Library], there are many materials to choose from below. After selecting, click [Add] and it will be downloaded soon.
4. Here we take the clipping on the computer as an example. Step 1: Click "Start Creation" to enter the interface below. Step 2: Click "Import Materials". Here you can click "Import Materials" and then select what you want from the folder. The video to be edited; you can also drag the video directly into the yellow box of the icon.
5. First, look at the format. The clip must support an editable format before it can be imported into the clip. Open the editing software. 2. Click the arrow position and a window will pop up. 3. There are two ways to find the video file. Paste and enter the location of your video in position 1.
6. How to add materials to the clipping: Open the "Clip" app and click "Start Creating". First import a video. Click "Picture in Picture" and choose to add a video. Click " " to add materials. Jianying is a mobile video editing application officially launched by Douyin.
How to add Apple’s own fonts to the clipping
The method is as follows: Find the font folder of the installation folder: For example: D:\JianyingPro\Resources\Font. Inside you can see many font files with the suffix .ttf.
Enter the creation interface. On the main screen editing page, select the Start Creation option to enter the creation interface. Select material. Select a picture in the album. Add footage. Select the add option in the lower right corner to add materials. Enter the text interface. Select the text option below to enter the text interface. Create new text.
Start creating Open the clip and enter the main page and click [Start creating]. Add video After selecting the video to be edited, click [Add]. Enter text and click [Text].
How to use your own fonts in clips? Dear, I am happy to answer your question: first open the clips and click "Start Creating"; then select the video and click "Add"; click "Text" to enter; then click Enter "New Text"; then click "Style" to go to settings.
Open the professional version of Cutout and click to start creating. Import the video that needs to be subtitled and drag it to the editing track. Click the text in the menu bar, select smart subtitles, click Start Recognition in Recognize Subtitles, and the voice in the video will be automatically recognized. When the video is played to the voice point, the subtitles will automatically be displayed on the video.
Open the clipping. This is the text content that has been entered. You need to click to select the text track to change the text style. Click "Font" on the right to select the text font you need. Click "Flower Characters" to select your favorite flower character style. You can click "Bubble" to add the underlying pattern of the text.
Where to find the mac font library
First click on the "Little Rocket" button in the dock bar at the bottom. Then open the "Other" folder. After opening it, you can see the "Font Book", which is the font folder. If you want to install the font, just click the " " sign above. Then find the font you want to install.
In the Mac system, the computer font folder is generally under the application folder. The specific path is /Library/Fonts. You can open the application folder in Finder and enter the above path in the address bar. You can find the Fonts folder, which contains the computer fonts folder.
First find the prepared font library. Open the folder: select the font you want to add and execute the copy command. Find the directory where CAD is installed. Find the CAD font library Fonts folder. After opening, execute the paste command to install the CAD font library.
Open the application that needs to use the font (such as Word, Pages, Photoshop, etc.) and you can find the newly installed font in the font list. If you need to install fonts in batches, you can put all font files in a folder, and then drag the folder to "Font Book" to install them.
Copy the decompressed fonts to the FONTS folder in the installation directory.
Conclusion: The above is all the content about the Mac clipping font folder settings introduced by this site. I hope it will be helpful to everyone. If you want to know more about this, remember to bookmark it. Follow this site.
The above is the detailed content of Methods and settings for importing fonts to Mac clipping. For more information, please follow other related articles on the PHP Chinese website!

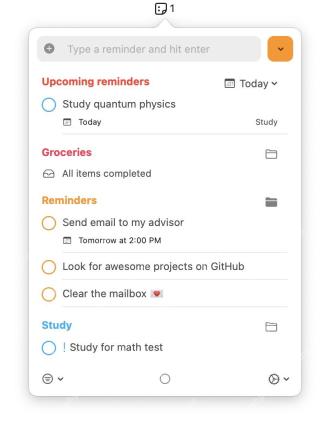 Get Reminders in Your Mac Menu Bar with Reminders MenuBarMay 11, 2025 am 10:37 AM
This handy macOS utility, Reminders MenuBar, puts your Reminders list right in your menu bar for quick access. Free and available on GitHub, it lets you add, complete, and view reminders without opening the Reminders app. The app provides a fully i
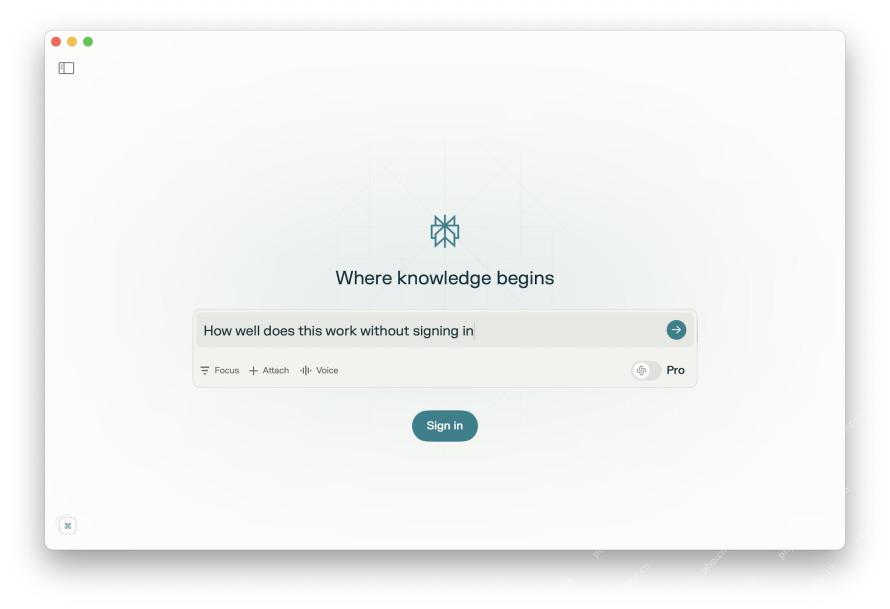 Perplexity AI Brings More Artificial Intelligence Tools to MacMay 11, 2025 am 10:36 AM
Mac users now have another native AI assistant choice—the Perplexity Mac version app. Perplexity provides a free AI-driven answer engine that uses multiple models, including GPT-4o and Claude 3, and best of all, it will cite sources in the answers, making it easier for you to confirm independently or further study the answers. Another advantage of Perplexity Mac is that it only requires macOS Ventura 13 or higher, providing another native AI option for Mac users who have not upgraded to macOS Sequoia (it is worth remembering that you can also use ChatGPT via web pages on almost any operating system,
 How to Install Command Line Tools in macOS Sequoia & SonomaMay 11, 2025 am 10:09 AM
macOS command line tool installation guide: Easily get development tools The Xcode command line tool is an optional component of Xcode that brings a variety of advanced utilities to the Mac command line, including compilers, debuggers, and other necessary tools for software development and command line operations. Even if you are not a developer, you may need to install command line tools on your Mac, as it is also a prerequisite for installing popular package managers and caskes like Homebrew. Whether you have recently installed macOS Sequoia or Sonoma, installing the command line tool is very easy. Installing command line tools in macOS is relatively easy, but if you are not familiar with this process,
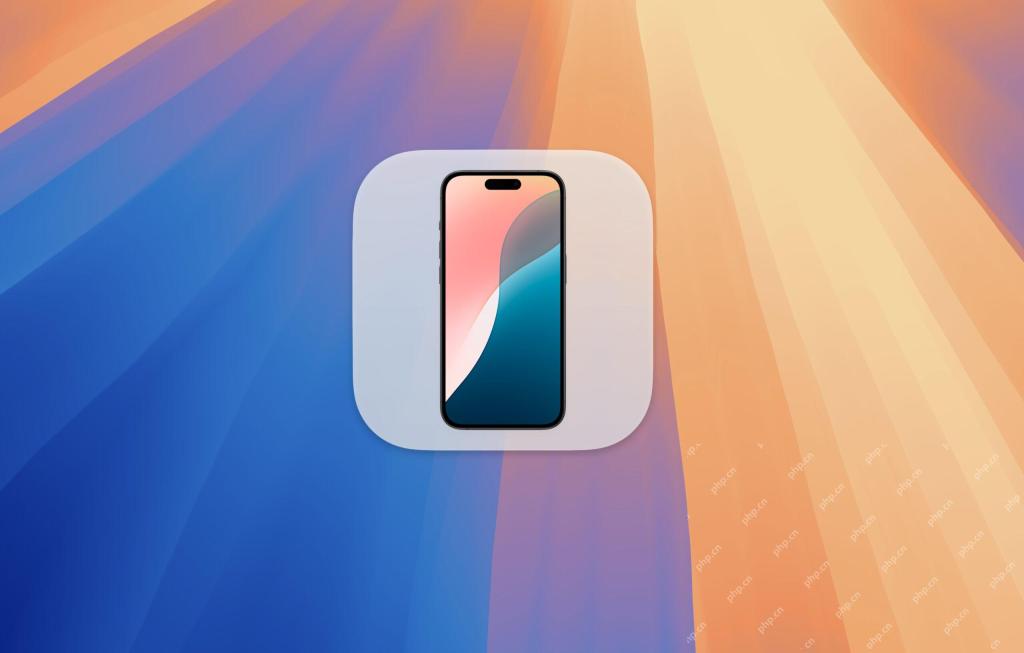 How to Use iPhone Mirroring on MacOS SequoiaMay 11, 2025 am 09:55 AM
The Power of MacOS Sequoia: iPhone Mirror MacOS Sequoia introduces powerful iPhone mirroring, allowing you to control your iPhone using your Mac's cursor and keyboard to make the most of it even if the iPhone is not around you or in your pocket. You can quickly access iPhone apps and devices, interact with iPhone notifications from your Mac, and move and copy files, documents, and photos between iPhone and Mac. This is one of the best features of MacOS Sequoia. If you haven't tried iPhone mirroring yet, now is the perfect time. We'll show you
 How to Update MacOS Sonoma/Ventura Without Installing SequoiaMay 11, 2025 am 09:53 AM
Skip macOS Sequoia: Update Your Mac to the Latest Sonoma or Ventura Software If you're hesitant to upgrade to macOS Sequoia due to compatibility concerns, feature limitations, or simply preferring Sonoma or Ventura, you can still install crucial syst
 How to Re-Enable Slow Motion Effects on MacOSMay 11, 2025 am 09:35 AM
Senior Mac users may remember that previously, by holding down the Shift key, it was possible to slow down the window to minimize and maximize animation speed, as well as other animation effects such as turning on Launchpad or using Mission Control. Some of the cool animations in the early Mac system date back to earlier versions of Mac OS X (some of them were reported as early as 2007!), but in later macOS development, Apple removed the optional slow-mo feature. However, just use some defaults commands and you can re-enable the slow motion effect on macOS, even in the latest macOS Sequoia versions. How to start on macOS
 Fix MacOS Sequoia Network & Wi-Fi Issues with These 6 TipsMay 11, 2025 am 09:30 AM
MacOS Sequoia network problems and solutions Some MacOS Sequoia users encountered various network problems after installing the MacOS Sequoia 15 system software update. These problems include: intermittent connection interruption, inability to connect to the Internet, extremely slow network speed, failed DNS resolution, VPN service failure, third-party firewall problems, system firewall problems, information applications cannot work behind the firewall, third-party security software problems, etc. It should be emphasized that almost every major version of MacOS will have problems affecting some users, which does not mean that MacOS Sequoia has serious flaws. Nevertheless, there may be some specific questions in Sequoia
 Can’t Open Microsoft Office Files in MacOS Sequoia? Fix Microsoft Word, Excel, Office File AssociationsMay 11, 2025 am 09:28 AM
After MacOS Sequoia was updated, some Mac users found that Microsoft Office files (Word documents, Excel tables, PowerPoint presentations, etc.) could not be opened in the expected app or were correctly associated with the corresponding Microsoft Office app. Worse, some users report that when trying to open a Microsoft 365 or Microsoft Office file on your Mac, such as a docx or xls file, you may see a warning message similar to "MacOS cannot verify DocumentName.


Hot AI Tools

Undresser.AI Undress
AI-powered app for creating realistic nude photos

AI Clothes Remover
Online AI tool for removing clothes from photos.

Undress AI Tool
Undress images for free

Clothoff.io
AI clothes remover

Video Face Swap
Swap faces in any video effortlessly with our completely free AI face swap tool!

Hot Article
Hot Tools

SublimeText3 Chinese version
Chinese version, very easy to use

mPDF
mPDF is a PHP library that can generate PDF files from UTF-8 encoded HTML. The original author, Ian Back, wrote mPDF to output PDF files "on the fly" from his website and handle different languages. It is slower than original scripts like HTML2FPDF and produces larger files when using Unicode fonts, but supports CSS styles etc. and has a lot of enhancements. Supports almost all languages, including RTL (Arabic and Hebrew) and CJK (Chinese, Japanese and Korean). Supports nested block-level elements (such as P, DIV),

SecLists
SecLists is the ultimate security tester's companion. It is a collection of various types of lists that are frequently used during security assessments, all in one place. SecLists helps make security testing more efficient and productive by conveniently providing all the lists a security tester might need. List types include usernames, passwords, URLs, fuzzing payloads, sensitive data patterns, web shells, and more. The tester can simply pull this repository onto a new test machine and he will have access to every type of list he needs.

MinGW - Minimalist GNU for Windows
This project is in the process of being migrated to osdn.net/projects/mingw, you can continue to follow us there. MinGW: A native Windows port of the GNU Compiler Collection (GCC), freely distributable import libraries and header files for building native Windows applications; includes extensions to the MSVC runtime to support C99 functionality. All MinGW software can run on 64-bit Windows platforms.

SAP NetWeaver Server Adapter for Eclipse
Integrate Eclipse with SAP NetWeaver application server.

