


This article will introduce you to the method of recovering PS files on Mac. I hope it will be helpful to you. Let’s take a look!
How to recover deleted game files on Mac?
In Mac system, when you delete a file, it will be moved to the Recycle Bin by default instead of permanently deleting it immediately. Therefore, you can first check the Recycle Bin to see if there are files that need to be recovered.
You can fix the Time Machine backup disk connection issue on your Mac device by following these steps: 1. Make sure the Time Machine backup disk of your Mac device is connected and turned on. 2. If the disk is connected to a network, make sure it is on the same network as the Mac device. 3. On your Mac, click the Apple menu and select "Restart." 4. After waiting for the Mac device to restart, check the Time Machine backup disk connection status again. These steps can help resolve Time Machine backup disk connection issues on Mac devices.
If you did not enable Time Machine backup or the deleted files are not in the Recycle Bin, you can try to use data recovery software to get them back. EaseUS Data Recovery Software for Mac is a highly rated tool that can help you recover lost files. You can use this software to scan your hard drive and find files that may have been deleted. You can then choose to restore these files to your computer. This is a convenient and effective way to get back your lost files.
4. Step 4: Press the space bar on your Mac to preview and click Restore if you are satisfied. The files will be restored to your hard drive. This is the easiest way to recover lost files. However, the catch is that you need to activate the feature before deleting files, otherwise the entire process will be useless.
The specific method is as follows: Select all according to the above address, right-click and select Query, enter the URL and click Download. After downloading, double-click the software file and drag the red circle into the corresponding application.
Now you can download this powerful Ma data recovery software and follow the 3 simple steps below to recover deleted files.

psShortcut key to return to the next step
psThe shortcut key to return to the next step is the "duCtrl" key, "Shift" key and "Z" key. At the same time, hold down the "Ctrl" key and the "Z" key on the keyboard to undo the previous operation, that is, undo the deletion of the selection. At this time, the deleted selection will be restored.
In PS, the default Ctrl Z shortcut key is restore, which can only go back one step and cannot return continuously. If you want to set a shortcut key to return one step continuously, you only need to modify the return step.
In PS, the shortcut key for going back one step is Ctrl Z, and the shortcut key for going back and undoing the previous step is Ctrl Shift Z. After opening the PS software on your computer, first create a new document. After creating a new document, you can first draw a rectangular selection box and then fill it with color. If you want to undo the previous operation, just press the Ctrl Z shortcut key to return to the state of the previous operation. This shortcut key can help you quickly roll back the last modification.
The first step to restore shortcut keys in ps is: open the Photoshop software and enter the interface. Click "Edit" in the menu bar. Select "Keyboard Shortcuts" from the edit drop-down menu.
PS shortcut keys can be mainly divided into different categories such as file operations, editing operations, image adjustment operations, layers, selections, filters, views, and commonly used tools.
How to restore and reset photoshop
Open the Photoshop software and hold down the "Ctrl Alt Shift" key on the startup screen. In the pop-up dialog box, select "Yes" to delete the current first Options Settings and Restore Default Settings If prompted to delete all custom presets, select Yes.
Method 1: PS reset basic functions First, we find the Photoshop shortcut key icon on our desktop. Depending on the version of PS, the operation may be different, but most of them support the following recovery operations.
Method 1: Shortcut keys to complete recovery Press SHIFT ALT CTRL Z immediately when starting PS. In the pop-up "Delete PS configuration file?" select "Yes" to restore factory settings. Method 2: Open Selective Recovery Open Photoshop.
You only need to find the restore settings function on the workspace. The specific steps are as follows: Tools/raw materials: Lenovo GeekPro2021, Windows 10, Photoshop CS6 10. Open PS and click Window on the toolbar. In the pop-up menu bar, click Workspace. On the secondary menu bar, click Basic Functions.
Next, the editor will introduce to you how to restore the default settings of photoshopcs6. Method 1: Window in the menu bar in PS--Click Basic Functions---in the workspace on the right, and click [Reset Basic Functions] in the pop-up menu.
The recovery method is as follows: restore the ps ellipse tool to default. Before resetting the toolbar, you first need to select any tool in the toolbar. After selecting a tool in the toolbar, find the icon for the selected tool in the options bar at the top of the screen.
How to repair damaged ps files
You can use [Hi Format Data Recovery Master] to perform data recovery operations. The specific steps are as follows: Download and install professional data recovery software, such as "Hi Format Data Recovery Master". Please note that the location when installing the software and the location of the deleted files cannot be the same to avoid overwriting the lost files.
Open Tencent Computer Manager, then find "File Recovery Tool" and click to open. After entering the recovery tool, click "Recover Deleted Files". Then select the path of the damaged file and click "Recover" on this interface.
How to repair damaged ps files? There is no need to reinstall the system, just reinstall and run cs2 and then enter [chkdsk /f x:] in Start-Run (note, x: is the installation drive letter of your Photshop). If it is on the C drive, you will be prompted to restart the scan, select Y.
Mac’s ps storage is gray
1. First, find the ps software in the computer. After finding the software, double-click the PS software to open it. Next, open the software, create a new blank background in PS, draw a selection in the background, and select this selection.
2. PS: "Save as web format" is always gray because of setting errors. The solution is: first, we find a picture and open it with PS. Find the file in the upper left corner - then select Save for web and the format you want to use. This will enter the web and the page in the format used.
3. The reason why "Save as web format" is always gray: This function cannot be used in multi-channel mode. A color channel has been deleted. Does the machine have the file "Save as Web Format.8be"?
Conclusion: The above is all the content about ps recovery files mac introduced by this site. I hope it will be helpful to everyone. If you want to know more about this, remember to bookmark and follow this site. .
The above is the detailed content of ps restore files mac?. For more information, please follow other related articles on the PHP Chinese website!

 Second Release Candidate of MacOS Sequoia 15.4 Available for TestingApr 30, 2025 am 10:26 AM
Apple has released a second Release Candidate (RC) build of macOS Sequoia 15.4 for its beta testing program. This follows the initial release candidate builds of Sequoia 15.4, iOS 18.4, and iPadOS 18.4, released just days prior. Release Candidates a
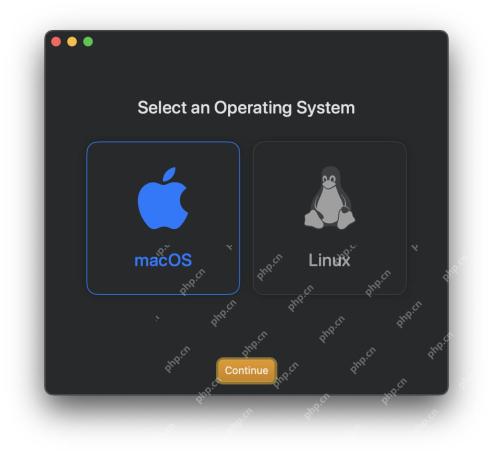 Easily Create MacOS Virtual Machines with VirtualBuddyApr 30, 2025 am 10:14 AM
VirtualBuddy: Easily virtualize macOS and Linux on Apple Silicon Mac VirtualBuddy provides a simple and fast way to virtualize macOS (and Linux) on any Apple Silicon Mac, providing developers, enthusiasts, and curious users with a way to easily run multiple instances of macOS. VirtualBuddy is fast, performs well, and it is free and open source, so you can easily explore the virtual machine world without any commitment, just prepare enough disk storage and bandwidth to set up a macOS or Linux virtual machine. Whether it is testing different versions
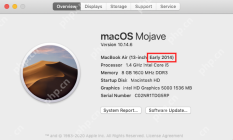 12 Things to Check Before Buying Second-hand MacBookApr 30, 2025 am 10:01 AM
Buying a used Mac on a budget? This guide ensures you avoid a lemon. We'll cover essential checks before you buy, including diagnostics you can perform on the spot. Remember to bring a bootable macOS USB drive and headphones. Step 1: Physical Insp
 How Long Does Updating MacOS Take? Why Is MacOS Update Taking So Long?Apr 30, 2025 am 09:53 AM
How long does it take to update the MacOS system software? Why does it take so long to update? Many Mac users will have this question when they see the software update of the new MacOS system. Both of these questions are very reasonable, and it is important to remember that the answers may vary. However, with modern MacOS, you can make a fairly accurate estimate of the time it takes to install updates to your MacOS system. Let's dive into this topic so you can better understand and prepare to install MacOS updates on your Mac. How long does it take for MacOS updates to be downloaded, installed and completed? MacOS updates can take between 15-20 minutes to several hours to complete, especially if you are considering downloading updates and installing updates to completion
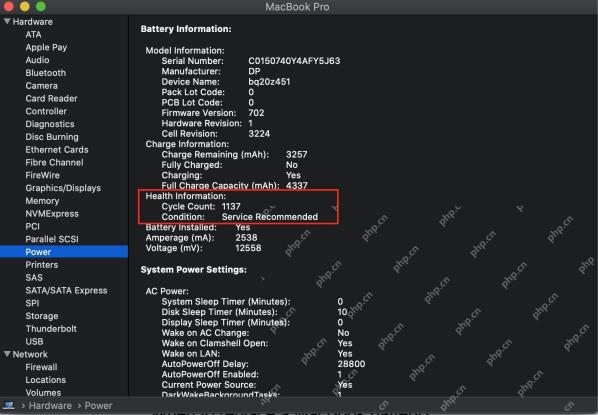 How Long Do MacBook Batteries Last? Here's How You Can Check ItApr 30, 2025 am 09:50 AM
Understanding MacBook Battery Life: Maximizing Your Mac's Power Concerned about your MacBook's battery performance, or planning a purchase? This guide clarifies MacBook battery lifespan and offers tips for extending it. Most Mac batteries endure appr
 Fixing Safari for Mac Error “This webpage was reloaded because a problem occurred”Apr 30, 2025 am 09:45 AM
Although the Safari browser under the Mac system is excellent, it is not perfect. Safari users occasionally encounter situations where the page refreshes and displays an error message "This page has reloaded because of a problem". You may also see variant information like "repeated problems". Since the error message is quite general, you may be wondering the root cause of the error in Safari and how to fix this on your Mac. Causes causing Safari for Mac to have a "This web page reloaded because a problem occurred" error Usually, if there is a memory problem, a website crash, or an incompatible with Safari, a software error, or other similar issues, you will see this error message in Safari on your Mac
 Get Googly Eyes in Your Mac Menu Bar to Follow Your Cursor AroundApr 30, 2025 am 09:42 AM
Nostalgic Mac users may remember an interesting application in the classic Mac OS system: it will place a pair of moving eyes in the Mac menu bar and move with your cursor. While classic Mac OS is long gone, you can still experience this fun on a modern Mac, just use an app called "Googly Eyes". Google Eyes resides in your Mac menu bar, and its pupils will follow your cursor like an older version of the app. When clicking on the mouse/trackpad, the little eyes will blink. Will this revolutionize your computing experience? Probably not. But is it interesting? Absolutely fun! Sometimes, just being fun is enough, right? So, enjoy it, in your Ma
 MacOS Sonoma 14.7.5 & MacOS Ventura 13.7.5 Security Updates ReleasedApr 30, 2025 am 09:40 AM
Apple has released macOS Sonoma 14.7.5 and macOS Ventura 13.7.5 security updates for Mac users running Sonoma and Ventura operating systems. These updates focus on security patches and do not include other new features available in the latest macOS Sequoia 15.4 update (sequoia 15.4 update is released simultaneously). Additionally, you'll find software updates for new and older iPhones and iPads, as well as updates for Apple TV, Apple Watch, and Apple Vision Pro


Hot AI Tools

Undresser.AI Undress
AI-powered app for creating realistic nude photos

AI Clothes Remover
Online AI tool for removing clothes from photos.

Undress AI Tool
Undress images for free

Clothoff.io
AI clothes remover

Video Face Swap
Swap faces in any video effortlessly with our completely free AI face swap tool!

Hot Article
Hot Tools

mPDF
mPDF is a PHP library that can generate PDF files from UTF-8 encoded HTML. The original author, Ian Back, wrote mPDF to output PDF files "on the fly" from his website and handle different languages. It is slower than original scripts like HTML2FPDF and produces larger files when using Unicode fonts, but supports CSS styles etc. and has a lot of enhancements. Supports almost all languages, including RTL (Arabic and Hebrew) and CJK (Chinese, Japanese and Korean). Supports nested block-level elements (such as P, DIV),

PhpStorm Mac version
The latest (2018.2.1) professional PHP integrated development tool

ZendStudio 13.5.1 Mac
Powerful PHP integrated development environment

SublimeText3 Mac version
God-level code editing software (SublimeText3)

DVWA
Damn Vulnerable Web App (DVWA) is a PHP/MySQL web application that is very vulnerable. Its main goals are to be an aid for security professionals to test their skills and tools in a legal environment, to help web developers better understand the process of securing web applications, and to help teachers/students teach/learn in a classroom environment Web application security. The goal of DVWA is to practice some of the most common web vulnerabilities through a simple and straightforward interface, with varying degrees of difficulty. Please note that this software

