 System Tutorial
 Windows Series
 Disable automatic updates in Windows 10: How to permanently shut down
Win10 automatic update is a very convenient but also very annoying function. Although users who turn on the automatic update function do not need to think about updates, users also lose control of their computers and automatically update. This function is still very difficult to turn off. Today, the editor will bring you a detailed tutorial with pictures and text on how to completely disable automatic updates in Win10. Friends who need to turn off the automatic update function in Win10, please come and take a look.
How to permanently turn off automatic updates in win10:
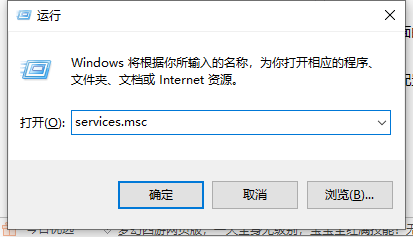
1. Press the "win R" key on the keyboard.

2. Enter services.msc and click "OK".

3. Find the windows update option, double-click "Windows Update", or right-click properties.

4. Select "Disabled" in the startup type selection.

5. Then click "Restore" at the top, select "No Action" for the first failure, and then click "Apply" and "OK".

6. Press the "win R" key on the keyboard, enter gpedit.msc and click "OK".

7. Select "Computer Configuration", "Administrative Templates", "Windows Components" and double-click "Windows Update".

8. Find the "Configure automatic update" option and double-click "Configure automatic update".

9. Select "Disabled", click "Apply" and "OK" to completely turn off Windows system updates.

The above is the detailed content of Disable automatic updates in Windows 10: How to permanently shut down. For more information, please follow other related articles on the PHP Chinese website!
 opporeno5pro怎么关闭自动更新_opporeno5pro关闭自动更新方法Mar 25, 2024 am 11:30 AM
1、在手机设置中点击【软件更新】。2、在软件更新选项页面找到夜间自动更新,将【夜间自动更新】的开关关闭即可。
 小米14怎么关闭自动更新?Mar 18, 2024 pm 05:07 PM
自动更新功能在手机中起着重要作用,它可以确保系统和应用程序保持最新状态。然而,有些用户可能会考虑关闭自动更新功能,以避免浪费流量或导致手机性能下降。如果你想知道如何在小米14手机上关闭自动更新功能,请按照以下步骤操作。关闭小米14手机的自动更新功能:1.打开手机的设置应用程序。2.滚动查找并点击“系统应用”选项。3.选择“安全中心”。4.点击“自动更新”。5.在自动更新页面上,找到“应用自动更新”开关,并将其关闭。通过以上步骤,你可以很容易地在小米14手机上关闭自动更新功能,从而避免不必要的更新
 小米14Pro怎么关闭自动更新?Mar 18, 2024 pm 09:31 PM
国产手机的发展史是真的十分的迅速的,小米手机就是国产手机的代表之一了,很多的小伙伴都成为了米粉,再加上最近小米14Pro的发布,很多的用户都购买了这款手机,大家再使用这款手机的时候有不少的疑问,比如说小米14Pro怎么关闭自动更新呢?小米14Pro怎么关闭自动更新?小米14Pro关闭自动更新方法介绍打开小米14Pro手机【设置】。点击【系统和设备】。在【系统和设备】中,滑动至【关于手机】并点击。在【关于手机】中,找到【MIUI版本】。点击【系统升级自动下载】选项,在弹出的选项中选择【禁止自动下载
 如何关闭win10自动更新的详细图文教程Jul 20, 2023 pm 01:33 PM
笔记本电脑是win10系统的小伙伴应该清楚,win10系统会经常推送系统自动更新,有时候正在忙的却突然弹出系统更新,非常不友好。那么如何关闭win10系统自动更新呢?接下来就由小编来跟大家说说如何关闭win10自动更新的教程,大家快来看看吧。方法一1、同时按下键盘快捷键Win+R打开运行窗口,输入services.msc,然后回车确定。2、接着出现的服务列表找到windowsUpdate,鼠标右击打开属性。3、在启动类型选择“禁用”就可以了。方法二、1、同时按下键盘快捷键Win+R打开运行窗口,
 红米13c怎么关闭自动更新?Mar 19, 2024 am 08:01 AM
随着手机操作系统的不断更新和升级,自动更新功能也逐渐引起了一些用户的不满。对于红米13c手机用户而言,关闭自动更新成为了一项重要的需求。那么,如何关闭红米13c手机的自动更新功能呢?红米13c怎么关闭自动更新?1.打开手机设置,点击我的设备。2.点击MIUI版本。3.点击右上角的三个点。4.点击系统更新设置。5.将自动下载和智能更新后面的开关关闭即可。关闭红米13c手机的自动更新功能可以帮助用户更好地掌控手机的使用体验,避免不必要的麻烦和数据浪费。无论是为了节省流量、保持稳定的系统运行还是出于其
 如何禁用win10的自动系统更新Jan 08, 2024 pm 04:17 PM
我们在使用win10操作系统的时候,有的小伙伴会发现win10会对需要更新的版本进行自动下载更新升级。如果我们不想让系统自动更新可以尝试在设置中的更新和安全中进行相关的设置即可。具体步骤就来看下小编是怎么做的吧~希望可以帮助到你。win10怎么关闭自动系统更新1、首先右键单击“此电脑”,选择“管理”,在“计算机管理”窗口选择“服务和应用程序”。2、然后点击打开“服务-WindowsUpdate”,右击,再选择“属性”选项。3、将“启动类型”后选择“禁用”,点击“确定”,重启电脑之后Windows
 Win10自动更新的完全禁用指南Jan 03, 2024 pm 01:17 PM
2020年,微软停止了win7版本的更新,然而最让人头疼的就是Win10自带的自动更新机制,只要一更新,系统就毛病不断,问题就非常的多,严重影响我们的操作体验。那么如何彻底关闭win10的自动更新,今天小编带来了详细的介绍,具体的一起来看看吧。彻底关闭win10自动更新的方法1、首先鼠标右键单击“此电脑”,选择“管理”,点击“服务”。2、然后在“服务”中找到“WindowsUpdate”,点击“登录”3、最后在“恢复”中设置重置天数,点击“确定”。4、然后退回桌面,按下“win+r”,输入“re
 如何禁用戴尔笔记本的Windows 10自动更新Dec 22, 2023 pm 01:45 PM
win10的系统自动更新是使用win10的用户都很讨厌的功能,有些朋友发现使用戴尔笔记本时可能无法使用网络上的一些关闭教程,因此今天小编就给大家带来了戴尔笔记本关闭win10自动更新的方法,一起来看看吧。戴尔笔记本win10关闭自动更新方法1、首先打开运行框,输入“gpedit.msc”并点击“确定”2、在组策略编辑器中找到“windows更新”3、双击打开图示的文件。4、勾选“已启用”,然后在下方的图示位置随便输入一个网址。5、接着我们来到更新界面就可以看到windows不会自动更新了,需要我


Hot AI Tools

Undresser.AI Undress
AI-powered app for creating realistic nude photos

AI Clothes Remover
Online AI tool for removing clothes from photos.

Undress AI Tool
Undress images for free

Clothoff.io
AI clothes remover

AI Hentai Generator
Generate AI Hentai for free.

Hot Article

Hot Tools

Dreamweaver Mac version
Visual web development tools

Safe Exam Browser
Safe Exam Browser is a secure browser environment for taking online exams securely. This software turns any computer into a secure workstation. It controls access to any utility and prevents students from using unauthorized resources.

Zend Studio 13.0.1
Powerful PHP integrated development environment

SAP NetWeaver Server Adapter for Eclipse
Integrate Eclipse with SAP NetWeaver application server.

SublimeText3 English version
Recommended: Win version, supports code prompts!


