


Maven project packaging steps: 1. Create a Maven project; 2. Add a Java source folder; 3. Add a resource folder; 4. Add the corresponding folder directory; 5. Add the corresponding configurations in different environments. file; 6. Add the packaging environment in the pom.xml file; 7. Set the resource file configuration; 8. Packaging; 9. Confirm the generated package; 10. Deploy and run. Detailed introduction: 1. Create a Maven project. First, use your favorite IDE to create a new Maven project, etc.

The operating system for this tutorial: Windows 10 system, DELL G3 computer.
The packaging steps of the Maven project are as follows:
1. Create a Maven project: First, use your favorite IDE (such as Eclipse, IntelliJ IDEA etc.) Create a new Maven project. In the IDE, there is usually an option for "Maven Project", select it and follow the wizard to complete the project creation.
2. Add the Java source folder: In the project structure, find the src/main/java directory, which is the location where the Java source code is stored. Place your Java source code files in this directory.
3. Add resource folder: In the project structure, find the src/main/resources directory, which is the location where the project resource files are stored. You can place configuration files, pictures and other resources in this directory.
4. Add the corresponding folder directory: Add other folder directories as needed, such as src/main/webapp for Web projects.
5. Add configuration files corresponding to different environments: In the src/main/resources directory, you can create configuration files for different environments, such as local.properties, test.properties and prod .properties, etc., to adapt to different environmental needs.
6. Add the packaging environment in the pom.xml file: Open the project's pom.xml file, which is the core file of the Maven project. In the pom.xml file, you need to add the relevant configuration of the packaging environment. This usually includes specifying packaged plug-ins, setting plug-in parameters, etc. For example, you can add the maven-jar-plugin plugin to package Java projects, or add the maven-war-plugin plugin to package Web projects.
7. Set resource file configuration: In the pom.xml file, you can set the configuration of resource files to ensure that resource files are processed correctly during the packaging process. For example, you can set the path to the resource folder and include/exclude resource files, etc.
8. Packaging: After completing the above steps, you can start packaging the project. In the IDE, you can usually run Maven's packaging command directly. In the command line, enter the root directory of the project, and then enter the following command:
mvn clean install
This command will perform the cleaning and installation operations of the project, and finally generate a packaged file (such as a jar package or a war package ).
9. Confirm the generated package: After the packaging is completed, you can find the generated package file in the target directory of the project. Check whether the generated package file meets expectations, including package name, version number and other information.
10. Deployment and operation: For Web projects, you can deploy the generated war package to the Web server, and then start the server for testing and running. For non-Web projects, you can run the generated jar package directly.
The above are the basic packaging steps of the Maven project. Depending on the specific needs of the project and the environment configuration, other additional configuration and operations may be required. Please ensure that you have correctly installed Maven and configured the relevant environment variables so that you can successfully perform the above steps.
The above is the detailed content of What are the steps for Maven project packaging?. For more information, please follow other related articles on the PHP Chinese website!

 怎么在maven中将springboot打成jar包May 17, 2023 am 08:19 AM
maven的命令:1.mvncleanpackage-DskipTests:在项目目录下运行此命令,在target目录下生成jar包或war包。2.mvnclean:清理项目生产的临时文件,一般是模块下的target目录3.mvncompile-DskipTests:模块安装命令将打包的的jar/war文件复制到你的本地仓库中,供其他模块使用-Dmaven.test.skip=true跳过测试(同时会跳过testcompile).4.mvntest:测试命令,或执行src/test/java/下
 解析Maven本地仓库配置的全面指南Jan 05, 2024 pm 12:40 PM
Maven本地仓库配置详解,需要具体代码示例在使用Maven进行项目构建时,本地仓库的配置是非常重要的一部分。本文将详细介绍如何正确配置Maven本地仓库,并附带代码示例。Maven本地仓库是用于保存项目中所需的依赖库的地方。当Maven构建项目时,它会根据项目中的pom.xml文件中的依赖配置,自动从远程仓库中下载所需的依赖库,并保存在本地仓库中。这样,当
 maven的本地仓库怎么配置Jan 04, 2024 am 11:18 AM
maven配置本地仓库的步骤:1、下载和安装Maven;2、配置环境变量;3、创建本地仓库文件夹;4、配置Maven的settings.xml文件;5、修改本地仓库位置;6、保存并关闭settings.xml文件;7、测试配置。详细介绍:1、下载和安装Maven,需要在计算机上下载和安装Maven,可以从Maven官网下载最新版本的Maven,根据操作系统选择合适的安装包等等。
 maven下载慢怎么办Jan 03, 2024 pm 03:42 PM
maven下载慢的解决办法:1、网络问题;2、代理设置;3、镜像设置;4、清理本地仓库;5、使用Maven的下载管理功能;6、升级Maven版本;7、插件问题;8、清理系统缓存;9、尝试使用其他工具。详细介绍:1、网络问题,检查网络连接是否稳定,如果网络不稳定可能导致下载速度慢,尝试切换到其他网络环境或者使用更稳定的网络连接;2、代理设置,如果网络需要通过代理服务器访问等等。
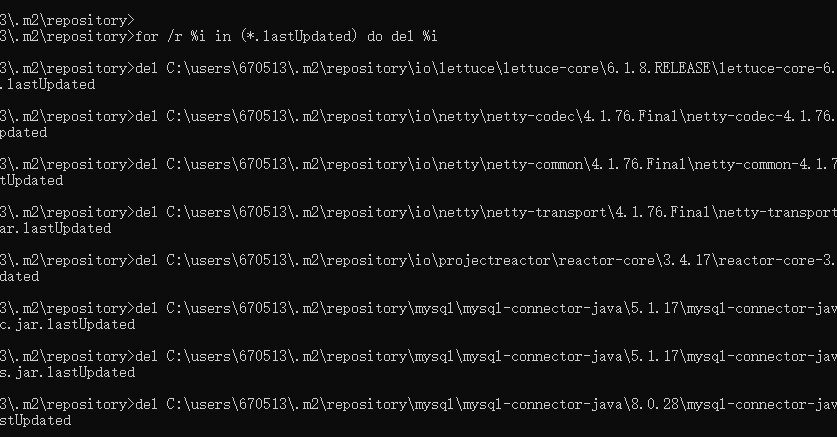 Springboot2.6集成redis maven报错怎么解决May 28, 2023 pm 12:55 PM
Springboot2.6集成redismaven报错org.springframework.bootspring-boot-starter-data-redis当加这个配置后,POM.xml的第一行总是报错:DescriptionResourcePathLocationTypeio.lettuce:lettuce-core:jar:6.1.8.RELEASEfailedtotransferfromhttps://repo.maven.apache.org/maven2duringaprevio
 maven打包插件有哪些Jan 03, 2024 pm 05:18 PM
maven打包插件有:1、maven-jar-plugin;2、maven-assembly-plugin;3、maven-shade-plugin;4、spring-boot-maven-plugin;5、maven-dependency-plugin;6、maven-resources-plugin;7、maven-compiler-plugin等等。
 Java之怎么实现maven打完jar包之后将jar包放到指定位置May 13, 2023 am 11:46 AM
方式一通过maven-jar-plugin指定outputDirectory输出路径可以排除某些配置文件,没有文件夹的话会自动创建!org.apache.maven.pluginsmaven-jar-pluginD:\test**/*.properties**/*.xml**/*.ymlstatic/**templates/**方式二通过maven-resources-plugin指定outputDirectory输出路径org.apache.maven.pluginsmaven-resourc
 Java错误:Maven错误,如何解决和避免Jun 24, 2023 pm 05:33 PM
在Java开发过程中,Maven是一个非常常用的工具。它可以帮助我们管理依赖、构建项目、运行测试等。然而,有时候我们会遇到Maven错误,这会给我们带来一定的麻烦。本文将介绍一些常见的Maven错误及其解决方法,以及如何避免这些错误的发生。一、依赖错误1.缺少依赖缺少依赖是Maven中最常见的错误之一。这通常是由于依赖配置不正确导致的。在使用Maven时,我


Hot AI Tools

Undresser.AI Undress
AI-powered app for creating realistic nude photos

AI Clothes Remover
Online AI tool for removing clothes from photos.

Undress AI Tool
Undress images for free

Clothoff.io
AI clothes remover

AI Hentai Generator
Generate AI Hentai for free.

Hot Article
Hot Tools

Safe Exam Browser
Safe Exam Browser is a secure browser environment for taking online exams securely. This software turns any computer into a secure workstation. It controls access to any utility and prevents students from using unauthorized resources.

PhpStorm Mac version
The latest (2018.2.1) professional PHP integrated development tool

ZendStudio 13.5.1 Mac
Powerful PHP integrated development environment

SublimeText3 Linux new version
SublimeText3 Linux latest version

Notepad++7.3.1
Easy-to-use and free code editor

