Home >Mobile Tutorial >iPhone >Detailed guide to setting reminders on iPhone
Detailed guide to setting reminders on iPhone
- 王林forward
- 2024-01-03 19:25:541046browse
Reminders is a convenient application on the iPhone that allows you to set reminders for important occasions, meetings, and events. This article provides all the information you need to know about using Reminders on your iPhone. Additionally, it includes a guide on how to set reminders on iPhone XS / XS Max / XR / X / 8/8 Plus / 7/7 Plus / 6 / 6S / 6 Plus / 6S Plus / 5S / SE.
- 1 part. How to set reminders on iPhone?
- part 2. How to set deadline reminders on iPhone?
- Part 3. How to set a recurring reminder due date reminder on iPhone?
- Part 4. How to add location-based alerts in Reminders iPhone?
- Part 5. How to pop up reminder in notification iPhone?
- Bonus Tip: How to Recover Deleted Reminders on iPhone?
part 1. How to set reminders on iPhone?
To set a reminder on your iPhone, follow the steps below.
First, we need to find and tap the Reminders app from the home screen. This application will usually appear as an icon with an alert symbol on it. Once we click on this icon, the Reminders app launches and displays the reminder we created earlier.
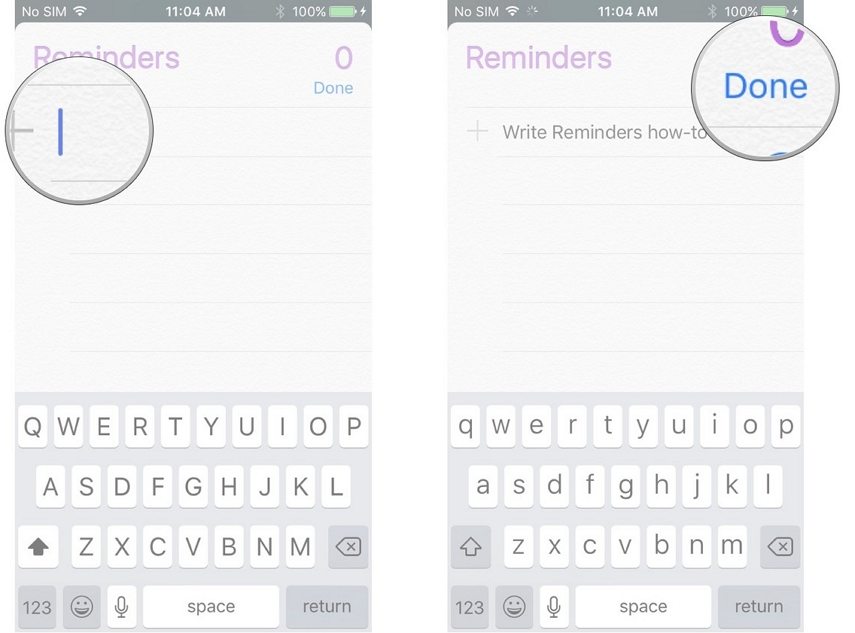
Step 2: Select the list to which you want to add a reminder or create a new reminder. (To create a new one, tap down on the " " icon > List, then name it.)
The third step is to tap the Add Reminder icon to show the keyboard. The reminder icon is a plus ( ) symbol.
Step 4: Enter the reminder and click Done to end.
part 2. How to set deadline reminders on iPhone?
To set a deadline, follow the steps below.
First, we need to find and tap the Reminders app from the home screen. This application will usually appear as an icon with an alert symbol on it. Once we click on this icon, the Reminders app launches and displays the reminder we created earlier.
Step 2: Select the list for which you want due date reminders.
Step 3: Select an existing reminder by clicking on it.
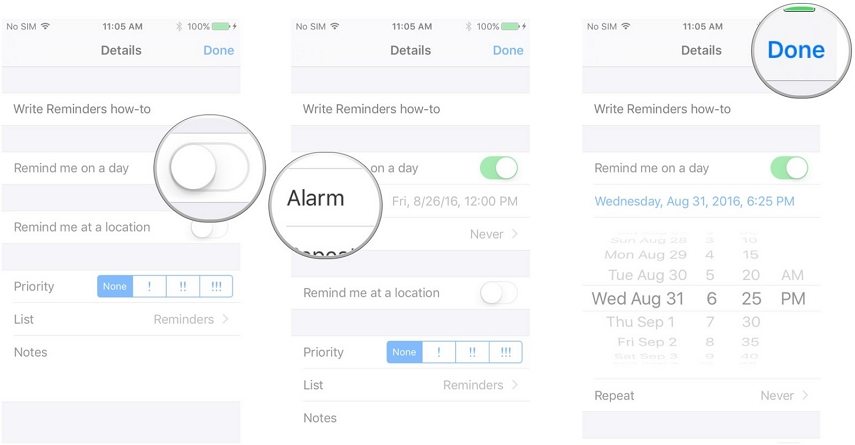
Step 4: Click the information icon, which is "I" inside a circle, located in the upper right corner of the screen.
Step 5: Set or change the date and time of the alarm b Tap Alarm. Do this by sliding the picker up and down.
Step 6: Click the Finish button to complete the entire process.
Part 3. How to set a recurring reminder due date reminder on iPhone?
Follow these steps to set recurring reminders and deadline reminders on iPhone: 1. Open the Settings app, usually on the Home screen. 2. Scroll and tap the Reminders option. 3. On the Reminders page, click the Add Reminder button (usually a plus icon). 4. Enter a title for the reminder you want to set, and add other details if needed. 5. Scroll and tap on the "Repeat" option. 6. Select the recurrence frequency you want to set, such as "Daily", "Weekly", "Monthly", etc. 7. If you need to further customize the recurring reminder, click the "Customize" option and set it according to your needs. 8. Scroll and click on the Warning option. 9. On the Alerts page, select when you want to be alerted. You can choose to receive reminders minutes, hours, or days before the deadline. 10. Click the "Done" button in the upper right corner to save the settings. Now, you have successfully set up recurring reminders and deadline reminders on your iPhone. You will be reminded before each recurrence and due date based on your settings. This will help you better manage your schedule and important tasks.
The first step is to open the Reminders app.
Step 2: Select the list to which you want to add a reminder by clicking on it.
Step 3: Select the reminder to add a reminder or create a reminder. Then tap the information icon, which is "I" inside a circle, located in the upper right corner of the screen.
The fourth step is to click Repeat. When you click Repeat, a list of alert options pops up, including Daily, Weekly, Monthly, and Yearly. If you want to customize the recurrence, you can click the "Customize" button and then select "Remind me one day" to set the date and time. This way you can set the frequency of recurring reminders according to your needs.
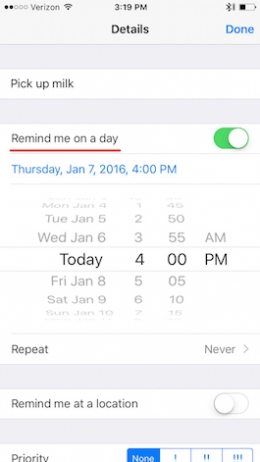
Step 5: Click the "Finish" button to complete the entire process.
Part 4. How to add location-based alerts in Reminders iPhone?
To add location-based alerts in Reminders, follow the steps below.
Step 1: Start the reminder.
Step 2: Select the list to which you want to add location-based alerts.
Step 3: Select the list you want to add a reminder to by clicking on it and then select the reminder you want to add a reminder or create a reminder. Then tap the information icon, which is "I" inside a circle, located in the upper right corner of the screen.
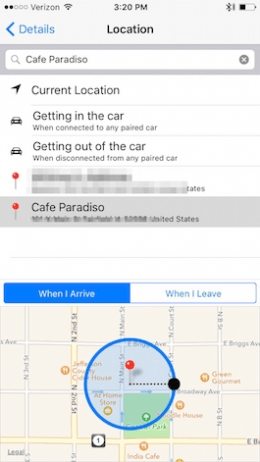
Step 4: Click on a location to remind me, then select the location in the location options.
Step 5: To be able to access your location while using the app, tap "Allow" to grant "Reminder App" permission. If you don't want to grant permission, click "Don't allow."
Step 6: Display a map of the desired location; tap the search bar to search for a location; select When I Arrive or When I Leave to choose when to get alerts. Set the range by sliding the black dot.
Step 7: Click Back and then Done to save the reminder.
Part 5. How to pop up reminder in notification iPhone?
To get reminders that pop up in notifications, follow these steps.
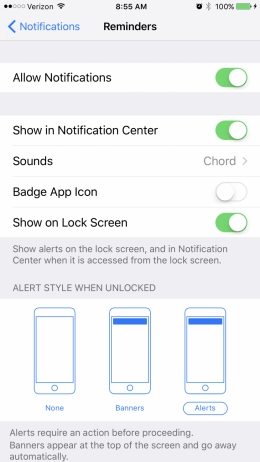
The first step is to open the Settings app and tap Notifications.
Step 2: Tap Reminder.
Step 3: Choose where you want the reminder notification to appear: Badge app icon, Lock screen, or Notification Center.
Bonus Tip: How to Recover Deleted Reminders on iPhone?
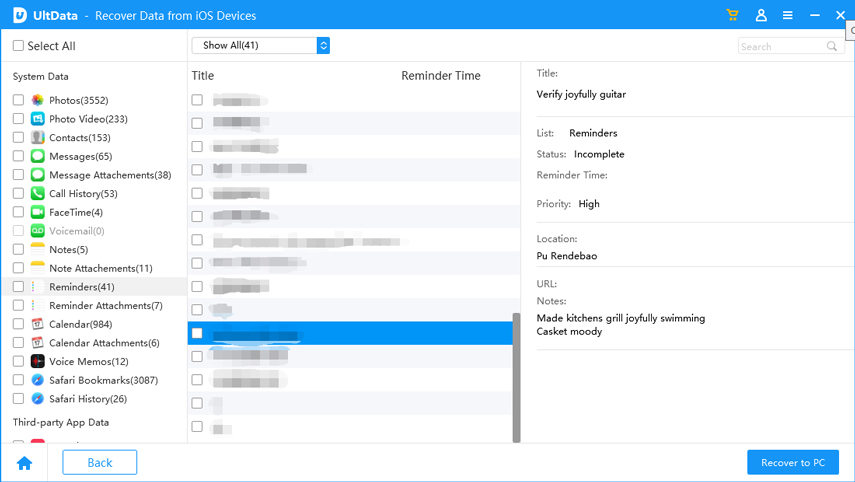
We strongly recommend you to use Tenorshare UltData to recover deleted reminders. This is a very convenient tool that helps you preview and selectively recover deleted reminders. Whether you have iCloud and iTunes backup or not, it can help you restore. Here are the steps to recover deleted reminders on iPhone using Tenorshare UltData: 1. First, download and install Tenorshare UltData software to your computer. 2. Connect your iPhone to the computer and launch Tenorshare UltData software. 3. On the software interface, you will see multiple recovery options. Select the "Restore Reminders" option. 4. Tenorshare UltData will start scanning your iPhone for deleted reminders. Please wait a moment until the scan is completed. 5. After the scan is completed, the software will list all deleted reminders. You can preview them and restore them selectively. 6. Select the reminder you want to restore and click the "Restore" button. 7. Tenorshare UltData will start restoring the selected reminders. Please wait patiently for the recovery process to complete. 8. After the recovery is completed, you will see a recovery reminder on the software interface. You can view them on your iPhone. With Tenorshare UltData, you can easily recover deleted reminders whether you have a backup or not. Hope this step helps you! If you have any further questions, please feel free to ask us.
Free Download for Win 10/8.1/8/7/XP Safe Download Free Download for macOS 10.13 and lower versions Safe DownloadFirst, we need to download, install and run the Tenorshare UltData software on the computer. Then, connect your iPhone to your computer via USB cable. If the option to recover from iPhone is not selected by default in the software, we need to click on that option.
Step 2: Click Start Scan and select Reminders and any other data you want to recover.
Step 3: Click the "Restore" button to restore the reminder function.
Conclusion
Want to know how reminders work on iPhone? This article details everything you need to know. If you delete or accidentally lose any reminders, we highly recommend you to use Tenorshare UltData.
The above is the detailed content of Detailed guide to setting reminders on iPhone. For more information, please follow other related articles on the PHP Chinese website!
Related articles
See more- How to remove the red dot prompt, that is, the unread message mark, in the Messages app in iOS 16?
- A non-destructive way to quickly import iPhone photos to your computer!
- How to self-check whether there are problems with the new iPhone 13/14 and how to avoid buying refurbished devices.
- Weiyun mac version download and function introduction
- How to solve the problem that Safari cannot be found in private browsing mode and cannot clear history in iOS 16?

