
Home >System Tutorial >LINUX >Four decryption methods for MySQL backup and recovery
Four decryption methods for MySQL backup and recovery

- WBOYWBOYWBOYWBOYWBOYWBOYWBOYWBOYWBOYWBOYWBOYWBOYWBforward
- 2024-01-02 15:12:401004browse
Backup is above all else. Today we will summarize several commonly used backup methods and recovery steps.
1. mysqldumpIn daily work, we will use the mysqldump command to create a dump file in SQL format to back up the database. Or we can export the data and perform operations such as data migration and active/standby setup. mysqldump is a logical backup tool that copies original database object definitions and table data to produce a set of executable SQL statements. By default, insert statements are generated, and output with other delimiters or files in XML format can also be generated.
shell> mysqldump [arguments] > file_name
Let’s take a brief look at the daily usage:
Back up all databases:
shell> mysqldump –all-databases > dump.sql (不包含INFORMATION_SCHEMA,performance_schema,sys,如果想要导出的话还要结合–skip-lock-tables和–database一起用)
Back up the specified database:
shell> mysqldump –databases db1 db2 db3 > dump.sql
When we only back up one data, we can omit –databases and write it directly: mysqldump test > dump.sql However, there are some subtle differences. If not added, the database dump output will not include the create database and use statements. Therefore, you can directly import it into a database with another name without adding this parameter.
Of course we can also back up only a certain table:
mysqldump –user [username] –password=[password] [database name] [table “” not found /]<br>
 table_name.sql
After understanding some simple usages, let’s focus on a few parameters:
- master-data Obtains the Binlog location and Binlog file name of the backup data, which is used to establish a replication relationship between instances restored through backup. This parameter is enabled by default.
- dump-slave is used to dump data on the slave and create a new slave. Because we will lock the table when using mysqldump, in most cases, our export operations will generally be done on the read-only standby database. In order to obtain the Relay_Master_Log_File and Exec_Master_Log_Pos of the main database, this parameter needs to be used, but this parameter is only available on Only after 5.7 will there be
- no-data, -d does not export any data, only exports the database table structure
We just said that the table will be locked when using mysqldump. Let's take a detailed look at its locking mechanism.
We open two windows, execute mysqldump -uroot -pxxxxx –master-data=2 –databases dbname > /tmp/dbnamedate %F.sql in the first window, and then log in in the second window and use show process The command can see that the current dump session is being executed.
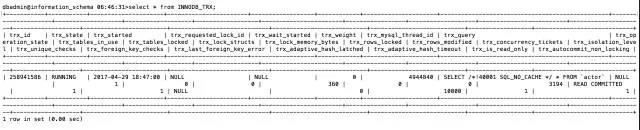
SELECT /!40001 SQL_NO_CACHE / * FROM table_name; You can see that this SQL is querying data in no_cache mode.
Then we executed select on the same table and found that it was blocked. The cursor never returns.

Generally when encountering this kind of file, we will wonder if there is a lock? To verify, let's check the lock information and find that the dump process is actually locked.

Generally when encountering this kind of file, we will wonder if there is a lock? To verify, let's check the lock information and find that the dump process is actually locked.

Let’s open the specific general_log and take a look at the operations at that time:
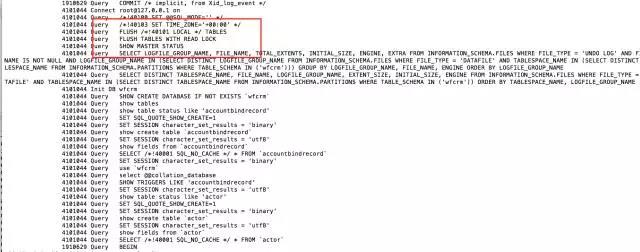
4101044 Query FLUSH /!40101 LOCAL / TABLES

4101044 Query FLUSH TABLES WITH READ LOCK
(Close all open tables, and add a read lock to all tables in the database until unlock tables is explicitly executed. This operation is often used for data backup.)
4101044 Query SHOW MASTER STATUS
(This is because I used –master-data=2)
So the table will be locked at this time.
If I do not add the –master-data parameter (mysqldump -uroot -pxx –databases db > /tmp/dbnamedate %F.sql) mysql will display LOCK TABLES table_name1 READ for each table to be backed up, LOCK TABLES table_name2 READ, and there will be no reading blocking.
Is there a way to avoid locking? In fact, there is. It is to use –single-transaction to put the backup operation in a transaction.
Mysqldump backup process with –single-transaction parameter:
If it is version 5.6 of MySQL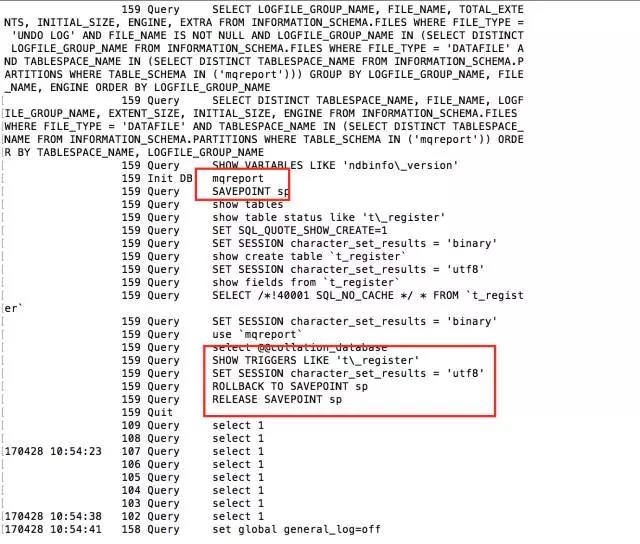
Between backups, first FLUSH TABLES WITH READ LOCK, then set the transaction level SET SESSION TRANSACTION ISOLATION LEVEL REPEATABLE READ, and then start a transaction START TRANSACTION for backup. At this time, the backup process is very interesting. It is created first. A savepoint, and then back up the tables in the database in sequence. After the backup is completed, it is rolled back to the previous savepoint to ensure data consistency.
如果是5.7版本的MySQL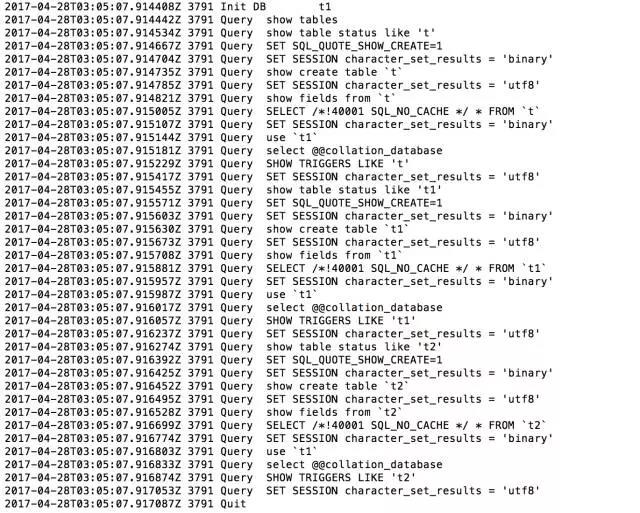
备份前的操作相同,只是没有了savepoint。
不过不管是哪个版本,只有InnoDB表是在一个一致性的状态。其它的任何MyISAM表或内存表是没有用的。 mysqldump的优势是可以查看或者编辑十分方便,它也可以灵活性的恢复之前的数据。它也不关心底层的存储引擎,既适用于支持事务的,也适用于不支持事务的表。不过它不能作为一个快速备份大量的数据或可伸缩的解决方案。如果数据库过大,即使备份步骤需要的时间不算太久,但有可能恢复数据的速度也会非常慢,因为它涉及的SQL语句插入磁盘I/O,创建索引等等。 对于大规模的备份和恢复,更合适的做法是物理备份,复制其原始格式的数据文件,可以快速恢复:如果你的表主要是InnoDB表,或者如果你有一个InnoDB和MyISAM表,可以考虑使用MySQL的mysqlbackup命令备份。
恢复操作:先看一下当前的数据:
dbadmin@test 11:10:34>select * from t;
+——-+
|  id  |
+——-+
|  1  |
+——-+
1 row in set (0.00 sec)
备份;
mysqldump -uroot -proot@1234 –master-data=1 test >test.sql
模拟增量操作
dbadmin@test 11:15:17>insert into t values (2);

Query OK, 1 row affected (0.00 sec)

dbadmin@test 11:15:36>select * from t; +——+ | id | +——+ | 1 | | 2 | +——+ 2 rows in set (0.00 sec)
模拟误操作:
dbadmin@test 11:15:41>truncate table t;

Query OK, 0 rows affected (0.01 sec)

dbadmin@test 11:16:14>select * from t;

Empty set (0.00 sec)
模拟恢复操作:
step 1:找到误操作的log position
dbadmin@test 11:20:57>show master logs;

dbadmin@(none) 11:21:37>show binlog events in ‘mysql-bin.000004’;
查看可以看到是444。
step 2:恢复到备份
dbadmin@test 11:16:25>source test.sql
dbadmin@test 11:17:26>select from t;
+——-+
|  id  |
+——-+
|  1  |
+——-+
1 row in set (0.00 sec)
step 3: 因为我们在备份的时候使用了master-data的参数,所以可以直接看到备份时候的最后位置,然后应用中间的log。查看可以看到是187。
我们使用mysqlbinlog得到这一段时间的操作,其实我们也可以用这个工具得到操作后使用sed进行undo的操作。
mysqlbinlog –start-position=187 –stop-position=444 mysql-bin.000004 > increment.sql

dbadmin@test 11:44:37>source /u01/my3307/log/increment.sql dbadmin@test 11:44:50>select from t; +——+ | id | +——+ | 1 | | 2 | +——+
至此数据恢复。
二、mysqlbackupmysqlbackup是Oracle公司提供的针对企业的备份软件,全名叫做MySQL Enterprise Backup,是一个收费的软件。
我们简单来看一下这个工具的使用。
查看所有的帮助:
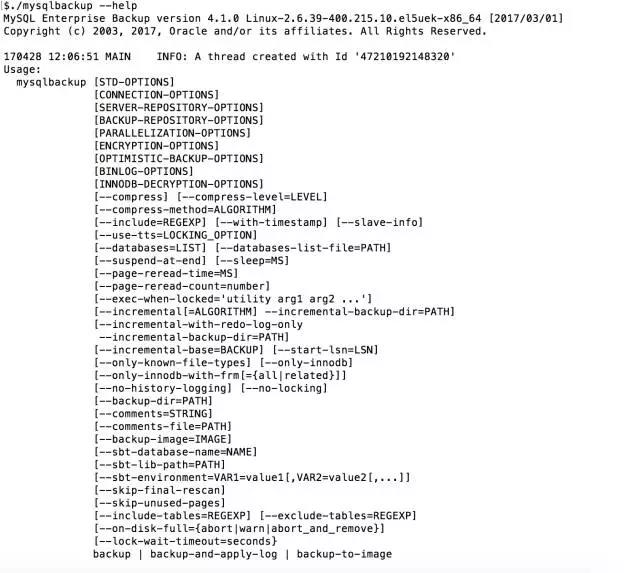
我这里只是截取了一小部分,这个帮助很长,参数很多,功能很全,是oracle官方主推的备份方式。
全量备份
mysqlbackup –user=root –password=ucjmh –databases=’t1′ –encrypt-password=1 –with-timestamp –backup-dir=/u01/backup/ backup
解释一下参数:
- databases 要备份的数据库
- with-timestamp 产生一个当前时间的备份目录。mysqlbackup这个工具要求一个空目录才能做备份。所以这个会常用。
- backup-dir 备份的目录 。
- compress:压缩备份 这个提供了多种压缩方法和压缩级别。1–9,压缩比依次递增。
backup 是备份的方式, 一共有如下几种方式,我会在一个恢复案例里把常用的几个都用到。
Backup operations: backup, backup-and-apply-log, backup-to-image

Update operations: apply-log, apply-incremental-backup

Restore operations: copy-back, copy-back-and-apply-log

Validation operation: validate

Single-file backup operations: image-to-backup-dir, backup-dir-to-image, list-image, extract
其实,在大多数情况下,单个文件备份,使用backup-to-image命令创建,性能优于backup。buckup这个命令只执行一个完整的备份过程的初始阶段。需要通过再次运行mysqlbackup运用apply-log 命令,使备份一致。
mysqlbackup –user=root –password=ucjmh –databases=’t1′ –encrypt-password=1 –with-timestamp –backup-dir=/u01/backup/2017-04-28_12-49-35/ apply-log
当然你可以直接用backup-and-apply-log 不过这个时候的备份将不能用于增量了。
增量备份:
mysqlbackup –user=root –password=ucjmh –databases=’t1′ –encrypt-password=1 –with-timestamp –backup-dir=/u01/backup/ –incremental –incremental-base=dir:/u01/backup/2017-04-28_12-49-35 –incremental-backup-dir=/u01/backup/incremental backup
这个是基于上次的备份做的备份,当然也可以基于某一个log position之后做。
–incremental:代表增量备份;
–incremental-base:上次全备的目录;
–incremental-backup-dir:增量备份的保存的目录
大致梳理一下操作步骤,来了解一下恢复的原理:首先检测并应用全备事务日志文件(这里是因为我备份的时候用的是backup而不是backup-and-apply-log),然后基于全备去应用增量的log。这个时候如果有多次增量备份也可以(基于LSN点向后应用)。 所有的都应用完成之后就是一个可以直接cp的数据库了。
个人感觉这个工具比xtrabackup好用,但是xtrabackup是开源的,所以市场占有量才会大,才会更有名,更多人用吧。
三、mysqlhotcopymysqlhotcopy使用lock tables、flush tables和cp或scp来快速备份数据库.它是备份数据库或单个表最快的途径,完全属于物理备份,但只能用于备份MyISAM存储引擎和ARCHIVE引擎,并且是一个服务器命令,只能运行在数据库目录所在的机器上.与mysqldump备份不同,mysqldump属于逻辑备份,备份时是执行的sql语句.使用mysqlhotcopy命令前需要要安装相应的软件依赖包. 因为这个功能很弱,我们只简单的介绍一个怎么用:
备份一个库
mysqlhotcopy db_name [/path/to/new_directory]
备份一张表
mysqlhotcopy db_name./table_name/ /path/to/new_directory
更详细的使用可以使用perldoc mysqlhotcopy查看。
四、xtrabackup/innobackupexPercona XtraBackup是一款基于MySQL的热备份的开源实用程序,它可以备份5.1到5.7版本上InnoDB,XtraDB,MyISAM存储引擎的表, Xtrabackup有两个主要的工具:xtrabackup、innobackupex 。
(1)xtrabackup只能备份InnoDB和XtraDB两种数据表,而不能备份MyISAM数据表
(2)innobackupex则封装了xtrabackup,是一个脚本封装,所以能同时备份处理innodb和myisam,但在处理myisam时需要加一个读锁。
首先我们先来简单的了解一下xtrabackup是怎么工作的。xtrabackup基于innodb的crash-recovery(实例恢复)功能,先copy innodb的物理文件(这个时候数据的一致性是无法满足的),然后进行基于redo log进行恢复,达到数据的一致性。
我们还是简单来看一下日常工作中具体的使用:
全备:
xtrabackup –backup –target-dir=/data/backup/base
可以先看到
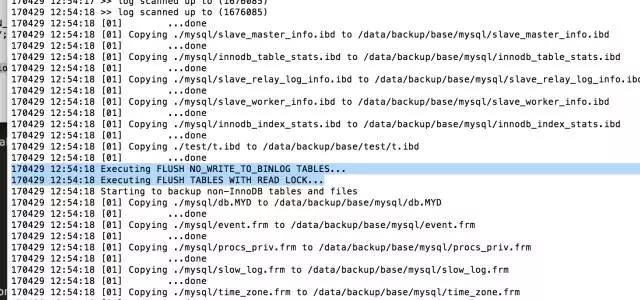
在备份过程中,可以看到很多输出显示数据文件被复制,以及日志文件线程反复扫描日志文件和复制。
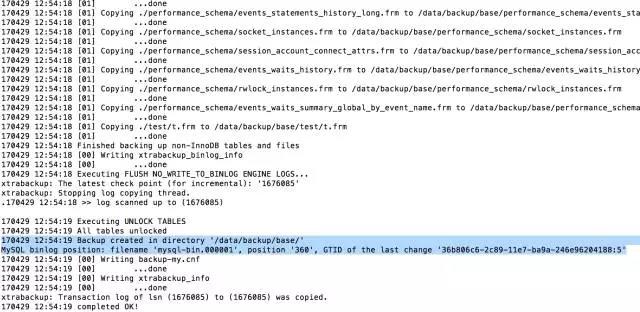
同样的,它也输出了当前的binlog filename和position,如果有gtid(同样也会输出) 可以用于搭建主从。最后一行一定会是你的lsn被copy的信息。 这是因为每次启动备份,都会记录170429 12:54:10 >> log scanned up to (1676085)),然后开始拷贝文件,一般来讲数据库越大拷贝文件是要花费越长的时间,所以说这期间一般情况都会有新的操作,所以说所有文件也可能记录的并不是一个时间点的数据, 为了解决数据这个问题,XtraBackup 就会启动一个后台进程来每秒1次的观测mysql的事务日志,直到备份结束。而且把事务日志中的改变记录下来。我们知道事物日志是会重用的(redo log),所以这个进程会把redolog写到自己的日志文件xtrabackup_log,这个后台监控进程会记录所有的事务日志的改变,用于保证数据一致性所。
增量备份:
当我们做过全量备份以后会在目录下产生xtrabackup_checkpoints的文件 这里面记录了lsn和备份方式,我们可以基于这次的全量做增量的备份。
$cat xtrabackup_checkpoints
backup_type = full-backuped
from_lsn = 0
to_lsn = 1676085
last_lsn = 1676085
compact = 0
recover_binlog_info = 0
xtrabackup –backup –target-dir=/data/backup/inc1 –incremental-basedir=/data/backup/base
这个时候xtrabackup也是去打开了xtrabackup_checkpoints文件进行上一次备份的信息查看。这个时候去查看增量备份的xtrabackup_checkpoints也记录了这些信息。
$cat xtrabackup_checkpoints backup_type = incremental from_lsn = 1676085 to_lsn = 1676085 last_lsn = 1676085 compact = 0 recover_binlog_info = 0
这也意味着你可以在增量的备份上继续增量的备份。
同样的,xtrabackup也支持压缩(–compress)、加密(–encrypt)、并行(–parallel)等操作,但是和mysqlbackup不同的是这个没有同时的备份binlog,而mysqlbackup是备份了binlog的。
我们来模拟一个恢复的过程深入的了解一下原理。
查看当前数据:
dbadmin@test 03:04:33>select from t;
+——-+
|  id  |
+——-+
|  1  |
+——-+
1 row in set (0.00 sec)
全量备份
$xtrabackup –backup –target-dir=/data/backup/base
模拟增量数据
dbadmin@test 03:07:16>select from t;
+——-+
|  id  |
+——-+
|  1  |
|  2  |
+——-+
2 rows in set (0.00 sec)
进行增量备份:
$xtrabackup –backup –target-dir=/data/backup/inc1 –incremental-basedir=/data/backup/base
模拟无备份操作:
dbadmin@test 03:09:42>select * from t;
+——-+
|  id  |
+——-+
|  1  |
|  2  |
|  3  |
+——-+
3 rows in set (0.00 sec)

模拟误操作:
dbadmin@test 03:09:45>truncate table t; Query OK, 0 rows affected (0.00 sec)
模拟恢复操作:
step 1:找到误操作的log position
dbadmin@test 03:10:19>show master logs;

dbadmin@test 03:10:47>show binlog events in ‘mysql-bin.000001’;

1333
我们需要分别对全量、增量备份各做一次prepare操作。
增量
如果我们使用它自带的还原命令的时候就要先把data目录给清空。不然就会报如下的错误
$innobackupex –copy-back /data/backup/base/

170429 15:37:19 innobackupex: Starting the copy-back operation

IMPORTANT: Please check that the copy-back run completes successfully.

At the end of a successful copy-back run innobackupex prints “completed OK!”.

innobackupex version 2.4.6 based on MySQL server 5.7.13 Linux (x86_64) (revision id: 8ec05b7) Original data directory /u01/my3307/data is not empty!
当然我们大多数据时候是不会在原来的实例上做操作的,都会把相应的备份在奇他的实例上进行恢复,然后再导出导入到误操作的实例。这里我们直接清掉目录,然后再次运行,查看恢复后的数据:
dbadmin@test 03:41:56>select * from t;
+——-+
|  id  |
+——-+
|  1  |
|  2  |
+——-+
2 rows in set (0.00 sec)
同样的被恢复的目录里会多出来两个文件,一个是xtrabackup_binlog_pos_innodb,一个是xtrabackup_info。在这两个文件中都可以看到你最后的log,pos。在info里还可以看到lsn。我们基于这个pos再进行binlog的重演,恢复在binlog没有被备份的数据。
1076
$mysqlbinlog mysql-bin.000001 –start-position=1076 –stop-position=1333 -vv >increment.sql
dbadmin@test 03:51:25>source /u01/my3307/log/increment.sql dbadmin@test 03:51:34>select * from t;
+——-+
|  id  |
+——-+
|  1  |
|  2  |
|  3  |
+——-+
3 rows in set (0.00 sec)
至此数据恢复完成。
五、直接复制整个数据库目录MySQL还有一种非常简单的备份方法,就是将MySQL中的数据库文件直接复制出来。这是最简单,速度最快的方法。 不过在此之前,要先将服务器停止,这样才可以保证在复制期间数据库的数据不会发生变化。如果在复制数据库的过程中还有数据写入,就会造成数据不一致。这种情况在开发环境可以,但是在生产环境中很难允许备份服务器。
注意:这种方法不适用于InnoDB存储引擎的表,而对于MyISAM存储引擎的表很方便。同时,还原时MySQL的版本最好相同。 只所以提这一点是因为当有停机窗口时,搭建主从的时候,这个往往是最快的。
一般生产环境的备份都会用percona-xtrabackup或者mysqlbackup,结合自己的情况,选择合适的备份策略,适时拿出来验证备份的有效性。
The above is the detailed content of Four decryption methods for MySQL backup and recovery. For more information, please follow other related articles on the PHP Chinese website!