I want to install fonts in deepin20, how to install it? Below we will introduce four methods.

method one:
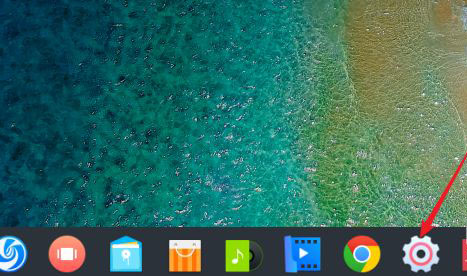
Click [Launcher] on the taskbar.

Search for Font Manager in [Launcher] and run it.

Open [Font Manager] and click the drop-down menu button in the upper right corner.

Click [Add font] in the drop-down menu.

After that, select the font file to be added in the pop-up window. Pay attention to the types of font files that can be used.

Wait a moment and the font will be installed successfully.
Method Two:
Double-click the font file to be installed in Deepin, and the font preview and installation interface will appear. Double-click "Install Font" to install it.
Method 3:
You can also copy the font files to the directory /usr/share/fonts and execute it in the terminal:
sudo nautilus /usr/share/fonts
Operation in the pop-up file manager.
Method 4:
Install Wenquanyi font directly in the terminal;
sudo apt-get install xfonts-wqy
The above is the detailed content of Learn how to add new fonts on deepin20. For more information, please follow other related articles on the PHP Chinese website!
 deepin任务栏不显示怎么办deepin任务栏消失不见的解决办法Feb 29, 2024 am 11:01 AM
我们在电脑系统更新的时候,一些电脑小白就迫不及待的去安装使用新的系统,殊不知新的电脑系统往往存在着诸多bug。例如新系统deepin系统,许多小伙伴在下载使用的过程中发现,任务栏不见了!那么我们要怎么找出任务栏呢?下面小编就带着大家一起看一下吧!方法一:1、关闭云同步中的任务栏同步。2、删除rm~/.config/dconf或rm~/.config/dconf-rf文件夹。3、重启即可解决。方法二:1、按下“ctrl+alt+t”进入终端。2、随后输入命令:sudoapt-getu
 deepin系统怎么设置屏幕分辨率? deepin分辨率的设置方法Jan 06, 2024 pm 09:30 PM
deepin中设置分辨率是很常见的说会用,该怎么设置呢?下面我们就来看看详细的教程。方法一、图形下设置1、点击任务栏上的“控制中心”。2、在控制中心中选择“显示”。3、在显示中,点击“分辨率”。4、在弹出的窗口可以看到当前系统支持的分辨率,选择相应的分辨率进行设置即可。方法二、命令设置法1、可以通过xrandr命令来设置屏幕分辨率。先查询当前分辨率,及当前支持的分辨率。xrandr-q当前分辨率为1680x10502、可以通过-s参数
 深度 deepin 操作系统 20.9今日发布: Qt 版本升级至 5.15.8Feb 29, 2024 am 09:55 AM
深度操作系统(deepin)是一款Linux发行版,来自中国团队研发。深度deepin操作系统20.9已正式发布。deepin20.9版本的核心目标是:为用户提供稳定的系统运行版本。该版本未对系统新增功能进行集成,主要对20.8版本系统所存在的稳定性问题进行了大量的修复和优化。目前,deepin20.9Qt版本已升级至5.15.8,并更新了日志查看器、相册、画板、系统软件包管理器等应用;修复了诸多影响体验的问题,进一步提升系统使用体验。下面是具体更新内容:新增及优化Qt版本升级至5.15.8;更
 如何查看deepin系统的版本号Dec 29, 2023 pm 01:57 PM
deepinlinux系统下想要查看系统版本信息,该怎么查看呢?我们可以通过图形界面查询,可以通过命令查询,也可以安装软件查询,下面我们就来详细说一下。方法一、图形界面查看deepinlinux版本点击任务栏上的“控制中心”。点击“系统信息”。即可查看到deepinlinux的版本信息方法二、命令行下查看deepinlinux系统版本在命令行可以通过查看/etc/os-release文件来查看deepinlinux系统版本。也可以通过lsb-release命
 Deepin Linux如何以root用户身份进行切换? Deepin Linux切换到root权限的方法Dec 27, 2023 pm 02:23 PM
Deepin系统怎么切换到root用户?下面我们就来看看详细的图文教程。首先按下“ctrl+lat+t”打开终端,随后给root用户设置一个密码执行su命令输入root用户的密码并切换到root用户在使用管理员权限进行简单操作时,更多的使用sudo命令遇到简单的提示找不到命令直接使用sudo命令来提升权限也可以切换到root用户再执行如果新建了一个用户,需要使用root权限,可以执行如下命令sudovisudo对sudo的配置文件进行修改,在如下图所示的位置,添加新建的用户即可,比
 deepin v20安装后无法启动怎么办 deepinv20无法启动解决方法Mar 01, 2024 am 11:55 AM
最近有人在使用deepinv20时,出现了无法启动的问题,每次打开电脑进入系统就会出现如图所示的错误代码界面,不知道应该如何解决,这时候我们可以通过尝试切换内核或者在Linux行中加入内容的方法来解决。deepinv20无法启动怎么办:方法一:1、如果我们使用了新电脑,可能会无法兼容deepin老版本的内核。2、这时候我们可以尝试更换最新的系统内核,或者直接升级系统版本来解决。方法二:1、重启电脑,开机时连按“F1”进入bios设置。2、然后在boot选项下,找到“se
 鼠标怎么设置为左手? deepin20左手鼠标设置方法Jan 11, 2024 pm 08:15 PM
一般电脑的鼠标设置都是右手模式,但部分人喜欢使用左手操作鼠标,该怎么设置鼠标为左手模式呢?下面我们就来看看详细的教程。1、首先点任务栏上的【启动器】。2、在启动器中点齿轮按钮打开【控制中心】。3、在【控制中心】中点【鼠标】。4、找到【左手模式】选项。5、将【左手模式】开关按钮打开即可。
 deepin20的软件程序卸载方法 deepin卸载应用程序的两种途径Jan 15, 2024 am 11:27 AM
deepin20中想要卸载软件程序,该怎么卸载?今天我们就来介绍两种卸载应用的方法。方法一:适合在终端操作1、桌面空白处打开终端。2、sudoaptautoremove后面接软件包,在终端可以卸载软件,如下图所示,用于卸载emacs。方法二:适合在图形界面下操作1、打开启动器。2、搜索并找到要卸载的程序。3、找到要卸载的程序后右键选择【卸载】。4、弹出提示点【确定】。


Hot AI Tools

Undresser.AI Undress
AI-powered app for creating realistic nude photos

AI Clothes Remover
Online AI tool for removing clothes from photos.

Undress AI Tool
Undress images for free

Clothoff.io
AI clothes remover

AI Hentai Generator
Generate AI Hentai for free.

Hot Article

Hot Tools

Dreamweaver CS6
Visual web development tools

SecLists
SecLists is the ultimate security tester's companion. It is a collection of various types of lists that are frequently used during security assessments, all in one place. SecLists helps make security testing more efficient and productive by conveniently providing all the lists a security tester might need. List types include usernames, passwords, URLs, fuzzing payloads, sensitive data patterns, web shells, and more. The tester can simply pull this repository onto a new test machine and he will have access to every type of list he needs.

Safe Exam Browser
Safe Exam Browser is a secure browser environment for taking online exams securely. This software turns any computer into a secure workstation. It controls access to any utility and prevents students from using unauthorized resources.

EditPlus Chinese cracked version
Small size, syntax highlighting, does not support code prompt function

mPDF
mPDF is a PHP library that can generate PDF files from UTF-8 encoded HTML. The original author, Ian Back, wrote mPDF to output PDF files "on the fly" from his website and handle different languages. It is slower than original scripts like HTML2FPDF and produces larger files when using Unicode fonts, but supports CSS styles etc. and has a lot of enhancements. Supports almost all languages, including RTL (Arabic and Hebrew) and CJK (Chinese, Japanese and Korean). Supports nested block-level elements (such as P, DIV),


