


How to successfully deploy a web project on Tomcat from scratch
Tomcat is a widely used open source web server for deploying and running Java web applications. This article will guide you from scratch to learn how to successfully deploy a web project on Tomcat.
Preparation work:
Before you start, you need to complete the following preparation work:
- Install Java Development Kit (JDK)
- Download Tomcat server
- Create a Web project
- Write project code
Next, we will guide you step by step on how to deploy your Web project.
Step 1: Install JDK
Before installing Tomcat, you need to install JDK first. You can download and install the JDK version suitable for your operating system from the Oracle official website. Once the installation is complete, make sure you have the JAVA_HOME environment variable set correctly.
Step 2: Download Tomcat server
Visit the Apache Tomcat official website (http://tomcat.apache.org) and download the latest version of Tomcat server. Choose the version appropriate for your operating system. Extract the downloaded zip file to a directory of your choice.
Step 3: Create a Web project
Create a new folder in Tomcat's webapps directory to store your Web project. For example, you can create a folder called "myproject".
Step 4: Write project code
In your Web project, you need to write some Java Servlet and JSP files. You can use any IDE (e.g. Eclipse, IntelliJ IDEA) to write Java code. Make sure your code complies with Java EE web application requirements.
The following is a simple code example that handles a web request and returns an HTML page.
import java.io.IOException;
import javax.servlet.ServletException;
import javax.servlet.http.HttpServlet;
import javax.servlet.http.HttpServletRequest;
import javax.servlet.http.HttpServletResponse;

public class HelloWorldServlet extends HttpServlet {
    protected void doGet(HttpServletRequest request, HttpServletResponse response)
            throws ServletException, IOException {
        response.setContentType("text/html");
        response.getWriter().println("<html><body><h2 id="Hello-World">Hello World!</h2></body></html>");
    }
}
Step 5: Deploy the Web project
Next, you need to deploy the written Web project to the Tomcat server.
- Place the written code into the web project folder you created (under the webapps/myproject directory).
-
Open the conf directory of the Tomcat server and edit the server.xml file. Find the
tag and add a new tag. The example is as follows: <Context path="/myproject" docBase="路径/myproject" reloadable="true"></Context>
where the path is the absolute path of your web project folder.
- Save and close the server.xml file.
- Start the Tomcat server. You can start Tomcat by running startup.bat (Windows) or startup.sh (Linux/Mac) in the bin directory.
Step 6: Test the Web Project
Open your browser and enter "http://localhost:8080/myproject" in the address bar (assuming you are using the Tomcat default port number 8080). If everything is OK, you will see a page that says "Hello World!"
At this point, you have successfully deployed your web project on Tomcat. You can continue to develop and modify your web application, deploying and testing accordingly as needed.
Summary:
This article details how to successfully deploy a web project on Tomcat from scratch. By following the above steps to complete the preparations, create the project, write the code, and deploy the project, you will be able to quickly deploy your Java web application to a server running Tomcat and perform corresponding testing and debugging. I hope this article will be helpful to you when deploying web projects on Tomcat.
The above is the detailed content of Web project deployment guide on Tomcat: starting from scratch. For more information, please follow other related articles on the PHP Chinese website!

 Springboot怎么使用内置tomcat禁止不安全HTTPMay 12, 2023 am 11:49 AM
Springboot内置tomcat禁止不安全HTTP方法1、在tomcat的web.xml中可以配置如下内容让tomcat禁止不安全的HTTP方法/*PUTDELETEHEADOPTIONSTRACEBASIC2、Springboot使用内置tomcat没有web.xml配置文件,可以通过以下配置进行,简单来说就是要注入到Spring容器中@ConfigurationpublicclassTomcatConfig{@BeanpublicEmbeddedServletContainerFacto
 springboot内置tomcat支持最大的并发量问题怎么解决May 22, 2023 pm 08:21 PM
springboot内置的tomcat支持最大的并发量SpringBoot内置Tomcat,在默认设置中,Tomcat的最大线程数是200,最大连接数是10000。支持的并发量是指连接数,也就是说支持最大并发量是一万(默认)Tomcat有两种处理连接的模式1,是BIO,一个线程只处理一个Socket连接,2,是NIO,一个线程处理多个Socket连接。由于HTTP请求不会太耗时,而且多个连接一般不会同时来消息,所以一个线程处理多个连接没有太大问题。一个线程处理多个连接数会很慢有可能会超时默认内嵌
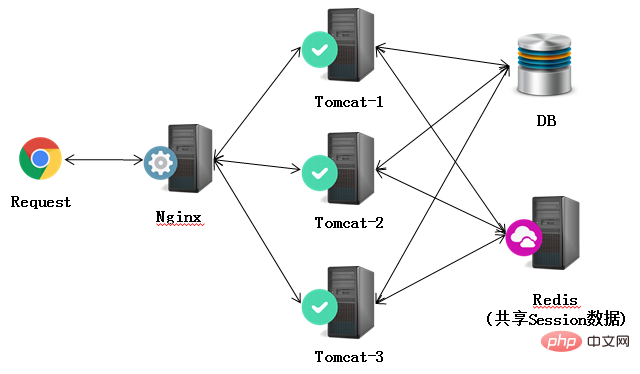 Nginx+Tomcat高性能负载均衡集群怎么搭建May 14, 2023 am 11:34 AM
nginx是一个高性能的http服务器/反向代理服务器及电子邮件(imap/pop3)代理服务器。其占有内存少,并发能力强,在同类型的网页服务器中表现较好。nginx可以在大多数unixlinuxos上编译运行,并有windows移植版。一般情况下,对于新建站点,建议使用最新稳定版作为生产版本。单个tomcat最大支持在线访问是500左右,要通知支持更多的访问量一个tomcat就没法做到了。在这里我们采用集群部署方式,使用多个tomcat,反向代理使用nginx。架构如下:准备工作apache-
 nginx,tomcat,apache的区别是什么May 15, 2023 pm 01:40 PM
1.Nginx和tomcat的区别nginx常用做静态内容服务和代理服务器,直接外来请求转发给后面的应用服务器(tomcat,Django等),tomcat更多用来做一个应用容器,让javawebapp泡在里面的东西。严格意义上来讲,Apache和nginx应该叫做HTTPServer,而tomcat是一个ApplicationServer是一个Servlet/JSO应用的容器。客户端通过HTTPServer访问服务器上存储的资源(HTML文件,图片文件等),HTTPServer是中只是把服务器
 Debian下搭建Nginx和Tomcat服务器实现负载均衡的方法May 19, 2023 pm 10:31 PM
负载均衡的基本概念负载平衡(loadbalancing)是一种计算机网络技术,用来在多个计算机(计算机集群)、网络连接、cpu、磁盘驱动器或其他资源中分配负载,以达到最佳化资源使用、最大化吞吐率、最小化响应时间、同时避免过载的目的。使用带有负载平衡的多个服务器组件,取代单一的组件,可以通过冗余提高可靠性。负载平衡服务通常是由专用软体和硬件来完成。负载平衡最重要的一个应用是利用多台服务器提供单一服务,这种方案有时也称之为服务器农场。通常,负载平衡主要应用于web网站,大型的internetrela
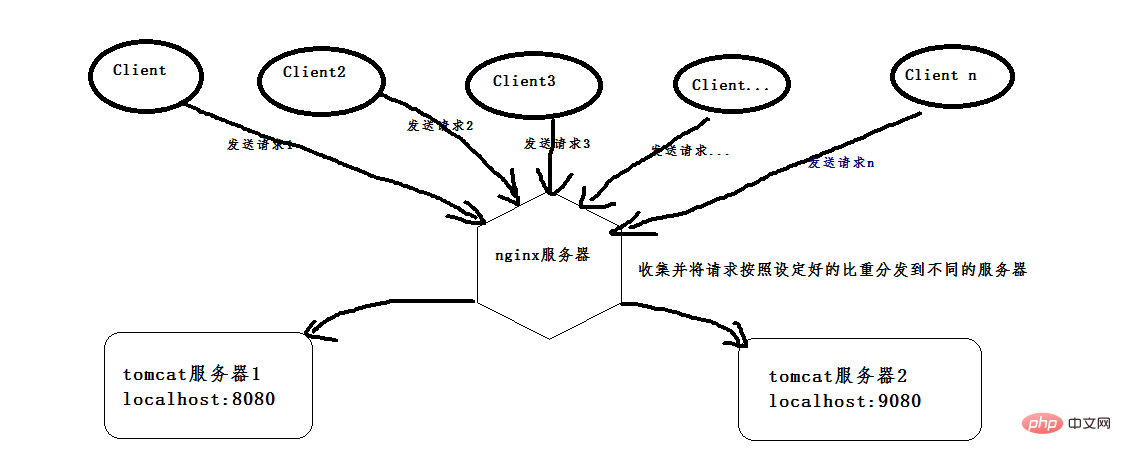 nginx+tomcat怎么实现Windows系统下的负载均衡May 16, 2023 pm 01:28 PM
首先,安装两个tomcat,可以是同一个复制成两个,也可以下载两个不同版本的tomcat,我就是下载了两个不同版本的。(这是8.0版本的,随便找两个不是特别老的版本的就行)。然后启动两个tomcat,在启动前,先更改其中一个的端口号,使得两个tomcat启动时不会端口冲突,一个是本身的8080端口,一个是改成了9080端口。配好以后,打开cmd命令窗口,我的tomcat一个放在d:\software\apache-tomcat-8.5.24目录下,按照如下命令即可启动,启动成功会弹出另一个窗口,
 Java环境变量和Tomcat服务器怎么配置May 11, 2023 pm 08:49 PM
第一步:配置与系统一致的jdk环境变量(32位/64位)(1)官网下载jdk安装包:官网下载地址:根据自己的操作系统选择对应的安装包(一定要选择接受许可协议)(2)安装jdk:安装jdk选择安装目录安装过程中会出现两次安装提示。第一次是安装jdk,第二次是安装jre。建议两个都安装在同一个java文件夹中的不同文件夹中。(不能都安装在java文件夹的根目录下,jdk和jre安装在同一文件夹会出错)安装完成如下图所示(3)配置环境变量安装完jdk后配置环境变量计算机→属性→高级系统设置→高级→环境
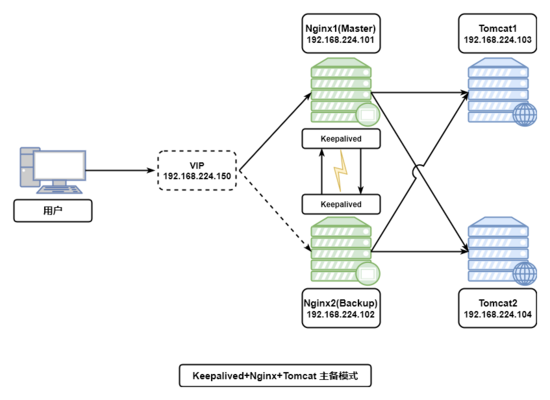 如何用Keepalived+Nginx+Tomcat实现高可用Web集群May 19, 2023 am 10:01 AM
keepalived+nginx+tomcat实现高可用web集群一、nginx的安装过程1.下载nginx安装包,安装依赖环境包(1)安装c++编译环境yum-yinstallgcc#c++(2)安装pcreyum-yinstallpcre-devel(3)安装zlibyum-yinstallzlib-devel(4)安装nginx定位到nginx解压文件位置,执行编译安装命令[root@localhostnginx-1.12.2]#pwd/usr/local/nginx/nginx-1.12


Hot AI Tools

Undresser.AI Undress
AI-powered app for creating realistic nude photos

AI Clothes Remover
Online AI tool for removing clothes from photos.

Undress AI Tool
Undress images for free

Clothoff.io
AI clothes remover

AI Hentai Generator
Generate AI Hentai for free.

Hot Article
Hot Tools

EditPlus Chinese cracked version
Small size, syntax highlighting, does not support code prompt function

SublimeText3 English version
Recommended: Win version, supports code prompts!

MinGW - Minimalist GNU for Windows
This project is in the process of being migrated to osdn.net/projects/mingw, you can continue to follow us there. MinGW: A native Windows port of the GNU Compiler Collection (GCC), freely distributable import libraries and header files for building native Windows applications; includes extensions to the MSVC runtime to support C99 functionality. All MinGW software can run on 64-bit Windows platforms.

SublimeText3 Linux new version
SublimeText3 Linux latest version

SAP NetWeaver Server Adapter for Eclipse
Integrate Eclipse with SAP NetWeaver application server.

