
Home >System Tutorial >LINUX >Quickly get started with Docker Engine's Swarm mode!
Quickly get started with Docker Engine's Swarm mode!

- PHPzforward
- 2023-12-27 14:34:001485browse
| Introduction | Swarm, sounds like a punk rock band. But it is indeed a new orchestration mechanism, or an improvement on Docker's existing orchestration mechanism. Simply put, if you are using an older version of Docker, you must manually configure Swarm to create a Docker cluster. Starting with version 1.12, the Docker engine integrates a native implementation (LCTT annotation: see below) to support seamless cluster setup. That's why this article exists. |
In this tutorial, I will take you to experience what the orchestrated Docker can do. This article isn’t meant to contain all the details (like BnBs) or give you all the answers, but it should get you started on your path to clustering. Let's get started with my leadership.
Teaser
Technical Summary It would be a shame to copy Docker’s detailed and useful documentation here, so I will briefly outline the technology. We already have Docker, right. Now, you want more servers to serve as Docker hosts, but at the same time you want them to belong to the same logical entity. That is, you want to set up a cluster.

Let's start with a cluster of hosts. When you initialize a Swarm cluster on a host, the host becomes the manager of the cluster. From a technical point of view, it becomes a node in the consensus group. The mathematical logic behind it is based on the Raft algorithm. The manager is responsible for scheduling tasks. Specific tasks will be delegated to each worker node that has joined the Swarm cluster. These operations will be managed by the Node API. Even though I hate the word API, I have to use it here.
Service API is the second component in this implementation. It allows the manager node to create a distributed service on all Swarm cluster nodes. This service can be replicated, which means that they (LCTT Annotation: refers to these services) will be distributed to the cluster by the balancing mechanism (LCTT Annotation: refers to replicated mode, multiple container instances will automatically schedule tasks to some in the cluster) nodes that meet the conditions), or can be assigned to the global (LCTT annotation: refers to global mode), which means that each node will run a container instance.
There is more work to be done, but this information is enough to get you going. Now let's get down to the practical stuff. Our target platform is CentOS 7.2, which interestingly only has version 1.10 of Docker in its repository as I write this tutorial, which means I have to manually update it to use Swarm. We will discuss this in another tutorial. We have a follow-up guide that covers how to add new nodes to our existing cluster, and we will use Fedora for an asymmetric configuration. At this point, please make sure that the correct configuration is in place and that you have a working cluster up and running (LCTT Annotation: Refers to the first node's Docker being installed and entering Swarm mode, but I have not covered how to initialize Swarm up to this point. Clusters, but don’t worry we’ll get to that in the next chapter).
Configuring images and servicesI will try to configure a load balanced Apache service and use multiple container instances to serve page content via unique IP addresses. Pretty standard (LCTT translation annotation: refers to this load-balanced web server). This example also highlights most of the reasons why you might want to use a cluster: availability, redundancy, scale-out, and performance. Of course, you need to consider both networking and storage, but they are beyond the scope of this guide.
This Dockerfile template can actually be found under httpd in the official image repository. All you need is a simple setup to get started. As for how to download or create your own image, please refer to my getting started guide, the link can be found at the top of this tutorial.
docker build -t my-apache2 .
Sending build context to Docker daemon 2.048 kB
Step 1 : FROM httpd:2.4
Trying to pull repository docker.io/library/httpd ...
2.4: Pulling from docker.io/library/httpd
8ad8b3f87b37: Pull complete
c95e1f92326d: Pull complete
96e8046a7a4e: Pull complete
00a0d292c371: Pull complete
3f7586acab34: Pull complete
Digest: sha256:3ad4d7c4f1815bd1c16788a57f81b413...a915e50a0d3a4
Status: Downloaded newer image for docker.io/httpd:2.4
---> fe3336dd034d
Step 2 : COPY ../public-html/ /usr/local/apache2/htdocs/
...

Image created
Before you continue with the following steps, you should make sure that you can start a container instance without errors and connect to the web server (LCTT annotation: use the following command). Once you make sure you can connect, we can start creating a distributed service.
docker run -dit --name my-running-app my-apache2
Enter this IP address into your browser and see what comes up.
Swarm initialization and configurationThe next step is to start the Swarm cluster. You'll need these most basic commands to get started, which are very similar to the examples on the Docker blog:
docker service create --name frontend --replicas 5 -p 80:80/tcp my-apache2:latest
What did we do here? We created a service called frontent with five container instances. At the same time, we also bind port 80 of the host to port 80 of these containers. We will use the newly created Apache image for this test. However, when you type the above command directly on your computer, you will see the following error:
docker service create --name frontend --replicas 5 -p 80:80/tcp my-apache2:latest
Error response from daemon: This node is not a swarm manager. Use "docker swarm init" or "docker swarm join" to connect this node to swarm and try again.
这意味着你没有将你的主机(节点)配置成一个 Swarm 管理者manager。你可以在这台主机上初始化 Swarm 集群或是让它加入一个现有的集群。由于我们目前还没有一个现成的集群,我们将初始化它(LCTT 译注:指初始化 Swarm 集群并使当前节点成为 manager):
docker swarm init
Swarm initialized: current node (dm58mmsczqemiikazbfyfwqpd) is now a manager.
为了向这个 Swarm 集群添加一个工作者worker,请执行下面的指令:
docker swarm join \
--token SWMTKN-1-4ofd46a2nfyvrqwu8w5oeetukrbylyznxla
9srf9vxkxysj4p8-eu5d68pu5f1ci66s7w4wjps1u \
10.0.2.15:2377
为了向这个 Swarm 集群添加一个管理者manager,请执行 docker swarm join-token manager 并按照指示操作。
操作后的输出不用解释已经很清楚明了。我们成功的创建了一个 Swarm 集群。新的节点们将需要正确的令牌token来加入这个 Swarm 集群。如果你需要配置防火墙,你还需找到它的 IP 地址和端口(LCTT 译注:指 Docker 的 Swarm 模式通讯所需的端口,默认 2377)。此外,你还可以向 Swarm 集群中添加管理者节点。现在,重新执行刚刚的服务创建指令:
docker service create --name frontend --replicas 5 -p 80:80/tcp my-apache2:latest
6lrx1vhxsar2i50is8arh4ud1
测试连通性
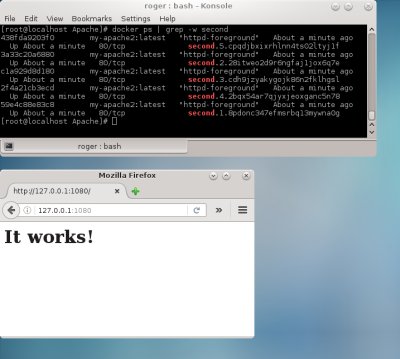
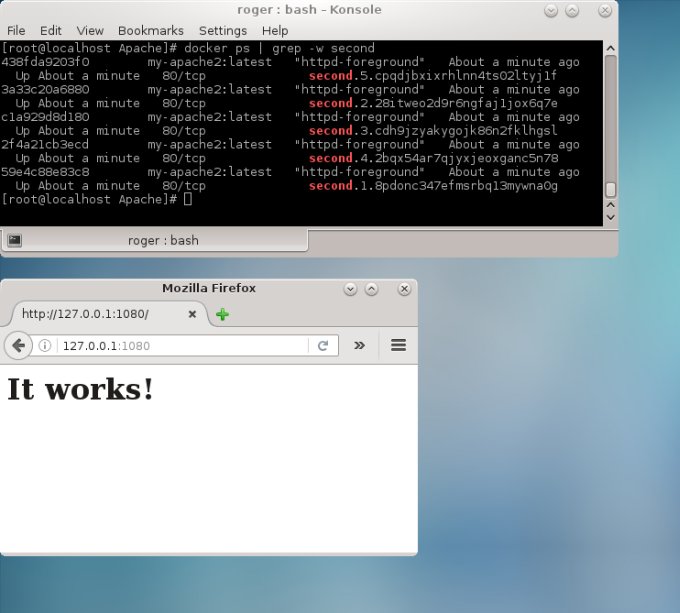
现在,我们来验证下我们的服务是否真的工作了。从某些方面讲,这很像我们在 Vagrant 和 coreOS 中做的事情那样。毕竟它们的原理几乎相同。相同指导思想的不同实现罢了(LCTT 译注:笔者观点,无法苟同)。首先需要确保 docker ps 能够给出正确的输出。你应该能看到所创建服务的多个容器副本。
docker ps
CONTAINER ID        IMAGE               COMMAND              CREATED             STATUS              PORTS
NAMES
cda532f67d55        my-apache2:latest   "httpd-foreground"
2 minutes ago       Up 2 minutes        80/tcp              frontend.1.2sobjfchdyucschtu2xw6ms9a
75fe6e0aa77b        my-apache2:latest   "httpd-foreground"
2 minutes ago       Up 2 minutes        80/tcp              frontend.4.ag77qtdeby9fyvif5v6c4zcpc
3ce824d3151f        my-apache2:latest   "httpd-foreground"
2 minutes ago       Up 2 minutes        80/tcp              frontend.2.b6fqg6sf4hkeqs86ps4zjyq65
eda01569181d        my-apache2:latest   "httpd-foreground"
2 minutes ago       Up 2 minutes        80/tcp              frontend.5.0rmei3zeeh8usagg7fn3olsp4
497ef904e381        my-apache2:latest   "httpd-foreground"
2 minutes ago       Up 2 minutes        80/tcp              frontend.3.7m83qsilli5dk8rncw3u10g5a
我也测试了不同的、非常规的端口,它们都能正常工作。对于你如何连接服务器和收取请求你将会有很多可配置的余地。你可以使用 localhost 或者 Docker 网络接口(笔者注:应该是指 Docker 的默认网桥 docker0,其网关为 172.17.0.1) 的 IP 地址的正确端口去访问。下面的例子使用了端口 1080:
Replicated Web service works
至此,这是一个非常粗略、简单的开始。真正的挑战是创建一个优化过的、可扩展的服务,但是它们需要一个准确的技术用例。此外,你还会用到 docker info 和 docker service(还有 inspect 和 ps)命令来详细了解你的集群是如何工作的。
可能会遇到的问题你可能会在把玩 Docker 和 Swarm 时遇到一些小的问题(也许没那么小)。比如 SELinux 也许会抱怨你正在执行一些非法的操作(LCTT 译注:指在强制访问控制策略中没有权限的操作)。然而,这些错误和警告应该不会对你造成太多阻碍。
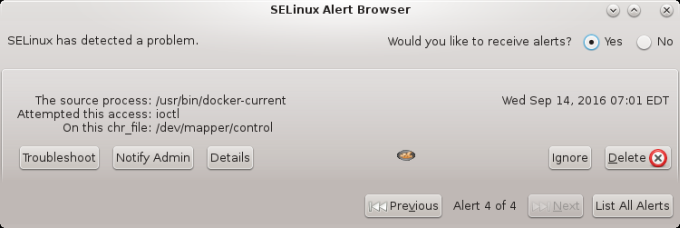
SELinux alert
- docker service 不是一条命令(docker service is not a docker command)当你尝试执行必须的命令去创建一个复制模式replicated的服务时,你可能会遇到一条错误说 docker: 'service' is not a docker command(LCTT 译注:见下面的例子)。这表示你的 Docker 版本不对(使用 -v 选项来检查)。我们将在将来的教程讨论如何修复这个问题。
docker service create --name frontend --replicas 5 -p 80:80/tcp my-apache2:latest
docker: 'service' is not a docker command.
- docker tag 无法识别(docker tag not recognized)你也许会看到下面的错误:
docker service create -name frontend -replicas 5 -p 80:80/tcp my-apache2:latest
Error response from daemon: rpc error: code = 3 desc = ContainerSpec: "-name" is not a valid repository/tag
关于这个错误已经有多个相关的讨论和帖子了。其实这个错误也许相当无辜。你也许是从浏览器粘贴的命令,在浏览器中的横线也许没被正确解析(笔者注:应该用 --name 而不是 -name)。就是这么简单的原因所导致的。
关于这个话题还有很多可谈的,包含 1.12 版之前的 Swarm 集群实现(笔者注:旧的 Swarm 集群实现,下文亦作独立版本,需要 Consul 等应用提供服务发现),以及当前的 Docker 版本提供的(笔者注:新的 Swarm 集群实现,亦被称为 Docker 引擎的 Swarm 模式)。也就是说,请别偷懒花些时间阅读以下内容:
- Docker Swarm Overview (standalone version of Swarm cluster installation)
- Build a Swarm cluster for production environment (independent version installation)
- Install and create a Docker Swarm cluster (standalone version installation)
- Docker Engine Swarm Overview (for version 1.12)
- Getting Started with Swarm Mode (for version 1.12)
You finally see it here. There is still no guarantee that you have learned anything at this point, but I believe you will still find this article useful. It covers some basic concepts and an overview of how Swarm cluster mode works and what it can do. We also successfully downloaded and created an image of our web server and then ran it based on it. Multiple clustered container instances. Although we have only done the above experiments on a single node at present, we will explain it clearly in the future (LCTT translation: to explain the multi-node Swarm cluster operation clearly). And we've solved some common problems.
I hope you found this guide interesting enough. Combined with the articles I have written about Docker in the past, these articles should give you a decent explanation, including: how to operate images, network stacks, storage, and now clusters. Just think of it as a warm-up. Indeed, enjoy and look forward to seeing you in the new Docker tutorial. I can't control how much I remember.
wish you happiness.
The above is the detailed content of Quickly get started with Docker Engine's Swarm mode!. For more information, please follow other related articles on the PHP Chinese website!