
Home >System Tutorial >Windows Series >How to Restore Networking Disabled Windows 7 Settings
How to Restore Networking Disabled Windows 7 Settings

- WBOYWBOYWBOYWBOYWBOYWBOYWBOYWBOYWBOYWBOYWBOYWBOYWBforward
- 2023-12-21 19:53:451983browse
The win7 system is a very intelligent and high-performance system. Recently, some friends have been asking how to restore the original state if the win7 network is disabled? Today, the editor will bring you the win7 network disabled recovery method to take a look at.

Win7 network disabled recovery method:
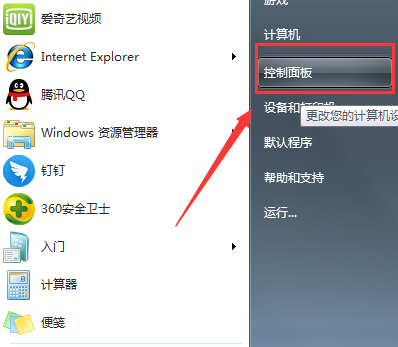
1. Click the Start menu in the lower left corner and select "Control Panel".
2. Select the "Network and Internet" option.

3. Click "Network and Sharing Center" in the opened interface.

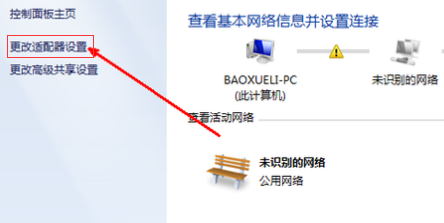
4. The following interface will open. In the directory on the left, select the "Change Adapter Settings" option.
5. The following interface will open. You can find the "Local Area Connection" icon. At this time, we can see that the local connection is displayed as "Disabled". Therefore, there will be a series of network problems such as network failure. Select the local connection, right-click the mouse and select "Enable" to restore the network.

(The above is the solution that the editor brings to you on how to restore the original state after win7 network is disabled! If it helps your problem, please continue to pay attention to this site! We will continue to bring you more excellent content)
The above is the detailed content of How to Restore Networking Disabled Windows 7 Settings. For more information, please follow other related articles on the PHP Chinese website!
Related articles
See more- What should I do if Windows 7 is stuck on the startup interface?
- win10 installation key
- What should I do if my win10 computer always automatically installs software?
- What should I do if the prompt that my windows license is about to expire keeps popping up?
- What should I do if there is insufficient memory in the photo viewer in Windows?