
CSS attributes to implement waterfall flow layout skills, need specific code examples
Waterfall flow layout is a common web page layout method, which is characterized by making the web page content like a waterfall They are also arranged from top to bottom, and the width of each content block is fixed, but the height can be different. This layout method can make the web page display more beautiful and give users a good visual experience.
In CSS, we can use some attributes to implement waterfall flow layout. The following will introduce some common techniques and give specific code examples.
- Use the column attribute of CSS
The column attribute of CSS can divide elements into multiple columns for layout. You can specify the number of columns in the layout by setting the column-count attribute. , set the column spacing through the column-gap attribute. By setting these two properties, you can achieve the effect of waterfall flow layout.
The following is a simple example:
HTML code:
<div class="waterfall">
  <div class="item">内容块1</div>
  <div class="item">内容块2</div>
  <div class="item">内容块3</div>
  <div class="item">内容块4</div>
  ...
</div>
CSS code:
.waterfall {
  column-count: 3;
  column-gap: 20px;
}

.item {
  margin-bottom: 20px;
}
By setting the column-count attribute of the waterfall container to 3 , you can divide the content block into 3 columns for layout. At the same time, control the spacing between each content block by setting the margin-bottom attribute of the item element. This achieves the effect of waterfall flow layout.
- Use the flexbox property of CSS
The flexbox property of CSS can also achieve the effect of waterfall flow layout. The flexbox attribute can realize flexible layout. You can realize the layout of content from top to bottom by setting the flex-direction attribute to "column", and realize content wrapping by setting the flex-wrap attribute to "wrap".
The following is an example:
HTML code:
<div class="waterfall">
  <div class="item">内容块1</div>
  <div class="item">内容块2</div>
  <div class="item">内容块3</div>
  <div class="item">内容块4</div>
  ...
</div>
CSS code:
.waterfall {
  display: flex;
  flex-direction: column;
  flex-wrap: wrap;
}

.item {
  width: 30%;
  margin-bottom: 20px;
}
By setting the display attribute of the waterfall container to flex, flex-direction If the attribute is column and the flex-wrap attribute is wrap, the content can be laid out from top to bottom, and the content that exceeds the width of the container will be displayed in a new line. At the same time, you can control the width and spacing of each content block by setting the width and margin-bottom attributes of the item element.
Summary:
The above are two commonly used CSS attributes to implement waterfall flow layout techniques, and specific code examples are given. Based on actual needs and specific scenarios, you can choose a suitable method to implement waterfall flow layout and improve the visual effects and user experience of the web page.
The above is the detailed content of Tips for implementing waterfall flow layout with CSS properties. For more information, please follow other related articles on the PHP Chinese website!
 提高 Python 代码可读性的五个基本技巧Apr 12, 2023 pm 08:58 PM
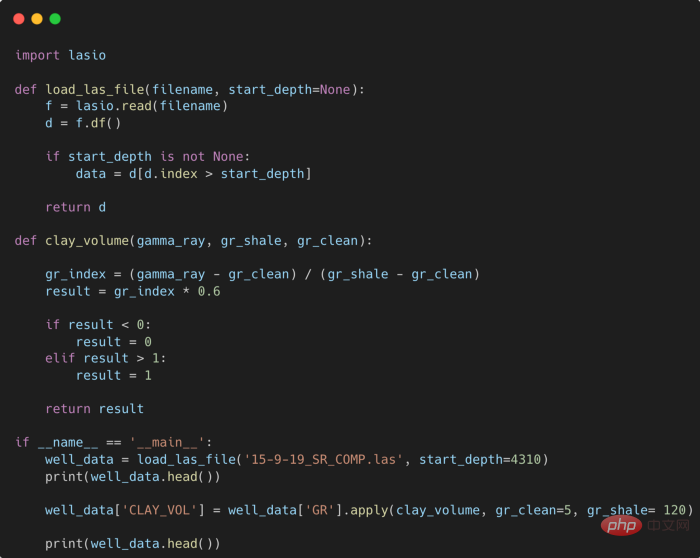
Python 中有许多方法可以帮助我们理解代码的内部工作原理,良好的编程习惯,可以使我们的工作事半功倍!例如,我们最终可能会得到看起来很像下图中的代码。虽然不是最糟糕的,但是,我们需要扩展一些事情,例如:load_las_file 函数中的 f 和 d 代表什么?为什么我们要在 clay 函数中检查结果?这些函数需要什么类型?Floats? DataFrames?在本文中,我们将着重讨论如何通过文档、提示输入和正确的变量名称来提高应用程序/脚本的可读性的五个基本技巧。1. Comments我们可
 如何使用Vue构建无限滚动和瀑布流布局?Jun 27, 2023 pm 01:32 PM
Vue.js是一种流行的JavaScript框架,它使开发者可以轻松地创建动态,响应式的Web应用程序。其中,尤其以其强大的组件化开发能力而备受开发者的青睐。而无限滚动和瀑布流布局已经成为现代Web开发中不可或缺的特性之一。本文旨在介绍如何使用Vue.js,结合一些第三方库,实现无限滚动和瀑布流布局的功能。实现无限滚动无限滚动(Infinit
 如何使用HTML和CSS实现瀑布流商品展示布局Oct 21, 2023 am 09:25 AM
如何使用HTML和CSS实现瀑布流商品展示布局瀑布流布局是一种常见的网页设计方式,特点是呈现出错落有致、动态有序的视觉效果。在商品展示网页中应用瀑布流布局可以提高商品的展示效果,吸引用户的注意力。本文将介绍如何使用HTML和CSS实现瀑布流商品展示布局,并提供具体的代码示例。一、HTML结构首先,我们需要搭建一个基本的HTML结构,以容
 使用PHP开发直播功能的十个技巧May 21, 2023 pm 11:40 PM
随着直播业务的火爆,越来越多的网站和应用开始加入直播这项功能。PHP作为一种流行的服务器端语言,也可以用来开发高效的直播功能。当然,要实现一个稳定、高效的直播功能需要考虑很多问题。下面列出了使用PHP开发直播功能的十个技巧,帮助你更好地实现直播。选择合适的流媒体服务器PHP开发直播功能,首先需要考虑的就是流媒体服务器的选择。有很多流媒体服务器可以选择,比如常
 提高Python代码可读性的五个基本技巧Apr 11, 2023 pm 09:07 PM
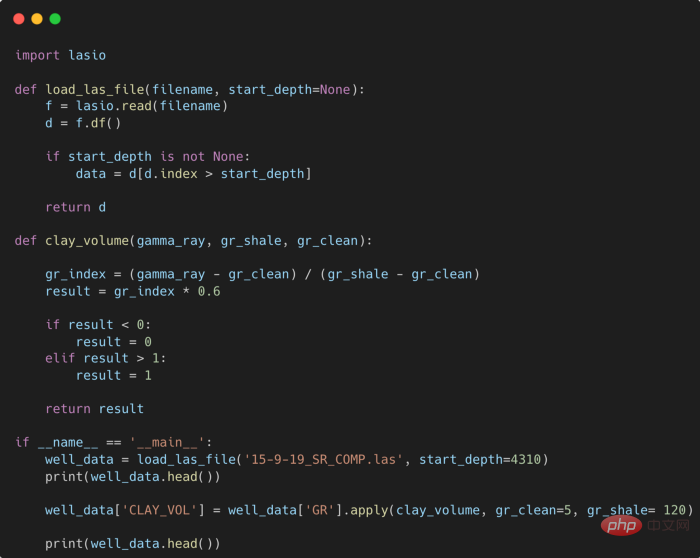
译者 | 赵青窕审校 | 孙淑娟你是否经常回头看看6个月前写的代码,想知道这段代码底是怎么回事?或者从别人手上接手项目,并且不知道从哪里开始?这样的情况对开发者来说是比较常见的。Python中有许多方法可以帮助我们理解代码的内部工作方式,因此当您从头来看代码或者写代码时,应该会更容易地从停止的地方继续下去。在此我给大家举个例子,我们可能会得到如下图所示的代码。这还不是最糟糕的,但有一些事情需要我们去确认,例如:在load_las_file函数中f和d代表什么?为什么我们要在clay函数中检查结果
 如何使用CSS3的flex属性,构建瀑布流布局效果?Sep 09, 2023 am 08:39 AM
如何使用CSS3的flex属性,构建瀑布流布局效果?在网页设计中,瀑布流布局(WaterfallLayout)是一种常见且流行的页面布局方式。它的特点是将内容以不规则的列数和行高呈现,营造出瀑布流般的美感。在过去,实现瀑布流布局需要使用复杂的JavaScript代码来计算元素的位置和尺寸。然而,随着CSS3的发展,我们可以利用其强大的flex属性来更加简单
 使用CSS实现响应式卡片瀑布流布局的技巧Nov 21, 2023 am 08:26 AM
使用CSS实现响应式卡片瀑布流布局的技巧随着移动设备的普及和网页内容的多样化,响应式设计已经成为现代web开发的基本要求之一。其中,卡片式布局和瀑布流布局都逐渐成为广受欢迎的设计风格。本文将介绍如何使用CSS实现一个响应式的卡片瀑布流布局,并提供具体的代码示例。一、HTML结构首先,我们需要在HTML中定义一组卡片的结构,例如使用<ul>和<
 Python中简单易用的并行加速技巧Apr 12, 2023 pm 02:25 PM
1.简介我们在日常使用Python进行各种数据计算处理任务时,若想要获得明显的计算加速效果,最简单明了的方式就是想办法将默认运行在单个进程上的任务,扩展到使用多进程或多线程的方式执行。而对于我们这些从事数据分析工作的人员而言,以最简单的方式实现等价的加速运算的效果尤为重要,从而避免将时间过多花费在编写程序上。而今天的文章费老师我就来带大家学习如何利用joblib这个非常简单易用的库中的相关功能,来快速实现并行计算加速效果。2.使用joblib进行并行计算作为一个被广泛使用的第三方Python库(


Hot AI Tools

Undresser.AI Undress
AI-powered app for creating realistic nude photos

AI Clothes Remover
Online AI tool for removing clothes from photos.

Undress AI Tool
Undress images for free

Clothoff.io
AI clothes remover

AI Hentai Generator
Generate AI Hentai for free.

Hot Article

Hot Tools

EditPlus Chinese cracked version
Small size, syntax highlighting, does not support code prompt function

MantisBT
Mantis is an easy-to-deploy web-based defect tracking tool designed to aid in product defect tracking. It requires PHP, MySQL and a web server. Check out our demo and hosting services.

Safe Exam Browser
Safe Exam Browser is a secure browser environment for taking online exams securely. This software turns any computer into a secure workstation. It controls access to any utility and prevents students from using unauthorized resources.

Dreamweaver CS6
Visual web development tools

PhpStorm Mac version
The latest (2018.2.1) professional PHP integrated development tool


