
Home >Web Front-end >HTML Tutorial >Mastering HTML5: Constrained Validation
Mastering HTML5: Constrained Validation

- WBOYWBOYWBOYWBOYWBOYWBOYWBOYWBOYWBOYWBOYWBOYWBOYWBOriginal
- 2023-09-13 10:01:011042browse

HTML5 brings us many very good advantages. Aside from common issues like unifying the error model, introducing new semantic tags, or simplifying document types, one of the biggest improvements is constraint validation for forms. What would the web be like without forms?
Constraint validation attempts to improve the usability of web forms. The browser can directly inform the user of the possibility of invalid values, rather than sending the form to the server, which then evaluates it as invalid, comes back to the client and is ultimately adjusted by the user. This not only reduces network traffic but also improves page usability.
It should be noted that constraint verification cannot replace server-side verification. Additionally, JavaScript-based solutions may still be useful. Generally speaking, we always have to implement server-side validation. If we use good architecture, model constraints on the server will automatically be reflected in the transferred HTML code. This way we get constraint verification for free. Now we can further enhance the experience using JavaScript, which can act as both a complement to constraint validation and as padding.
We will start our journey with non-validated forms. We will then integrate a JavaScript based solution. Finally, let’s introduce HTML5 constraint validation. In the final section, we'll look at cross-browser oddities you may encounter.
Non-validation form submission
The most classic version of the HTML form is the one without any client-side validation logic. We just need to provide a standard form, without any special attributes. As already stated in the introduction, we need to always pay special attention to this form submission.
While we do want to protect forms that already exist on the client, we can never be sure of the state of the submitted data. Techniques for securing and enhancing form validation on the server largely depend on the programming framework and language used. Therefore we will skip such discussion. Instead, we will now discuss form submission in general.
In the second part of the "Mastering HTML5" series we have already mentioned the importance of form encoding type. We also looked at three mature encoding types. The question that remains is: How are these values actually established? The exact behavior of the browser depends on the protocol specified for action. For simplicity, we now assume HTTP or HTTPS.
In principle, the browser has two options:
- Change the action to carry the form's value.
- Submit the value via the request body.
The procedures for both are roughly the same. In short, we find the following steps:
- Build the dataset using the correct encoding.
- Create a request using the dataset and encoding type.
- send request.
The construction of form data sets implies some subtle issues, but these issues are not well known. For example, the situation is different if you click a button to submit a form. In this case, the button's value will be transferred to the server. This can be used to determine which button was pressed.
If we press the first button, then the following content will be sent to the server.
foo=bar
Triggering form submission from JavaScript will result in nothing being transferred. The JavaScript code uses the submit() method of the HTMLFormElement instance.
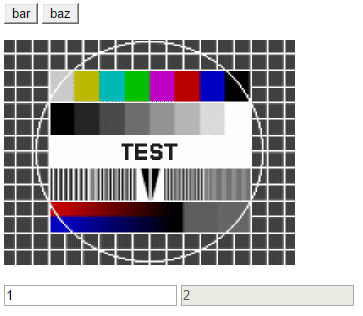
Another interesting aspect is the use of the image type to submit the click coordinates of the input element. image Input types were very popular a while ago and people thought it would be a good idea to check where the user clicked. Perhaps the image shown indicates several possibilities. The server will then be responsible for evaluating the user's request.
The following example illustrates this behavior.
If we click on the image to submit the form, the data of foo will be considered. Name-value pairs are inserted only if the value exists. Additionally, we need to name the input elements, otherwise nothing will be transferred.
The content of the request may be similar to the following code snippet.
foo.x=71&foo.y=38&foo=bar
Additionally, we should be careful not to consider disabled fields. This makes sense. Therefore, the table below considers the first two examples with two input fields (one enabled and one disabled) that can be built as a proof of concept.
Submitting the form programmatically will result in a single value being transferred.
Basic form validation
Even without constraint validation or JavaScript, browsers already provide us with some simple form validation. As we saw before, both the form's state (e.g. enabled or disabled) and the submitter are taken into account. However, none of this will prevent the form from being submitted. A simple approach is to write some JavaScript to handle situations where the process might be aborted.
JavaScript 的最初用途之一实际上是为表单提供增强的功能。基本思想是在即将提交表单时收到事件通知。此时我们可以检查所有值并中止该过程。当然,我们可以改进整个想法,以便在任何值发生变化时始终进行检查。尽管如此,最终我们可能会根据我们最后的评估而中止提交。
var form = document.querySelector('form');
form.addEventListener('submit', function (ev) {
	// always abort!
	ev.preventDefault();
}, false);
理论上进行实时验证很容易。然而,指定的 DOM 事件的工作方式可能与直观猜测的不同。例如,文本框的 change 事件仅在文本框失去焦点后才会触发。当用户单击提交按钮时可能会发生这种情况。因此,与验证的交互被破坏并且感觉不活跃。
相反,使用 keyup 或 input 事件是有意义的。虽然前者是文本框的有效解决方案,但后者适用于所有输入元素(如预期)。唯一的限制是它是随 HTML5 引入的,某些较旧的浏览器可能不支持。
考虑到这一点,让我们比较各个事件以查看执行顺序。下面的测试代码可以帮助我们。
var input = document.querySelector('input');

['input', 'keyup', 'change'].forEach(function (eventName) {
	input.addEventListener(eventName, function (e) {
		console.log(eventName + ' event triggered');
	}, false);
});
对于我们的测试 <input> 元素,当使用几个字母进行探测时,我们会看到以下结果。最后我们使用 Tab 键显式地移开焦点。
正如我们所看到的,顺序设置为首先触发 input 事件,然后触发 keyup。其实这是有道理的。首先我们需要 keydown,然后该值可能会发生变化,从而导致 input 事件。最后我们释放密钥,这会产生一个 keyup 事件。值得强调的是,input 仅在值发生变化时才会触发,而 keyup 与实际值变化无关。举个例子,如果我们按箭头键,我们只会看到 keyup 事件,而看不到 input 事件。
可以通过向所有表单字段添加事件侦听器来对所有元素进行实时验证。或者,我们只需要为表单添加一个用于 input 事件的事件侦听器。尽管非常优雅,但这种方法有一个明显的缺点。
考虑以下非常简单的 HTML:
我们使用 HTML5 form 属性在其外部声明 <form></form> 的一个字段。但是,input 事件正常工作,因为这些事件实际上会在 DOM 树中冒泡。因此,外部场触发的特定事件将不会被看到。
因此,最可靠的方法是获取表单并迭代 elements 集合中给出的子项。这里收集所有分配的字段(image 输入类型除外)。
约束验证
约束验证意味着我们能够在 HTML 源代码中指定约束,然后浏览器使用这些约束来检查表单。有很多可能性。很多选项与输入类型相关,不能随意使用。在我们深入研究不同的验证和实现怪癖之前,让我们先简要了解一下整体设计。
所选择的 API 旨在使我们能够进行快速检查。我们可以探测当前实例是否能够通过单个 API 调用进行约束验证。
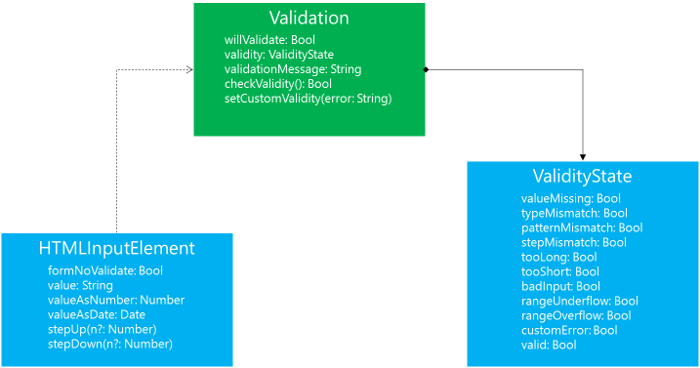
API也非常开放,我们可以查询浏览器得到的结果,或者扩展浏览器的结果。伪接口Validation也被其他接口继承,不仅仅是HTMLInputElement。
让我们看一些示例代码。在下面的代码中,我们首先检查表单验证是否可行。如果是这样,那么我们关心 type=date 字段的验证结果。如果用户选择了有效日期,我们会检查复选框的状态。
var form = document.querySelector('form');
var date = document.querySelector('#birthday');

if (form.willValidate) {
	if (!date.validity.valid || checkbox.checked)
		checkbox.setCustomValidity('');
	else
		checkbox.setCustomValidity('You need to agree to our terms.');
}
这样的条件逻辑(仅在某些情况下有效)不能单独使用标记来实现。但我们可以很好地将自定义逻辑与集成功能结合起来。
HTML5 知道很多不同的输入类型。但毕竟它们可以分为三类:
- 文字
- 数量
- Date
从 value 属性中看不到差异。这里我们总是得到 string 值。毕竟,该值将以文本形式提交。拥有这三个组的结果是针对某些类型的约束的不同行为。
The following constraints almost always work in the same way:
-
required, if the length ofvalueis zero, results invalueMissing -
minlength, if the string length is too short, it will result intooShort -
maxlength, if the string length is too long, it will result intooLong
Of course, there are exceptions. For example, a checkbox would react to required, requiring checked. If the color selection is required and contains an invalid color, the color selection will be validated as valueMissing. Other types react similarly.
Other possible constraints depend on the specific type of input. The type determines how the value is handled. Is it treated as text? Does it represent a number? Constraints react to it.
We take the date input type as an example. If a valid date is set, we will get a valueMissing if the limit is required. Additionally, badInput will be set if something is actually entered. However, if the date is valid, we may get one or more of the following validation errors:
-
rangeUnderflowif the date is below the date specified in theminattribute -
rangeOverflowif the date is higher than the date specified in themaxattribute -
stepMismatch, if the date does not meet the providedsteppattern
The last point is quite interesting. Here we have to deal with a mechanism that subtracts the base (either the default base or the one provided in the min attribute) and calculates a number that can be modulo the step. For date input types, the calculation is not entirely obvious. The actual date types provided are different. However, from a user's perspective, the results make sense.
For text input, there is also the pattern attribute, which allows us to specify a regular expression for validation. If the input type supports this constraint, patternMismatch will be logged on failure.
in conclusion
Constraint validation allows us to provide users (even with JavaScript disabled) immediate feedback about the current form state. We don't have to waste network bandwidth to and from the server just to display an error message. Nonetheless, we should always remember that form submission is usually OK. Therefore, some validation on the server side is inevitable.
The possibilities brought by constraint verification are almost unlimited. We can use client-side validation to ensure that regular expressions are met, valid ranges for dates and numbers are taken into account, and certain checkboxes are checked. We can also extend the available checks using JavaScript.
references
- MDN: Constraint Verification
- W3C: Limitations and Form Submission
- Raymond Camden: HTML5 Form Validation – Constraint Validation API
- Tomomi Imura - HTML5 input event handlers and user experience
- TJ VanToll - Constrained Validation: Native Client-Side Validation of Web Forms
The above is the detailed content of Mastering HTML5: Constrained Validation. For more information, please follow other related articles on the PHP Chinese website!