
Home >Backend Development >PHP Tutorial >Protect your forms with form keys
Protect your forms with form keys

- WBOYWBOYWBOYWBOYWBOYWBOYWBOYWBOYWBOYWBOYWBOYWBOYWBOriginal
- 2023-09-07 21:49:141553browse
Safety is a hot topic. Securing your website is extremely important for any web application. In fact, 70% of my time is spent securing applications. One of the most important things we have to protect are forms. Today, we’ll review a way to prevent XSS (cross-site scripting) and cross-site request forgery on your forms.
Why?
POST data can be sent from one website to another. Why is this bad? A simple scenario...
A user logged into your site visits another site during their session. The website will be able to send POST data to your website - for example, using AJAX. Because the user is logged in to your site, other sites can also send post data to a secure form that is only accessible if logged in.
We must also protect our pages from attacks using cURL
How do we solve this problem?
With form keys! We will add a special hash (form key) to each form to ensure that the data is only processed when sent from your website. Once the form is submitted, our PHP script will validate the submitted form key against the form key we set in the session.
What we must do:
- Add form keys to each form.
- Store the form key in the session.
- Verify the form key after submitting the form.
Step 1: Simple Form
First, we need a simple form for demonstration. One of the most important forms we have to protect is the login form. Login forms are vulnerable to brute force attacks. Create a new file and save it as index.php in your web root directory. Add the following code in the body:
	<!DOCTYPE html PUBLIC "-//W3C//DTD XHTML 1.0 Strict//EN" "http://www.w3.org/TR/xhtml1/DTD/xhtml1-strict.dtd">
	<html xmlns="http://www.w3.org/1999/xhtml" xml:lang="en" lang="en">
	<head>
		<meta http-equiv="content-type" content="text/html;charset=UTF-8" />
		<title>Securing forms with form keys</title>
	</head>
	<body>
		<form action="" method="post">
		<dl>
			<dt><label for="username">Username:</label></dt>
			<dd><input type="text" name="username" id="username" /></dd>
			<dt><label for="username">Password:</label></dt>
			<dd><input type="password" name="password" id="password" /></dd>
			<dt></dt>
			<dd><input type="submit" value="Login" /></dd>
		</dl>
		</form>
	</body>
	</html>
Now we have a simple XHTML page with a login form. If you want to use form keys on your website, you can replace the above script with your own login page. Now, let's move on to the real action.
Step 2: Create the class
We will create a PHP class for the form key. Because each page can only contain one form key, we can create a singleton for our class to ensure that our class is used correctly. Since creating singletons is a more advanced OOP topic, we will skip this part. Create a new file called formkey.class.php and place it in your web root directory. Now we have to think about the functionality we need. First, we need a function to generate the form key so we can put it into the form. Place the following code in your PHP file:
<?php

//You can of course choose any name for your class or integrate it in something like a functions or base class
class formKey
{
	//Here we store the generated form key
	private $formKey;

	//Here we store the old form key (more info at step 4)
	private $old_formKey;

	//Function to generate the form key
	private function generateKey()
	{

	}
}
?>
Above, you see a class with three parts: two variables and a function. We make this function private because it will only be used by the output function we will create later. In these two variables we will store the form keys. They are also private since they can only be used by functions within our class.
Now, we have to find a way to generate the form key. Because our form key must be unique (otherwise we have no security), we bind the key to the user using a combination of the user's IP address, use mt_rand() to make it unique, and use the uniqid() function to make It's more unique. We also encrypt this information using md5() to create a unique hash value, which we then insert into our page. Because we used md5(), the user cannot see what we used to generate the key. Entire function:
//Function to generate the form key
private function generateKey()
{
	//Get the IP-address of the user
	$ip = $_SERVER['REMOTE_ADDR'];

	//We use mt_rand() instead of rand() because it is better for generating random numbers.
	//We use 'true' to get a longer string.
	//See http://www.php.net/mt_rand for a precise description of the function and more examples.
	$uniqid = uniqid(mt_rand(), true);

	//Return the hash
	return md5($ip . $uniqid);
}
Insert the above code into your formkey.class.php file. Replace the function with the new function.
Step 3: Insert the form key into the form
For this step, we create a new function that outputs hidden HTML fields using form keys. This function consists of three steps:
- Generate the form key using our generateKey() function.
- Store the form key in the $formKey variable and session.
- Output HTML fields.
We named the function outputKey() and made it public since we have to use it outside the class. Our function will call the private function generateKey() to generate a new form key and save it in the local session. Finally, we create the XHTML code. Now add the following code in our PHP class:
//Function to output the form key
public function outputKey()
{
	//Generate the key and store it inside the class
	$this->formKey = $this->generateKey();
	//Store the form key in the session
	$_SESSION['form_key'] = $this->formKey;

	//Output the form key
	echo "<input type='hidden' name='form_key' id='form_key' value='".$this->formKey."' />";
}
Now we will add the form key to our login form to keep it secure. We have to include this class in the index.php file. We also have to start the session because our class uses the session to store the generated keys. To do this, we add the following code above the doctype and head tags:
<?php
//Start the session
session_start();
//Require the class
require('formkey.class.php');
//Start the class
$formKey = new formKey();
?>
The code above is pretty self-explanatory. We start the session (since we store the form key) and load the PHP class file. After that, we start the class using new formKey(), which will create our class and store it in $formKey. Now we just need to edit the form so that it contains the form key:
<form action="" method="post">
<dl>
	<?php $formKey->outputKey(); ?>
	<dt><label for="username">Username:</label></dt>
	<dd><input type="text" name="username" id="username" /></dd>
	<dt><label for="username">Password:</label></dt>
	<dd>input type="password" name="password" id="password" /></dd>
<dl>
</form>
仅此而已!因为我们创建了函数 outputKey(),所以我们只需将它包含在表单中即可。我们可以在每个表单中使用表单键,只需添加 outputKey(); ?> 现在只需查看网页的源代码,您就可以看到表单上附加了一个表单密钥。剩下的唯一步骤是验证请求。
第 4 步:验证
我们不会验证整个表单;只有表单键。验证表单是基本的 PHP 操作,并且可以在网络上找到教程。让我们验证表单密钥。因为我们的“generateKey”函数会覆盖会话值,所以我们向 PHP 类添加一个构造函数。创建(或构造)我们的类时将调用构造函数。在我们创建新密钥之前,构造函数会将前一个密钥存储在类中;所以我们将始终拥有以前的表单密钥来验证我们的表单。如果我们不这样做,我们将无法验证表单密钥。将以下 PHP 函数添加到您的类中:
//The constructor stores the form key (if one exists) in our class variable.
function __construct()
{
	//We need the previous key so we store it
	if(isset($_SESSION['form_key']))
	{
		$this->old_formKey = $_SESSION['form_key'];
	}
}
构造函数应始终命名为__construct()。当调用构造函数时,我们检查是否设置了会话,如果是,我们将其本地存储在 old_formKey 变量中。
现在我们可以验证表单密钥了。我们在类中创建一个基本函数来验证表单密钥。这个函数也应该是公共的,因为我们将在类之外使用它。该函数将根据表单键的存储值验证表单键的 POST 值。将此函数添加到 PHP 类中:
//Function that validated the form key POST data
public function validate()
{
	//We use the old formKey and not the new generated version
	if($_POST['form_key'] == $this->old_formKey)
	{
		//The key is valid, return true.
		return true;
	}
	else
	{
		//The key is invalid, return false.
		return false;
	}
}
在index.php中,我们使用刚刚在类中创建的函数来验证表单密钥。当然,我们仅在 POST 请求后进行验证。在 $formKey = new formKey(); 后添加以下代码
$error = 'No error';

//Is request?
if($_SERVER['REQUEST_METHOD'] == 'post')
{
	//Validate the form key
	if(!isset($_POST['form_key']) || !$formKey->validate())
	{
		//Form key is invalid, show an error
		$error = 'Form key error!';
	}
	else
	{
		//Do the rest of your validation here
		$error = 'No form key error!';
	}
}
我们创建了一个变量$error来存储我们的错误消息。如果已发送 POST 请求,我们将使用 $formKey->validate() 验证表单密钥。如果返回 false,则表单键无效,并且我们会显示错误。请注意,我们仅验证表单密钥 - 您需要自己验证表单的其余部分。
在 HTML 中,您可以放置以下代码来显示错误消息:
<div><?php if($error) { echo($error); } ?></div>
这将回显 $error 变量(如果已设置)。
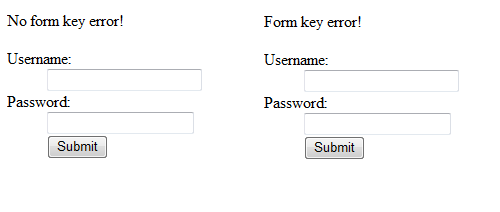
如果您启动服务器并转到index.php,您将看到我们的表单和消息“无错误”。当您提交表单时,您将看到消息“无表单键错误”,因为它是有效的 POST 请求。现在尝试重新加载页面并在浏览器请求再次发送 POST 数据时接受。您将看到我们的脚本触发了一条错误消息:“表单键错误!”现在,您的表单可以免受来自其他网站的输入和页面重新加载错误的影响!刷新后也会显示该错误,因为我们提交表单后生成了新的表单密钥。这很好,因为现在用户不会意外地将表单发布两次。
完整代码
以下是完整的 PHP 和 HTML 代码:
index.php
Securing forms with form keys fomrkey.class.php
<?php //You can of course choose any name for your class or integrate it in something like a functions or base class class formKey { //Here we store the generated form key private $formKey; //Here we store the old form key (more info at step 4) private $old_formKey; //The constructor stores the form key (if one excists) in our class variable function __construct() { //We need the previous key so we store it if(isset($_SESSION['form_key'])) { $this->old_formKey = $_SESSION['form_key']; } } //Function to generate the form key private function generateKey() { //Get the IP-address of the user $ip = $_SERVER['REMOTE_ADDR']; //We use mt_rand() instead of rand() because it is better for generating random numbers. //We use 'true' to get a longer string. //See http://www.php.net/mt_rand for a precise description of the function and more examples. $uniqid = uniqid(mt_rand(), true); //Return the hash return md5($ip . $uniqid); } //Function to output the form key public function outputKey() { //Generate the key and store it inside the class $this->formKey = $this->generateKey(); //Store the form key in the session $_SESSION['form_key'] = $this->formKey; //Output the form key echo "<input type='hidden' name='form_key' id='form_key' value='".$this->formKey."' />"; } //Function that validated the form key POST data public function validate() { //We use the old formKey and not the new generated version if($_POST['form_key'] == $this->old_formKey) { //The key is valid, return true. return true; } else { //The key is invalid, return false. return false; } } } ?>结论
将此代码添加到您网站上的每个重要表单中将显着提高表单的安全性。它甚至会停止刷新问题,正如我们在步骤 4 中看到的那样。由于表单密钥仅对一个请求有效,因此不可能进行双重发布。
这是我的第一个教程,希望您喜欢它并使用它来提高您的安全性!请通过评论让我知道您的想法。有更好的方法吗?让我们知道。
进一步阅读
- WordPress 还使用表单键(将其命名为 Nonce):Wordpress Nonce
- 编写安全 PHP 应用程序的七个习惯
- 在 Twitter 上关注我们,或订阅 NETTUTS RSS Feed 以获取更多日常 Web 开发教程和文章。
The above is the detailed content of Protect your forms with form keys. For more information, please follow other related articles on the PHP Chinese website!
Statement:The content of this article is voluntarily contributed by netizens, and the copyright belongs to the original author. This site does not assume corresponding legal responsibility. If you find any content suspected of plagiarism or infringement, please contact admin@php.cn