


In the last Crafty series, you learned about different ways to move elements using your keyboard. While the keyboard can help you create a variety of games, some situations require you to control different mouse events to make the game more interesting. For example, consider a game in which balloons appear at random locations on the screen. If the user needs to click on the balloon to score points, then you definitely need a mouse component.
Similarly, when you develop a game for mobile devices, the Keyboard component will be of no use. In this case, you will have to rely on touch components to create your game. In this tutorial, you'll learn about mouse and touch components in Crafty.
Mouse component
Mouse Component is used to add basic mouse events to entities. The following is a list of all events contained in this component:
- MouseOver: This event is triggered when the mouse enters the entity.
-
MouseOut: This event is triggered when the mouse leaves the entity.
-
MouseDown: This event is triggered when the mouse button is pressed on the entity.
-
MouseUp: This event is triggered when the mouse button is released within the entity.
-
Click: This event is triggered when the mouse button is clicked within the entity.
-
DoubleClick: This event is triggered when the mouse button double-clicks an entity.
- MouseMove: This event is triggered when the mouse moves within the entity.
Remember that mouse events will only fire on an entity if you have added a Mouse component to the entity. Here is the code to bind the MouseMove event to the box in the demo below:
var Box = Crafty.e("2D, Canvas, Color, Mouse")
  .attr({
    x: 200,
    y: 100,
    w: 200,
    h: 200
  })
  .color("black")
  .origin("center")
  .bind('MouseMove', function() {
    this.rotation += 1;
  });
After the box is bound to the MouseMove event, every time the mouse moves on the box, the box will rotate 1 degree. .origin() The method is used to set the rotation point of the box to the center. It can also take other values, such as "upper left corner", "lower right corner", etc.
Try moving the cursor in and out of the box in the demo. Holding down the mouse button inside the box will trigger the MouseDown event and change the color of the box to red.
MouseEvent The object is also passed as a parameter to the callback functions of all these mouse events. It contains all the data related to that specific mouse event.
You can also use the mouseButton property to check which mouse button the user clicked. For example, you can use Crafty.mouseButtons.LEFT to detect left clicks. Likewise, middle clicks can be detected using Crafty.mouseButtons.MIDDLE.
MouseDragThe component provides entities with different drag and drop mouse events. However, there isn't much point in adding these events if the entity itself can't be dragged and dropped. You can add drag-and-drop functionality to entities using the Draggable component. This component listens for events from the MouseDrag component and moves the given entity accordingly. The MouseDrag component is automatically added to any entity that has a Draggable component.
Draggable component has three methods: .enableDrag(), .disableDrag() and .dragDirection().before Two methods enable and disable dragging on entities respectively. The third method is used to set the drag direction.
By default, entities will move in whatever direction the cursor moves. However, you can constrain the entity's movement to the vertical direction using this.dragDirection({x:0, y:1}). Likewise, you can use this.dragDirection({x:1, y:0}) to force the entity to move only in the horizontal direction.
You can also specify the direction directly in degrees. For example, to move an element 45 degrees, you would simply use this.dragDirection(45) instead of this.dragDirection({x:1, y:1} ).
In addition to dragging and dropping elements, you also need to know when dragging starts and stops. This can be accomplished using the StartDrag and StopDrag events. There is also a Dragging event, which is triggered when an entity is dragged.
Here is the code for dragging the red box in the demo below:
var hBox = Crafty.e("2D, Canvas, Color, Draggable")
  .attr({
    x: 50,
    y: 50,
    w: 50,
    h: 50
  })
  .color("red")
  .dragDirection(0)
  .bind('Dragging', function(evt) {
    this.color("black");
  })
  .bind('StopDrag', function(evt) {
    this.color("red");
  });
设置框的宽度、高度和位置后,我使用 .dragDirection(0) 来限制框在水平方向的移动。我还使用 .bind() 方法将实体绑定到 Dragging 和 StopDrag 方法。
将颜色更改为黑色可以向用户表明实体当前正在被拖动。您还可以使用 StartDrag 事件代替 Dragging 因为实体的颜色只需要更改一次。当您必须连续更改或监视被拖动实体的属性时,Dragging 事件更合适。例如,您可以使用以下代码在框到达所需位置后禁用对其的拖动。
hBox.bind('Dragging', function(evt) {
    this.color("black");
    if(this.x > 300) {
      this.disableDrag();
    }
});
触摸组件
如果需要访问实体的触摸相关事件,可以使用 Touch 组件。该组件使您可以访问四个不同的事件:
- TouchStart:当实体被触摸时触发此事件。
- TouchMove:当手指在实体上移动时会触发此事件。
- TouchCancel:当某些事件中断触摸事件时会触发此事件。
- TouchEnd:当手指在实体上抬起或离开该实体时,会触发此事件。
前三个事件可以访问TouchEvent对象,该对象包含有关触摸的所有信息。
某些游戏或项目可能需要您检测多次触摸。这可以通过使用 Crafty.multitouch(true) 启用多点触控来实现。传递此方法 true 或 false 可打开和关闭多点触控。
在您的项目中使用 Touch 组件之前,您应该知道它目前与 Draggable 组件不兼容。
结论
完成本教程后,您现在应该能够正确处理不同的鼠标事件或轻松创建基于拖放的游戏。请记住,我在本教程中使用了 Crafty 版本 0.7.1,并且演示可能无法与该库的其他版本一起使用。
在下一个教程中,您将学习如何使用精灵表在 Crafty 中为不同的游戏角色设置动画。
The above is the detailed content of Getting clever beyond the basics: Mouse and touch events. For more information, please follow other related articles on the PHP Chinese website!

 打开win11的分屏交互方式Dec 25, 2023 pm 03:05 PM
在win11系统中,我们可以通过打开分屏交互来让多个显示器使用同一款系统,共同操作,但是很多朋友不知道分屏交互怎么开启,其实只要在系统设置中找到显示器就可以了,下面一起来学习一下吧。win11分屏交互怎么打开1、点击开始菜单,找到其中的“设置”2、然后在其中找到“系统”设置。3、进入系统设置后,在左侧选择“显示”4、接着在右边的多显示器中选择“扩展这些显示器”即可。
 Python GUI编程:快速上手,轻松打造交互式界面Feb 19, 2024 pm 01:24 PM
pythonGUI编程简述GUI(GraphicalUserInterface,图形用户界面)是一种允许用户通过图形方式与计算机交互的方式。GUI编程是指使用编程语言来创建图形用户界面。Python是一种流行的编程语言,它提供了丰富的GUI库,使得PythonGUI编程变得非常简单。PythonGUI库介绍Python中有许多GUI库,其中最常用的有:Tkinter:Tkinter是Python标准库中自带的GUI库,它简单易用,但功能有限。PyQt:PyQt是一个跨平台的GUI库,它功能强大,
 Vue3+TS+Vite开发技巧:如何与后端API进行交互Sep 08, 2023 pm 06:01 PM
Vue3+TS+Vite开发技巧:如何与后端API进行交互引言:在网页应用开发中,前端与后端之间的数据交互是一个非常重要的环节。Vue3作为一种流行的前端框架,与后端API进行交互的方式也有很多种。本文将介绍如何使用Vue3+TypeScript+Vite开发环境来与后端API进行交互,并通过代码示例来加深理解。一、使用Axios发送请求Axios是
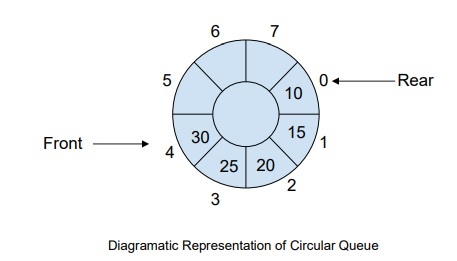 如何在C++中管理完整的循环队列事件?Sep 04, 2023 pm 06:41 PM
介绍CircularQueue是对线性队列的改进,它被引入来解决线性队列中的内存浪费问题。循环队列使用FIFO原则来插入和删除其中的元素。在本教程中,我们将讨论循环队列的操作以及如何管理它。什么是循环队列?循环队列是数据结构中的另一种队列,其前端和后端相互连接。它也被称为循环缓冲区。它的操作与线性队列类似,那么为什么我们需要在数据结构中引入一个新的队列呢?使用线性队列时,当队列达到其最大限制时,尾指针之前可能会存在一些内存空间。这会导致内存损失,而良好的算法应该能够充分利用资源。为了解决内存浪费
 PHP8.0中的事件处理库:EventMay 14, 2023 pm 05:40 PM
PHP8.0中的事件处理库:Event随着互联网的不断发展,PHP作为一门流行的后台编程语言,被广泛应用于各种Web应用程序的开发中。在这个过程中,事件驱动机制成为了非常重要的一环。PHP8.0中的事件处理库Event将为我们提供一个更加高效和灵活的事件处理方式。什么是事件处理在Web应用程序的开发中,事件处理是一个非常重要的概念。事件可以是任何一种用户行
 uniapp实现如何使用JSBridge实现与原生交互Oct 20, 2023 am 08:44 AM
uniapp实现如何使用JSBridge实现与原生交互,需要具体代码示例一、背景介绍在移动应用开发中,有时需要与原生环境进行交互,比如调用原生的一些功能或获取原生的一些数据。uniapp作为一种跨平台的移动应用开发框架,提供了一种方便的方式来实现与原生交互,即使用JSBridge进行通信。JSBridge是一种前端与移动原生端进行交互的技术方案,通过在前端和
 PHP与JavaScript交互的方法及常见问题解答Jun 08, 2023 am 11:33 AM
PHP与JavaScript交互的方法及常见问题解答随着互联网的快速发展,网页已经成为人们获取信息、进行交流的主要平台。而PHP和JavaScript是开发网页的两种最常用语言。它们都具有各自的优点和适用场景,而在大型网站的开发过程中,两者的结合将会拓展开发人员的的工作能力。本文将介绍PHP和JavaScript交互的方法及常见问题解答。PHP与JavaSc
 冒泡事件的含义是什么Feb 19, 2024 am 11:53 AM
冒泡事件是指在Web开发中,当一个元素上触发了某个事件后,该事件将会向上层元素传播,直到达到文档根元素。这种传播方式就像气泡从底部逐渐冒上来一样,因此被称为冒泡事件。在实际开发中,了解和理解冒泡事件的工作原理对于正确处理事件十分重要。下面将通过具体的代码示例来详细介绍冒泡事件的概念和使用方法。首先,我们创建一个简单的HTML页面,其中包含一个父级元素和三个子


Hot AI Tools

Undresser.AI Undress
AI-powered app for creating realistic nude photos

AI Clothes Remover
Online AI tool for removing clothes from photos.

Undress AI Tool
Undress images for free

Clothoff.io
AI clothes remover

AI Hentai Generator
Generate AI Hentai for free.

Hot Article
Hot Tools

MinGW - Minimalist GNU for Windows
This project is in the process of being migrated to osdn.net/projects/mingw, you can continue to follow us there. MinGW: A native Windows port of the GNU Compiler Collection (GCC), freely distributable import libraries and header files for building native Windows applications; includes extensions to the MSVC runtime to support C99 functionality. All MinGW software can run on 64-bit Windows platforms.

mPDF
mPDF is a PHP library that can generate PDF files from UTF-8 encoded HTML. The original author, Ian Back, wrote mPDF to output PDF files "on the fly" from his website and handle different languages. It is slower than original scripts like HTML2FPDF and produces larger files when using Unicode fonts, but supports CSS styles etc. and has a lot of enhancements. Supports almost all languages, including RTL (Arabic and Hebrew) and CJK (Chinese, Japanese and Korean). Supports nested block-level elements (such as P, DIV),

WebStorm Mac version
Useful JavaScript development tools

Atom editor mac version download
The most popular open source editor

ZendStudio 13.5.1 Mac
Powerful PHP integrated development environment

