
Home >Web Front-end >HTML Tutorial >Continuing the journey: Building a Python Flask and MySQL web application from scratch - Part 2
Continuing the journey: Building a Python Flask and MySQL web application from scratch - Part 2

- WBOYWBOYWBOYWBOYWBOYWBOYWBOYWBOYWBOYWBOYWBOYWBOYWBOriginal
- 2023-09-02 09:25:041705browse
In the previous part of this series, we saw how to get started using Python Flask and MySQL and implement the user registration part of the application. In this tutorial, we will take it to the next level by implementing login and logout functionality for our application.
start using
Start by cloning the source code of the previous tutorial from GitHub.
git clone https://github.com/tutsplus/create-a-web-app-from-scratch-using-python-flask-and-mysql/.git
After cloning the source code, navigate to the part-1 directory and start the server.
python app.py
Point your browser to https://localhost:5000 and the application should be running.
Create login interface
Navigate to FlaskApp/templates and create a new file named signin.html. Open signin.html and add the following HTML code:
<!DOCTYPE html>
<html lang="en">
<head>
<title>Python Flask Bucket List App - Sign In</title>
<link
href="https://cdn.jsdelivr.net/npm/bootstrap@5.1.3/dist/css/bootstrap.min.css"
rel="stylesheet"
integrity="sha384-1BmE4kWBq78iYhFldvKuhfTAU6auU8tT94WrHftjDbrCEXSU1oBoqyl2QvZ6jIW3"
crossorigin="anonymous"
/>
<link href="../static/signup.css" rel="stylesheet" />
</head>
<body>
<div class="container">
<div class="header">
<nav
class="border-bottom flex-wrap mb-4 py-3 d-flex justify-content-center"
>
<a
href="/"
class="text-dark text-decoration-none mb-3 mb-md-0 d-flex align-items-center me-md-auto"
>
<span class="fs-4">Python Flask App</span>
</a>
<ul class="nav nav-pills">
<li class="nav-item">
<a href="/" class="nav-link">Home</a>
</li>
<li class="nav-item">
<a href="/signup" class="nav-link">Signup</a>
</li>
<li class="nav-item">
<a href="/signin" class="nav-link active" aria-current="page"
>Sign In</a
>
</li>
</ul>
</nav>
</div>
<div class="bg-light rounded-3 mb-4 p-5">
<div class="container-fluid py-5">
<h1 class="text-center fw-bold display-5">Bucket List App</h1>
<form class="form-signin" action="/api/validateLogin" method="post">
<label for="inputEmail" class="sr-only">Email address</label>
<input type="email" name="inputEmail" id="inputEmail" class="form-control" placeholder="Email address" required autofocus>
<label for="inputPassword" class="sr-only">Password</label>
<input type="password" name="inputPassword" id="inputPassword" class="form-control" placeholder="Password" required>
<button id="btnSignIn" class="btn btn-lg btn-primary btn-block" type="submit">Sign in</button>
</form>
</div>
<footer class="footer">
<p>© Company 2022</p>
</footer>
</div>
</body>
</html>
Open app.py and add a new route for the login interface.
@app.route('/signin')
def showSignin():
    return render_template('signin.html')
Next, open index.html and signup.html and add href links for login on both pages: /signin. Save all changes and restart the server.
python app.py
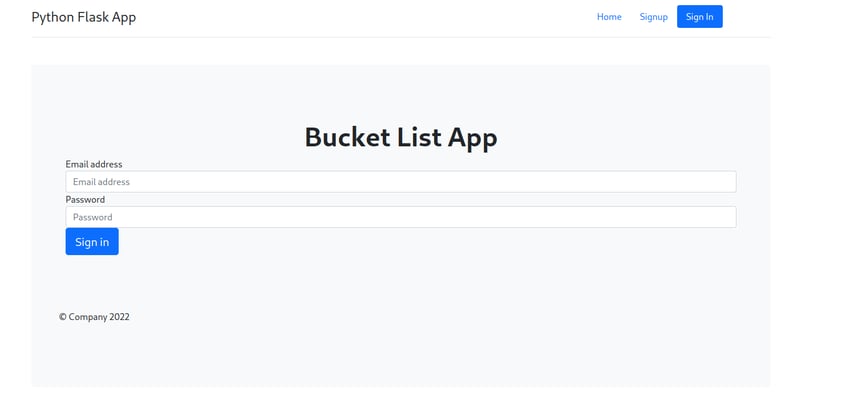
Point your browser to http://localhost:5000 and click the Login link, you should be able to see the login page.
Realize login
Now, we need to create a function to authenticate user login. After clicking Login we will post the entered email address and password to the Verify User function.
Create stored procedure
To authenticate users, we need a MySQL stored procedure. Therefore, create a MySQL stored procedure as shown:
DELIMITER $$
CREATE DEFINER=`root`@`localhost` PROCEDURE `sp_validateLogin`(
IN p_username VARCHAR(20)
)
BEGIN
    select * from tbl_user where user_username = p_username;
END$$
DELIMITER ;
We will use sp_validateLogin to get the user details based on username from the MySQL database. Once we have the hashed password, we verify it against the password entered by the user.
Verify user method
Create a method to authenticate the user, we will call this method when the user submits the form:
@app.route('/api/validateLogin',methods=['POST'])
def validateLogin():
    try:
        _username = request.form['inputEmail']
        _password = request.form['inputPassword']

    except Exception as e:
        return render_template('error.html',error = str(e))
As shown in the code above, we have read the published email address and password into _username and _password. Now we will call the sp_validateLogin procedure with the parameter _username. Therefore, create a MySQL connection inside the validatelogin method:
con = mysql.connect()
After creating the connection, use con to connect to create cursor.
cursor = con.cursor()
Use a cursor to call the MySQL stored procedure, as shown below:
cursor.callproc('sp_validateLogin',(_username,))
Get the records obtained from the cursor, as shown below:
data = cursor.fetchall()
If the data has some records, we will match the retrieved password with the password entered by the user.
if len(data) > 0:
    if check_password_hash(str(data[0][3]),_password):
        return redirect('/userhome')
    else:
        return render_template('error.html',error = 'Wrong Email address or Password.')
else:
    return render_template('error.html',error = 'Wrong Email address or Password.')
As shown in the code above, we use a method called check_password_hash to check whether the returned hashed password matches the password entered by the user. If all goes well, we'll redirect the user to userHome.html. If any errors occur, we will display error.html along with the error message.
This is the complete validateLogin Code:
@app.route('/api/validateLogin',methods=['POST'])
def validateLogin():
    try:
        _username = request.form['inputEmail']
        _password = request.form['inputPassword']


        # connect to mysql

        con = mysql.connect()
        cursor = con.cursor()
        cursor.callproc('sp_validateLogin',(_username,))
        data = cursor.fetchall()


        if len(data) > 0:
            if check_password_hash(str(data[0][3]),_password):
                session['user'] = data[0][0]
                return redirect('/userHome')
            else:
                return render_template('error.html',error = 'Wrong Email address or Password')
        else:
            return render_template('error.html',error = 'Wrong Email address or Password')


    except Exception as e:
        return render_template('error.html',error = str(e))
    finally:
        cursor.close()
        con.close()
Create a page named userhome.html in the templates folder and add the following HTML code:
<!DOCTYPE html>
<html lang="en">
<head>
<title>Python Flask Bucket List App - Home</title>
<link
href="https://cdn.jsdelivr.net/npm/bootstrap@5.1.3/dist/css/bootstrap.min.css"
rel="stylesheet"
integrity="sha384-1BmE4kWBq78iYhFldvKuhfTAU6auU8tT94WrHftjDbrCEXSU1oBoqyl2QvZ6jIW3"
crossorigin="anonymous"
/>
</head>
<body>
<div class="container">
<div class="header">
<nav
class="border-bottom flex-wrap mb-4 py-3 d-flex justify-content-center"
>
<a
href="/"
class="text-dark text-decoration-none mb-3 mb-md-0 d-flex align-items-center me-md-auto"
>
<span class="fs-4">Python Flask App</span>
</a>
<ul class="nav nav-pills">
<li class="nav-item">
<a href="/userhome" class="nav-link">Home</a>
</li>
<li class="nav-item">
<a href="/logout" class="nav-link active">Logout</a>
</li>
</ul>
</nav>
</div>
<div class="bg-light rounded-3 mb-4 p-5">
<div class="container-fluid py-5">
<h1 class="text-center fw-bold display-5">Welcome Home!</h1>
</div>
</div>
<footer class="footer">
<p>© Company 2022</p>
</footer>
</div>
</body>
</html>
Additionally, create an error page named error.html in the templates folder and add the following HTML code:
<!DOCTYPE html>
<html lang="en">
<head>
<title>Error - Python Flask App</title>
<link
href="https://cdn.jsdelivr.net/npm/bootstrap@5.1.3/dist/css/bootstrap.min.css"
rel="stylesheet"
integrity="sha384-1BmE4kWBq78iYhFldvKuhfTAU6auU8tT94WrHftjDbrCEXSU1oBoqyl2QvZ6jIW3"
crossorigin="anonymous"
/>
</head>
<body>
<div class="container">
<div class="header">
<nav
class="border-bottom flex-wrap mb-4 py-3 d-flex justify-content-center"
>
<a
href="/"
class="text-dark text-decoration-none mb-3 mb-md-0 d-flex align-items-center me-md-auto"
>
<span class="fs-4">Python Flask App</span>
</a>
<ul class="nav nav-pills">
<li class="nav-item">
<a href="/" class="nav-link">Home</a>
</li>
<li class="nav-item">
<a href="/signup" class="nav-link">Signup</a>
</li>
<li class="nav-item">
<a href="/signin" class="nav-link">Sign In</a>
</li>
</ul>
</nav>
</div>
<div class="bg-light rounded-3 mb-4 p-5">
<div class="container-fluid py-5">
<h1 class="text-center fw-bold display-5">{{error}}</h1>
</div>
</div>
<footer class="footer">
<p>© Company 2022</p>
</footer>
</div>
</body>
</html>
In error.html we have an element that looks like this:
<h1 class="text-center fw-bold display-5">{{error}}</h1>
The value of a variable can be passed from the render_template function and can be set dynamically.
After successful login, we redirect the user to the user homepage, so we need to create a route called /userHome as shown below:
@app.route('/userHome')
def userHome():
    return render_template('userHome.html')
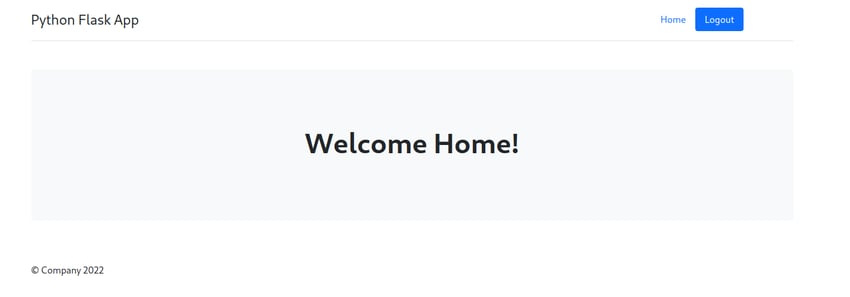
Save all changes and restart the server. Click the Login link on the home page and try logging in with a valid email address and password. After successful user authentication, you should see a page like this:
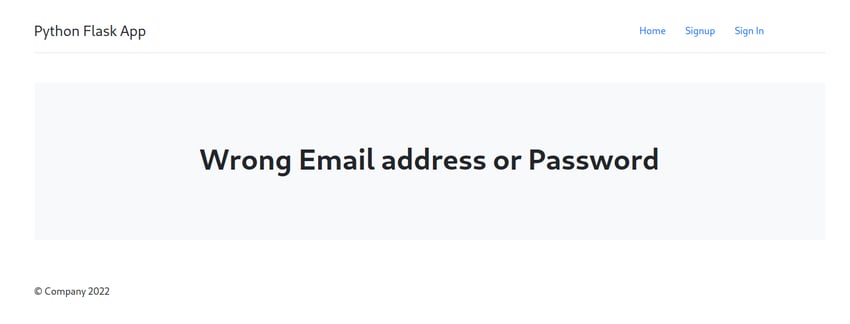
When user verification is unsuccessful, the user will be redirected to the error page, as shown below:
Here we use a separate error page to display errors. If you want to use the same page to display error messages that's fine too.
限制未经授权访问用户主页
用户验证成功后,用户将被重定向到用户主页。但现在,即使是未经授权的用户也可以通过简单地浏览 URL http://localhost:5000/userhome 来查看主页。
为了限制未经授权的用户访问,我们将检查会话变量,并在用户成功登录时设置该变量。因此从 Flask 导入 session:
from flask import session
我们还需要为会话设置一个密钥。因此,在 app.py 中,在应用程序初始化后,设置密钥,如下所示:
app.secret_key = 'why would I tell you my secret key?'
现在,在 validateLogin 方法中,在成功登录后将用户重定向到 /userhome 之前,设置 session 变量,如下所示:
session['user'] = data[0][0]
接下来,在 userhome 方法内,在渲染 userhome.html 之前检查会话变量。如果未找到会话变量,则重定向到错误页面。
@app.route('/userhome')
def userHome():
    if session.get('user'):
        return render_template('userhome.html')
    else:
        return render_template('error.html',error = 'Unauthorized Access')
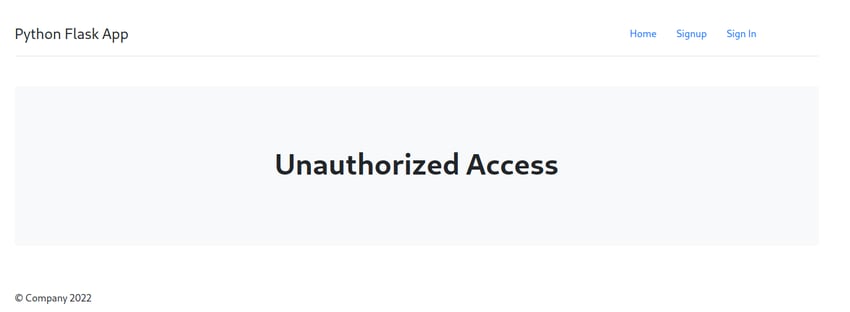
保存所有更改并重新启动服务器。在不登录的情况下,尝试导航到 http://localhost:5000/userhome,由于您尚未登录,因此您应该被重定向到错误页面。
实现注销
实现注销功能是最简单的。我们需要做的就是将会话变量 user 设置为 null 并将用户重定向到主页。
在app.py中,为 logout 创建一个新的路由和方法,如下所示:
@app.route('/logout')
def logout():
    session.pop('user',None)
    return redirect('/')
我们已经将注销按钮的 href 设置为 /logout。因此,保存所有更改并重新启动服务器。在主页上,单击登录并尝试使用有效的电子邮件地址和密码登录。登录后,单击用户主页中的注销按钮,您应该会成功从应用程序注销。
结论
在本教程的这一部分中,我们了解了如何实现用户登录和注销功能。我们还了解了如何限制对应用程序页面的未经授权的访问。在本教程的下一部分中,我们将实现登录用户在应用程序中添加和编辑博客文章的功能。
这篇文章已根据 Jacob Jackson 的贡献进行了更新。 Jacob 是一名 Web 开发人员、技术作家、自由职业者和开源贡献者。
The above is the detailed content of Continuing the journey: Building a Python Flask and MySQL web application from scratch - Part 2. For more information, please follow other related articles on the PHP Chinese website!