
Home >Backend Development >PHP Tutorial >Create your first ExpressionEngine plug-in
Create your first ExpressionEngine plug-in

- 王林Original
- 2023-09-01 22:33:021593browse
No matter how great a CMS is, sometimes the specific needs you need to meet simply don't work out of the box. Here we'll explore creating a plug-in for ExpressionEngine to address such needs.
Version Notes
Recently, EllisLab, the creators of ExpressionEngine, announced the official release date of ExpressionEngine 2.0 as December 1, 2009. Please note that this tutorial was written based on the details of the 1.6.x version. Some details, such as file paths and global objects, will change in version 2.0. While these details will vary, the general application and approach to ExpressionEngine plug-in creation will remain the same.
ExpressionEngine plug-in type
Like most powerful management systems available, ExpressionEngine or "EE" provides developers with multiple ways to add functionality that may not be present by default. Unlike popular systems like WordPress, EE has different names for these add-ons, depending on how they interact with your site. There are three main ways you can add functionality to EE 1.6.x, namely plug-ins, extensions, and modules. Plugins mainly deal with modifying template code and tend to be more of a front-end job. Extensions typically adjust the functionality of a backend or control panel by binding to "hooks" in the system. Modules tend to be larger in scope, have their own area in the control panel, and are also available on the front-end of the EE website. Modules can be full-fledged applications that sit within EE and leverage memberships, templates, databases, etc.
Required experience
There are a few things that are sure to help you know before proceeding:
- How to set up and install ExpressionEngine in a development environment
- Basic understanding of ExpressionEngine’s control panel and template parsing
- Have a basic understanding of PHP and object-oriented programming
- How to read the documentation!
Our plugin
In this tutorial, we will create a simple plugin that scans the data passed to it and wraps certain strings with HTML tags. This is a very simple EE plug-in application that should show you how easy it is to get started with plug-in development. Our plugin will be used to search and replace acronyms that we as developers use. For the sake of example, we’ll stick with three: HTML, CSS, and RSS. We named the plugin “Auto Acronym”.
Where do I start?
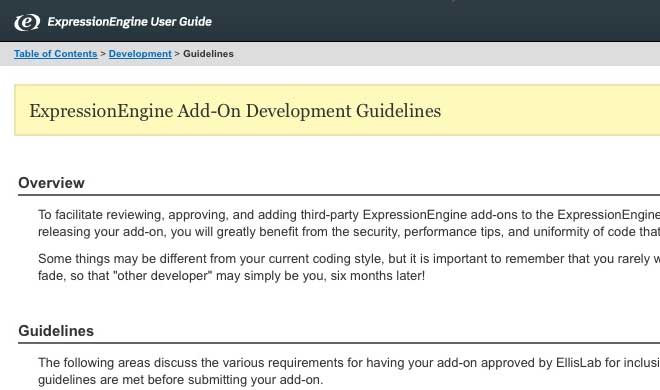
The best starting point for EE add-on development is the official ExpressionEngine documentation. Before diving into developing ExpressionEngine, you should read their guidelines, which, if followed, will help keep your system running well. The guide covers things like naming conventions, performance, and security. I'll give you a few minutes to read the ExpressionEngine Add-on Development Guide
Okay, now that you've read this we can start looking at how to actually create a plugin and what the components of a simple plugin are.
Pieces of the puzzle
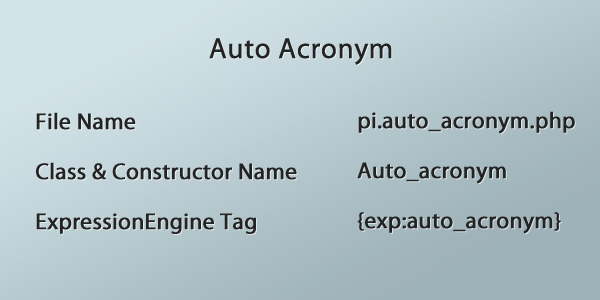
Every plugin requires a class and at least one function. Naming conventions are very specific, so we need to make sure we name them correctly and carefully. The name of our plugin is Auto Acronym and it works with our file name, class name, and EE tags. The filename takes the name of the plugin, replacing any spaces with underscores and adding "pi" in front. to the front. All letters must be lowercase. This will give our file name "pi.auto_acronym.php". All EE plugins go into a single directory located under system/plugins (imagine that).
Class names are similar to file names, except the first letter is capitalized. This makes our class name "Auto_acronym". The plugin only requires one function, so it will have the same name as the class. These will also be the names we use in the EE plugin tags. Plugin tags always start with "exp:", which tells the template parser, "Hey! I need to do some processing here!". Next is your class name, all lowercase, giving us: "exp:auto_acronym". The third paragraph of the plug-in tag calls the function in the plug-in class. In our example we will only use one function, the constructor, so we only need the class name. Here’s what we know about the plugin so far:
Write it into code
Let's see what our code looks like so far:
<?php

class Auto_acronym
{

   function Auto_acronym()
   {

   }

}

/* End of file pi.auto_acronym.php */
/* Location: ./system/plugins/pi.auto_acronym.php */
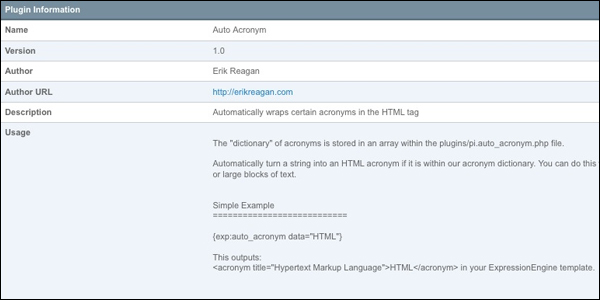
For those of you familiar with WordPress plugin development, you know that WordPress pulls some data from the annotated code when displaying details in the plugin manager. ExpressionEngine performs similar operations, except using arrays from the plugin file. Let's go ahead and add it to the file above the class and give it the appropriate information.
<?php

$plugin_info       = array(
   'pi_name'        => 'Auto Acronym',
   'pi_version'     => '1.0',
   'pi_author'      => 'Erik Reagan',
   'pi_author_url'  => 'http://erikreagan.com',
   'pi_description' => 'Automatically wraps certain acronyms in the HTML <acronym> tag',
   'pi_usage'       => Auto_acronym::usage()
   );

class Auto_acronym
{

   function Auto_acronym()
   {

   }

}

/* End of file pi.auto_acronym.php */
/* Location: ./system/plugins/pi.auto_acronym.php */
每个数组键的用途都应该非常明显。然而,最后一个键有点不同。它显然不只是像其他字符串一样。它用于告诉 ExpressionEngine 控制面板在哪里可以找到插件的用法或简单文档。每个 EE 插件都应该在插件文件中包含一些基本文档,以便使用该插件的人可以在控制面板中查看它并了解如何使用标签。这是通过向插件类添加一个名为“usage”的函数来完成的。我喜欢将使用函数放在类的最后,所以让我们继续从 ExpressionEngine 插件文档复制并粘贴示例,并删除 ?> 和
   // ----------------------------------------
   //  Plugin Usage
   // ----------------------------------------

   // This function describes how the plugin is used.
   //  Make sure and use output buffering

   function usage()
   {
   ob_start();
   ?>


   <?php
   $buffer = ob_get_contents();

   ob_end_clean();

   return $buffer;
   }
我们的用法将在我们完成插件后编写。现在,我们只是输入一些文本以进行测试。请记住,此文本将被视为预先格式化,并且所有字符都将转换为 HTML 实体; HTML 将不起作用。让我们看看到目前为止我们的插件的整体情况
<?php

$plugin_info       = array(
   'pi_name'        => 'Auto Acronym',
   'pi_version'     => '1.0',
   'pi_author'      => 'Erik Reagan',
   'pi_author_url'  => 'http://erikreagan.com',
   'pi_description' => 'Automatically wraps certain acronyms in the HTML <acronym> tag',
   'pi_usage'       => Auto_acronym::usage()
   );

class Auto_acronym
{

   function Auto_acronym()
   {

   }


   // ----------------------------------------
   //  Plugin Usage
   // ----------------------------------------

   // This function describes how the plugin is used.
   //  Make sure and use output buffering

   function usage()
   {
   ob_start();
   ?>

   This is where our simplified documentation will go

   <?php
   $buffer = ob_get_contents();

   ob_end_clean();

   return $buffer;
   }

}

/* End of file pi.auto_acronym.php */
/* Location: ./system/plugins/pi.auto_acronym.php */
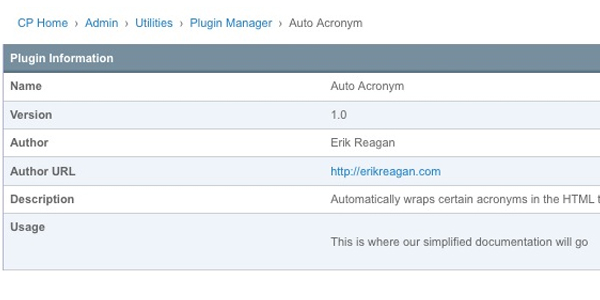
现在我们有了一个简单的插件文件,我们需要将其保存到 system/plugins 目录中,以确保系统正确读取它。保存后,您将在“管理”>“实用程序”>“插件管理器”下看到它。如果您点击我们的新插件,您应该会看到这样的页面,其中包含我们刚刚添加到插件中的信息
让它发挥作用
现在我们的插件已正确引入 ExpressionEngine 系统,我们可以让它真正做某事。每个插件都会返回某种形式的数据。该数据始终来自 EE 将查找的标准化变量,称为“return_data”。我们要做的第一件事是在类中的第一个函数之前定义它。然后,出于测试目的,我们将在第一个函数中使用它来返回一个简单的字符串。
class Auto_acronym
{

   var $return_data  = "";

   function Auto_acronym()
   {
      $this->return_data = "Just making sure this works";

   }
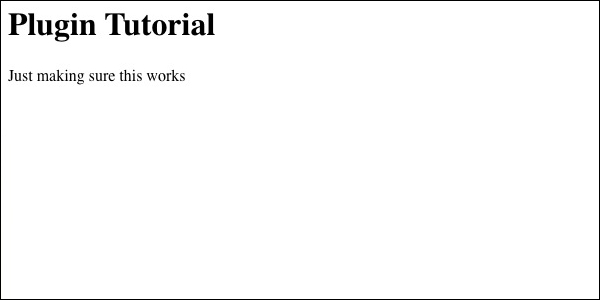
现在我们已经返回了一些数据,我们可以在网站的前端对其进行测试。我现在正在使用一个非常小的模板用于测试目的,但您可以在任何 ExpressionEngine 模板中使用它。如果您还记得之前我们的插件标签是 {exp:auto_acronym} ,并且由于我们只有一个函数,因此我们不需要在此插件中使用第三个段。这是我的模板代码的样子,然后是我的浏览器显示的内容:
<h1>Plugin Tutorial</h1>

<p>{exp:auto_acronym}</p>
虽然不完全是开创性的,但它让我们离我们的目标又近了一步。现在我们知道如何传回数据,我们可以看看如何获取传递给插件的数据。
使用我们的插件处理数据
我们将重点关注的处理数据的第一个方法是 ExpressionEngine 读取插件标签对之间的所有数据。我您还不知道,我们的标签 pair 与 HTML 标签对的工作方式非常相似。我们有一个开放标记,后跟数据,然后是结束标记,如下所示:
{exp:auto_acronym}
This gets processed
{/exp:auto_acronym}
通过使用模板对象,ExpressionEngine 可以非常轻松地获取这些数据。在这种情况下,我们需要在我们的函数中将其设置为全局,以便我们可以访问它。然后我们通过调用“tagdata”变量来定义我们的变量。该变量是我们的打开和关闭标记对之间的数据。看看:
function Auto_acronym()
{
   global $TMPL;

   $data = $TMPL->tagdata;
}
现在让我们对数据做一些非常简单的事情,并将其设置为粗体,因为它现在只是文本。我们将在其周围添加 标签,然后相应地定义我们的 return_data 变量。这就是我们的代码、模板和渲染页面现在的样子:
插件:
function Auto_acronym()
{
   global $TMPL;

   $data = '<strong>'.$TMPL->tagdata.'</strong>';

   $this->return_data = $data;
}
模板:
<h1>Plugin Tutorial</h1>

{exp:auto_acronym}
<p>This gets processed</p>
{/exp:auto_acronym}
在浏览器中呈现:
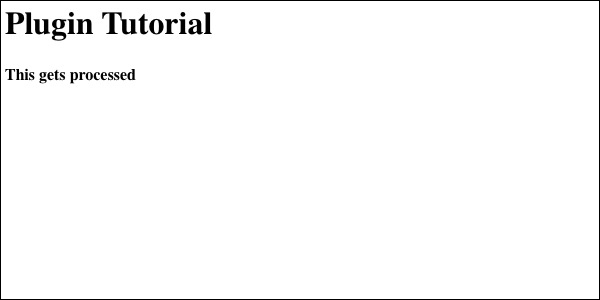
已经做点什么了!
好吧好吧。现在让我们真正享受一下这个乐趣。我们使用此插件的目标是扫描传递给它的数据以查找常见的 Web 开发首字母缩略词。我提到我们将在本教程中使用 3 个:HTML、CSS 和 RSS。我们要做的第一件事是将它们全部放入函数中的数组中。请注意,如果我们在整个插件中使用此数组并且具有多个函数,我们可能希望将其存储在构造函数之外,以便任何函数都可以调用它。
function Auto_acronym()
{
   global $TMPL;

   $data = $TMPL->tagdata;

   $acronyms = array(
      'HTML' => 'HyperText Markup Language',
      'CSS' => 'Cascading Style Sheets',
      'RSS' => 'Really Simple Syndication'
      );
}
现在我们有了标签数据以及首字母缩略词数组,我们需要对首字母缩略词运行 foreach() 循环。我们要做的第一件事是通过 strpos() 函数运行缩写词和标签数据,以确保缩写词实际上在我们的字符串内。我们这样做的原因是为了不运行不需要的字符串替换。如果您的首字母缩略词词典有数百个值,并且您在一篇冗长的文章中运行它,则可能会冒不必要的处理时间的风险。当且仅当首字母缩略词位于我们的标签数据中时,我们才会使用 str_replace() 函数实际添加 标签。在 foreach() 循环之后,我们将相应地定义 return_data 变量。它看起来像这样:
function Auto_acronym()
{
   global $TMPL;

   $data = $TMPL->tagdata;

   $acronyms = array(
      'HTML' => 'HyperText Markup Language',
      'CSS' => 'Cascading Style Sheets',
      'RSS' => 'Really Simple Syndication'
      );

   foreach ($acronyms as $short => $long)
   {
      if (strpos($data, $short) !== FALSE)
      {
         $data = str_replace($short, '<acronym title="'.$long.'">'.$short.'</acronym>', $data);
      }
   }

   $this->return_data = $data;

}
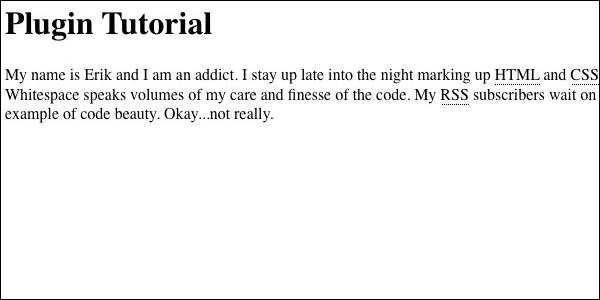
为了正确测试这一点,我们需要更改模板,以便它实际上包含一些我们想要的首字母缩略词。我将把我的模板更改为:
<h1>Plugin Tutorial</h1>

{exp:auto_acronym}
<p>My name is Erik and I am an addict. I stay up late into the night marking up HTML and CSS with magical alignment.
Whitespace speaks volumes of my care and finesse of the code. My RSS subscribers wait on their toes for my next
example of code beauty. Okay...not really.</p>
{/exp:auto_acronym}
保存我们的模板并刷新浏览器应该会产生以下结果:
现在我们已经取得进展了!
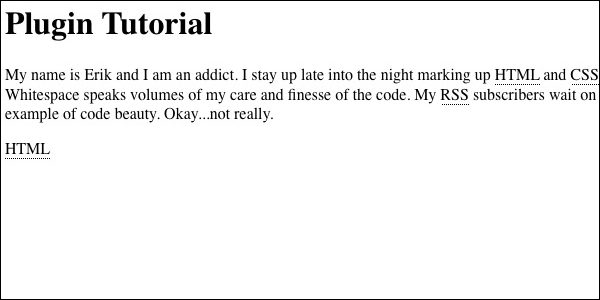
现在我们已经正确处理了插件的打开标签和关闭标签之间的标签,让我们看看另一个选项:在单个标签内传递数据。将单个标签与插件一起使用将需要添加参数,以便数据仍然传递到插件进行处理。您可以随意命名参数。在我们的例子中,我们将使用它并将其添加到我们的模板中:
{exp:auto_acronym data="HTML"}
现在我们有了一个标签,我们需要找到一种在插件中使用它的方法。您想要在插件中使用的任何参数都可以使用我们之前使用的相同模板对象来获取。您需要使用名为 fetch_param() 的函数来获取它,而不是通过变量来获取它。我们希望我们的 pluign 可以与单个标签或标签对一起使用,因此在定义 $data 变量时我们会考虑到这一点。这就是我们要改变的:
// Original
$data = $TMPL->tagdata;

// New
$data = ($TMPL->fetch_param('data')) ? $TMPL->fetch_param('data') : $TMPL->tagdata ;
如果您不熟悉这个语法,基本上就是“如果数据参数存在(或返回 true),则将其用作我们的数据变量,否则使用标签对之间的 tagdata”。这一更改将使我们能够使用定义了数据参数的标签对和单个标签。这是我们的模板现在应该呈现的内容:
即将完成!
现在我们有了一个功能齐全的 ExpressionEngine 插件。完成它的最后一步是添加有用的“使用”信息。让我们深入到 use() 函数并为控制面板添加一些简单的文档。
function usage()
{
   ob_start();
?>

The "dictionary" of acronyms is stored in an array within the plugins/pi.auto_acronym.php file.

Automatically turn a string into an HTML acronym if it is within our acronym dictionary. You can do this with individual words or large blocks of text.


Simple Example
===========================

{exp:auto_acronym data="HTML"}

This outputs:
HTML in your ExpressionEngine template.


Large Block Example
===========================

{exp:auto_acronym}

My name is Erik and I am an addict. I stay up late into the night marking up HTML and CSS with magical alignment.
Whitespace speaks volumes of my care and finesse of the code. My RSS subscribers wait on their toes for my next
example of code beauty. Okay...not really.

{/exp:auto_acronym}

This outputs:
My name is Erik and I am an addict. I stay up late into the night marking up HTML and CSS with magical alignment.
Whitespace speaks volumes of my care and finesse of the code. My RSS subscribers wait on their toes for my next
example of code beauty. Okay...not really.


现在我们的控制面板应该看起来像这样:

恭喜!

您现在已经完成了第一个 ExpressionEngine 插件。希望这将为您打开大门,因为您会看到它是多么容易。获取和返回数据非常简单,您可以从插件本身运行许多 PHP 魔法。我在我的 GitHub 帐户上托管此插件,如果您愿意,您可以在那里下载完整的插件代码。接下来,在我们的 ExpressionEngine 附加组件系列中,我们将着眼于为控制面板创建一个简单的扩展。请继续关注!
附注
别忘了查看其他精彩的 ExpressionEngine 教程!
- 使用 EE 创建 Google 地图
- 使用 Slideshow Pro 和 ExpressionEngine 创建幻灯片
- 5 天内成为 ExpressionEngine 超级明星
- 在 Twitter 上关注我们,或订阅 Nettuts+ RSS Feed 以获取网络上最好的 Web 开发教程。
The above is the detailed content of Create your first ExpressionEngine plug-in. For more information, please follow other related articles on the PHP Chinese website!