

 Backend DevelopmentPHP TutorialDesigning a Personalized WordPress Communications Platform, Part 4

In this series, we learned how to implement a system that allows us to programmatically define custom messages that appear on a given admin page in the WordPress backend.
If you've been following the series so far, you'll know:
- We have laid the foundation for the plugin used in this series and even developed it further.
- We defined and used a custom hook that can be used to render setup messages.
- We've added support for success, warning, and error messages that can be rendered at the top of a given settings page.
As mentioned in the previous tutorial:
But if you've read any of my previous tutorials, you'll know that I don't like duplicate code. I also don't like having one class do a lot of things. Unfortunately, that's exactly what we're doing.
We will solve this problem in the final tutorial. In the end, we will have a complete refactoring solution that uses some intermediate object-oriented principles (such as inheritance). We will also provide some methods that can be used programmatically or can be registered in the WordPress hooking system.
Final start
At this point you should know exactly what is required in your local development environment. Specifically, you should have the following:
- PHP 5.6.25 and MySQL 5.6.28
- Apache or Nginx
- WordPress 4.6.1
- Your preferred IDE or editor
I also recommend the latest version of the source code as it allows you to step through all the changes we will be making. If you don't have one, that's okay, but I recommend reading the previous tutorial before continuing.
In the previous tutorial
As you may remember (or ascertain from the comments above), the previous tutorial left us with a class that did too much work.
One way to understand this is that if you were to describe what the class is doing, you wouldn't be able to give a single answer. Instead, you have to say that it is responsible for handling success messages, warning messages, error messages, and rendering all messages independently of each other.
While you might say it "manages custom messages", you wouldn't necessarily describe how verbose that class is. This is what we hope to solve in this tutorial.
In the final tutorial
Specifically, we will consider doing the following:
- Remove old settings messenger class
- Add new, more general settings message class
- Add setup messenger class for communication
- Introducing methods we can use independently of WordPress
- Simplify the way WordPress renders messages
We've done our job, so let's go ahead and start executing all of the above.
Reconstructing our work
When refactoring our work, it helps to know exactly what we want to do. In our case, we realized we had a lot of duplicate code that could be compressed.
Additionally, we manage three different types of messages in exactly the same way, except for how they are presented. In this case it's a problem with HTML class attributes.
So we can generalize this code to focus on a specific type , and we can consolidate many of the methods of adding a success message or retrieving an error message by generalizing a way to identify said Method>Type.
Eventually, we will do this. But first, some housekeeping needs to be done.
1. Delete old settings Messenger
In previous tutorials, we have been using a class called Settings_Messenger. So far it has served its purpose, but we will refactor this class in the rest of the tutorial.
When it comes to this type of refactoring, it's easy to want to simply delete the class and start over. There are times when that's appropriate, but this isn't one of them. Instead, we'll take the course and refactor what we already have.
All this is to illustrate, do not delete the file and start using a new one. Instead, keep track of what we did in this tutorial.
2. New settings message class
First we introduce a Settings_Message class. This represents any type of setup message we want to write. That is, it will manage success messages, error messages, and warning messages.
To do this, we will define the class, introduce a property, and instantiate it in the constructor. Check out this code, I'll explain more below:
<?php

class Settings_Message {

    private $messages;

    public function __construct() {

        $this->messages = array(
            'success' 	=> array(),
            'error'     => array(),
            'warning' 	=> array(),
        );
    }
}
Please note that we created a private property $messages. When instantiating this class, we create a multidimensional array. Each index, identified by success, error, or warning, refers to its own array where we will store the corresponding message.
接下来,我们需要能够添加消息、获取消息以及获取所有消息。我将立即更详细地讨论其中的每一个。
添加消息
首先,让我们看看如何添加消息:
<?php
public function add_message( $type, $message ) {

    $message = sanitize_text_field( $message );

    if ( in_array( $message, $this->messages[ $type ] ) ) {
        return;
    }

    array_push( $this->messages[ $type ], $message );
}
该消息首先获取传入的字符串并清理数据。然后它检查它是否已存在于成功消息中。如果是这样,它就会返回。毕竟,我们不想要重复的消息。
否则,它会将消息添加到集合中。
获取消息
检索消息有两种形式:
- 按类型呈现单条消息
- 在管理页面的显示中呈现消息(完成 HTML 清理等)
请记住,有时我们可能只想显示警告消息。其他时候,我们可能想要显示所有消息。由于有两种方法可以做到这一点,我们可以利用其中一种方法,然后在其他函数中利用它。
听起来很混乱?请耐心等待,我会解释这一切。我们要关注的第一部分是如何按类型呈现消息(例如成功、错误或警告)。这是执行此操作的代码(看起来应该很熟悉):
<?php

public function get_messages( $type ) {

    if ( empty( $this->messages[ $type ] ) ) {
		return;
	}

	$html  = "<div class='notice notice-$type is-dismissible'>";
	$html .= '<ul>';
	foreach ( $this->messages[ $type ] as $message ) {
		$html .= "<li>$message</li>";
	}
	$html .= '</ul>';
	$html .= '</div><!-- .notice-$type -->';

	$allowed_html = array(
		'div' => array(
			'class' => array(),
		),
		'ul' => array(),
		'li' => array(),
	);

	echo wp_kses( $html, $allowed_html );
}
请注意,我们使用了上一教程中大部分相同的代码;但是,我们对其进行了概括,以便它查看传入的 $type 并将其动态应用到标记。
这使我们能够使用单个函数来呈现消息。但这还不是全部。有时我们想要获取所有消息怎么办?这可能是在页面上呈现或以编程方式获取它们以进行其他处理。
为此,我们可以引入另一个函数:
<?php

public function get_all_messages() {

    foreach ( $this->messages as $type => $message ) {
        $this->get_messages( $type );
    }
}
此消息应该很容易理解。它只是循环遍历我们集合中的所有消息,并调用我们上面概述的 get_messages 函数。
它仍然将它们全部渲染在一起(我们很快就会在自定义钩子的实现中看到它们的一种使用)。如果您想将它们用于其他目的,您可以将结果附加到字符串中并将其返回给调用者,或者执行一些其他编程功能。
这只是一个实现。
3。设置信使
这适用于实际的 Settings_Message 类。但我们如何与它沟通呢?当然,我们可以直接与它对话,但是如果有一个中间类,我们可以对返回给我们的内容进行一些控制,而无需向 Settings_Message 类添加更多责任,对吗?
输入Settings_Messenger。这个类负责允许我们读取和写入设置消息。我认为您可以根据其职责将其分为两个类,因为它既可以读取也可以写入,但是就像发送和接收的信使一样,这就是此类的目的。
该类的初始设置很简单。
- 构造函数创建
Settings_Message类的实例,我们可以使用它来发送和接收消息。 - 它将一个方法与我们在上一个教程中定义的自定义
tutsplus_settings_messages挂钩关联起来。
看一下前几个方法:
<?php

class Settings_Messenger {

    private $message;

    public function __construct() {
        $this->message = new Settings_Message();
    }

    public function init() {
        add_action( 'tutsplus_settings_messages', array( $this, 'get_all_messages' ) );
    }
}
请记住,在本教程的前面,我们在视图中定义了钩子,可以在 settings.php 中找到。为了完整起见,将其列在这里:
<div class="wrap">

    <h1><?php echo esc_html( get_admin_page_title() ); ?></h1>
	<?php do_action( 'tutsplus_settings_messages' ); ?>

	<p class="description">
		We aren't actually going to display options on this page. Instead, we're going
		to use this page to demonstration how to hook into our custom messenger.
	</p><!-- .description -->
</div><!-- .wrap -->
但是请注意,这个特定的钩子利用了 get_all_messages 方法,我们稍后会回顾一下。不一定非要用这个方法。相反,它可以用于简单地呈现成功消息或您想要使用的任何其他方法。
添加消息
创建添加消息的函数很简单,因为这些函数需要类型和消息本身。请记住,Settings_Message 负责清理信息,以便我们可以简单地传入传入消息。
请参阅下面我们添加成功、警告和错误消息的位置:
<?php

public function add_success_message( $message ) {
    $this->add_message( 'success', $message );
}

public function add_warning_message( $message ) {
    $this->add_message( 'warning', $message );
}

public function add_error_message( $message ) {
    $this->add_message( 'error', $message );
}
很简单,不是吗?
获取消息
检索消息没有太大不同,只是我们只需要提供要检索的消息类型:
<?php

public function get_success_messages() {
    echo $this->get_messages( 'success' );
}

public function get_warning_messages() {
    echo $this->get_messages( 'warning' );
}

public function get_error_messages() {
    echo $this->get_messages( 'error' );
}
完成了,对吧?
但是你明白了吗?
请注意,上面的消息均引用了我们尚未实际介绍的另外两种方法。这些私人消息可以帮助我们简化上述通话。
查看以下私有方法,它们负责直接从信使对象上维护的 Settings_Message 实例添加和检索消息:
<?php

private function add_message( $type, $message ) {
    $this->message->add_message( $type, $message );
}

private function get_messages( $type ) {
    return $this->message->get_messages( $type );
}
完成了新的 Settings_Messenger 类。所有这些都简单得多,不是吗?
启动插件
不过,它确实提出了一个问题:既然我们已经完成了所有这些更改,我们如何启动插件?
查看下面的整个函数:
<?php

add_action( 'plugins_loaded', 'tutsplus_custom_messaging_start' );
/**
 * Starts the plugin.
 *
 * @since 1.0.0
 */
function tutsplus_custom_messaging_start() {

    $plugin = new Submenu(
        new Submenu_Page()
    );
    $plugin->init();

    $messenger = new Settings_Messenger();
    $messenger->init();

    $messenger->add_success_message( 'Nice shot kid, that was one in a million!' );
    $messenger->add_warning_message( 'Do not go gently into that good night.' );
    $messenger->add_error_message( 'Danger Will Robinson.' );
}
就是这样。
需要注意的几点:
- If you don't call init on
Settings_Messenger, then you don't have to worry about any messages being displayed on the settings page. - This code adds a message to
Settings_Messengerbut doesn't actually retrieve any messages because I'm using the init method. 李> - If you want to retrieve the message, you can use the method we outlined above.
This is what refactoring is all about. This doesn't work completely out of the box, as some code is still required to load all the PHP files required for the plugin to work; however, the code above focuses on refactoring, which is the focus of the entire tutorial.
in conclusion
To get a complete working version of this tutorial with complete source code that works out of the box, download the source code attached to this article in the right sidebar.
I hope that by studying this material, you will be able to master some new skills and methods for WordPress development. We've covered a lot as we move through the series:
- Custom menu
- Management Page Introduction
- Various message types
- Define and utilize custom hooks
- And refactor object-oriented code
As usual, I'm also happy to answer questions in the comments, and you can also check out my blog and follow me on Twitter. I usually talk about software development in WordPress and some unrelated topics. If you’re interested in more WordPress development, don’t forget to check out my previous series and tutorials, as well as the other WordPress materials we offer here at Envato Tuts.
resource
- Create a custom admin page using WordPress
- WordPress Settings API
- How to get started with WordPress
- Add operation
- Perform operation
- wp_kses
- Clean text fields
The above is the detailed content of Designing a Personalized WordPress Communications Platform, Part 4. For more information, please follow other related articles on the PHP Chinese website!

 Working with Flash Session Data in LaravelMar 12, 2025 pm 05:08 PM
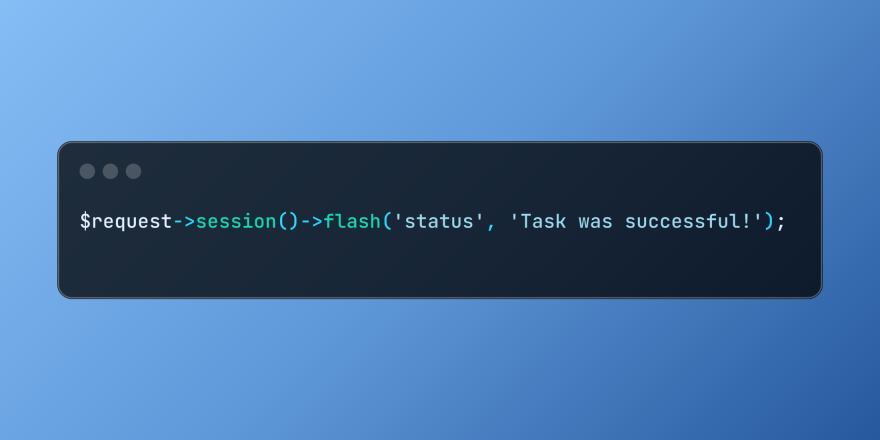
Laravel simplifies handling temporary session data using its intuitive flash methods. This is perfect for displaying brief messages, alerts, or notifications within your application. Data persists only for the subsequent request by default: $request-
 cURL in PHP: How to Use the PHP cURL Extension in REST APIsMar 14, 2025 am 11:42 AM
The PHP Client URL (cURL) extension is a powerful tool for developers, enabling seamless interaction with remote servers and REST APIs. By leveraging libcurl, a well-respected multi-protocol file transfer library, PHP cURL facilitates efficient execution of various network protocols, including HTTP, HTTPS, and FTP. This extension offers granular control over HTTP requests, supports multiple concurrent operations, and provides built-in security features.
 Simplified HTTP Response Mocking in Laravel TestsMar 12, 2025 pm 05:09 PM
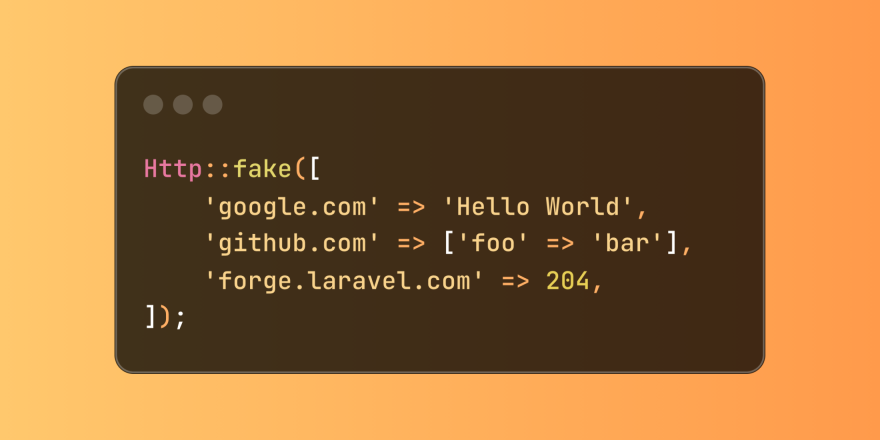
Laravel provides concise HTTP response simulation syntax, simplifying HTTP interaction testing. This approach significantly reduces code redundancy while making your test simulation more intuitive. The basic implementation provides a variety of response type shortcuts: use Illuminate\Support\Facades\Http; Http::fake([ 'google.com' => 'Hello World', 'github.com' => ['foo' => 'bar'], 'forge.laravel.com' =>
 12 Best PHP Chat Scripts on CodeCanyonMar 13, 2025 pm 12:08 PM
Do you want to provide real-time, instant solutions to your customers' most pressing problems? Live chat lets you have real-time conversations with customers and resolve their problems instantly. It allows you to provide faster service to your custom
 Explain the concept of late static binding in PHP.Mar 21, 2025 pm 01:33 PM
Article discusses late static binding (LSB) in PHP, introduced in PHP 5.3, allowing runtime resolution of static method calls for more flexible inheritance.Main issue: LSB vs. traditional polymorphism; LSB's practical applications and potential perfo
 PHP Logging: Best Practices for PHP Log AnalysisMar 10, 2025 pm 02:32 PM
PHP logging is essential for monitoring and debugging web applications, as well as capturing critical events, errors, and runtime behavior. It provides valuable insights into system performance, helps identify issues, and supports faster troubleshoot
 Discover File Downloads in Laravel with Storage::downloadMar 06, 2025 am 02:22 AM
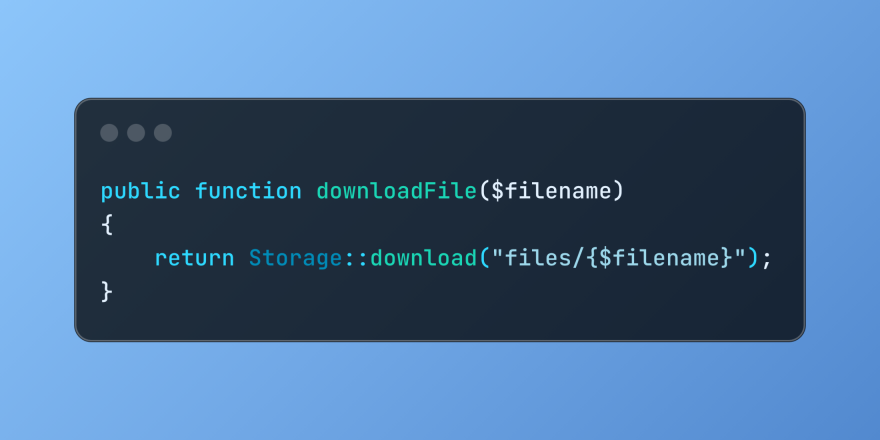
The Storage::download method of the Laravel framework provides a concise API for safely handling file downloads while managing abstractions of file storage. Here is an example of using Storage::download() in the example controller:
 Global View Data Management in LaravelMar 06, 2025 am 02:42 AM
Laravel's View::share method offers a streamlined approach to making data accessible across all your application's views. This is particularly useful for managing global settings, user preferences, or recurring UI components. In Laravel development,


Hot AI Tools

Undresser.AI Undress
AI-powered app for creating realistic nude photos

AI Clothes Remover
Online AI tool for removing clothes from photos.

Undress AI Tool
Undress images for free

Clothoff.io
AI clothes remover

AI Hentai Generator
Generate AI Hentai for free.

Hot Article
Hot Tools

PhpStorm Mac version
The latest (2018.2.1) professional PHP integrated development tool

VSCode Windows 64-bit Download
A free and powerful IDE editor launched by Microsoft

WebStorm Mac version
Useful JavaScript development tools

Dreamweaver CS6
Visual web development tools

SublimeText3 Mac version
God-level code editing software (SublimeText3)

