


Building single-page applications is an art, and there are many impressive frameworks to choose from. Angular is one of the most intuitive and widely used frameworks for building web and mobile applications. Today, Angular 10 has been released, and it comes with a lot of impressive features. Before you dig deeper, however, you need to master the components.
First Task: Setting Up Dependencies
Before trying Angular, you need to make sure you have successfully installed the following dependencies:
- Node.js
- Angular CLI
You can install Angular CLI globally using NPM.
npm install -g @angular/cli
Now you can start your Angular project in a few different ways:
- Create it manually
- Using Angular CLI
- Clone and run the project from GitHub
Here's how to create a new project using Angular CLI:
ng new my-project-name
cd my-project-name
That's it! Now your Angular journey has begun. In this article, we will build a simple calculator for adding two numbers using Angular.
What are angular components?
In Angular, we use directives. There are three types of directives: structural directives, attribute directives and component directives. In the next few sections, we'll dive into everything about components.
Components in Angular are the elements we design and build for rendering UI projects. These UI items will allow users to interact with the application and access its functionality.By the end of this tutorial, you will be able to build components in Angular. What's more, you'll understand every step of the way.
Components will be available in any Angular project from day one. In a way, you can think of any Angular project as a tree made up of many connected components. Each component has a specific functionality and a template that renders it. A single template can be reused in multiple components. A collection of components forms an Angular application, which is ultimately seen in the browser.
A component is like a class that encapsulates the behavior of an element and its view. Behavior includes the data that is loaded or rendered and how the user interacts with it, and its views are templates that define how the data is presented.
Build Calculator Component
Let's learn about components by creating an Angular component for adding two numbers. We won't be creating the components step by step in this tutorial, but you can find the complete code for this application in our GitHub repository.
Use Component decorator to define components
Component Decorators are used to define components in Angular. The metadata that defines the component is as follows:
@Component({
  selector: 'calculator',
  templateUrl: './calculator.component.html',
  styleUrls: ['./calculator.component.css']
})
export class Calculator{

}
In the definition above, selector tells the application which elements of the application's HTML the component needs to be used for. templateUrl Tells the application what can be rendered. Everything else in the above decorator is optional.
What is a selector?
selector is an important property in Angular. It helps the application determine where to place components. The selector is always a string. Selectors can be defined in three different ways, each with unique use cases:
-
selector: 'calculator'Can be used when the component will be specified as a<calculator></calculator>element in HTML. -
selector: '.calculator'If the component is to be used as a CSS element, it can be usedin HTML. -
selector: '[calculator]'Can be used when the component should be used as a property, it looks like.
Selectors can be simple or complex, but the golden rule is to keep the selector as simple as possible.
What is a template?
templateUrl Identifies the template that the component will use. The path to the template should be relative. For templates located in the same folder as the component source code, you can use templateUrl: './calculator.html' or templateUrl: 'calculator.html'.
You also have the option of using the template option to replace the templateUrl option with an inline template. This is useful in simple components where the TypeScript code and HTML don't have to be in different files.
This approach has no impact on the final application. Why? Regardless of the method, a single bundle is generated.
What is styleUrl?
Components are never simple; they are always full of styles. The styleUrl property is used to help you include component-specific CSS. Just like templates, you can use inline styles via the styles attribute. But if the code has a lot of styles, it needs to be separated into different files.
Note that styleUrl always takes an array, so you can add multiple stylesheets.
样式封装
Angular 组件始终鼓励样式隔离和完整封装。这意味着子组件或父组件中的样式不会影响 UI 层次结构中的其他组件。
为了控制样式封装,Angular 在 Component 装饰器中提供了一个名为 encapsulation 的属性。封装可以具有以下值之一:
-
ViewEncapsulation.Emulated是默认值。它创建填充样式来模拟影子根和 DOM。 -
如果您的浏览器本身支持影子 DOM,则
ViewEncapsulation.ShadowDom是最快的。 -
ViewEncapsulation.None,正如其名称所示,使用全局样式并避免任何形式的封装。
在我们的计算器组件中使用 encapsulation 属性的语法如下:
import { Component, ViewEncapsulation } from '@angular/core';
@Component({
  selector: 'calculator',
  templateUrl: './calculator.component.html',
  styleUrls: ['./calculator.component.css'],
  encapsulation: ViewEncapsulation.None
})
export class Calculator{}
在上面的示例中,我们选择了 ViewEncapsulation.None。这绝对是将通用样式应用于父组件和子组件的最佳方式。
Angular 组件和模块
在深入了解组件生命周期之前,让我们先看看组件和模块是如何相互链接的。我们的计算器应用程序的模块如下:
import { BrowserModule } from '@angular/platform-browser';
import { NgModule } from '@angular/core';

import { AppComponent } from './app.component';
import { CalcComponent } from './calc/calc.component'

@NgModule({
  declarations: [
    AppComponent,
    CalcComponent
  ],
  imports: [
    BrowserModule
  ],
  providers: [],
  bootstrap: [AppComponent]
})
export class AppModule { }
如果您创建组件,则必须将其包含为模块的一部分。
如果不将新创建的组件添加到模块中,则会出现错误。
要将组件添加到模块,必须首先导入它。首先,必须将导入的文件添加到 declarations 数组中。现在,该组件在整个应用程序中都是可见的,并且可以被其他组件使用。
让我们看看 @NgModule 指令中的每个数组代表什么:
-
declarations确保指令和组件在模块的范围内可用。 Angular CLI 具有一项功能,可以将指令和组件自动添加到模块中。 -
imports用于导入和访问其他模块。这允许开发人员在应用程序中包含第三方模块。 -
如果您的项目创建一个库或多个模块,则使用
exports。如果组件未导出,则无法在其他地方使用。
组件生命周期
我们现在准备了解组件和指令的生命周期。请记住,每个组件都有一个生命周期,从创建到销毁。渲染组件的那一刻,该组件及其子组件的生命周期就开始了。
了解生命周期事件在 Angular 应用程序中非常有用,它可以帮助开发人员正确观察和响应事件。
以下是 Angular 组件的生命周期挂钩,按照调用每个挂钩的顺序排列。
- 组件构造函数
ngOnChangesngOnInitngDoCheckngAfterContentInitngAfterContentCheckedngAfterViewInitngAfterViewCheckedngOnDestroy
创建组件时,会调用 构造函数 。接下来,按照上述顺序调用各种钩子。某些挂钩(例如 OnInit 和 AfterContentInit)将仅被调用一次。同时,只要组件中的内容发生更改,就会调用其他挂钩。最后,onDestroy 被调用一次。
上面的生命周期钩子有一个接口。要使用钩子,您应该实现该接口。通常,该接口带有函数,以 ng 开头。例如,如果要使用 ngOnInit 函数,则组件必须实现 OnInit 接口。以下是 Angular 组件中生命周期挂钩中常用接口和方法的快速摘要。该表再次根据实现时首先调用的方法进行排序。
| 界面 | 方法 | 目的 |
OnChanges |
ngOnChanges |
在构造函数之后以及输入值发生更改时调用。 |
OnInit |
ngOnInit |
仅调用一次。非常特定于组件或指令。它是从服务器加载数据的最佳位置。 |
DoCheck |
ngDoCheck |
当 Angular 无法自动检查更改或绑定时,使用此方法。它通知组件任何变化。 |
AfterContentInit |
ngAfterContentInit |
仅调用一次。它由组件初始化触发。 |
AfterContentChecked |
ngAfterContentChecked |
在组件内容的每次更改时调用。 |
AfterViewInit |
ngAfterViewInit |
一旦每个子组件都被初始化,就会调用这个生命周期钩子。视图可能没有完全渲染,但内部视图已经由 Angular 准备好了。 |
AfterViewChanged |
ngAfterViewChecked |
一旦每个子组件都经过验证和更新,就会调用此挂钩。 |
OnDestroy |
ngOnDestroy |
如果组件准备好从 UI 中删除或销毁,则会调用此挂钩。这是保留取消订阅和取消注册可观察对象或计时器的侦听器的好地方。 |
现在,如果您想将生命周期挂钩添加到我们的计算器组件中,它将显示如下:
import { Component, OnInit } from '@angular/core';
@Component({
  selector: 'calculator',
  templateUrl: './calculator.component.html',
  styleUrls: ['./calculator.component.css'],
  encapsulation: ViewEncapsulation.None
})
export class Calculator implements OnInit {

  constructor() {}

  ngOnInit(): void {
    console.log('Component - On Init');
  }

}
创建计算器组件
我们正在构建的计算器应用程序的 UI 如下所示。
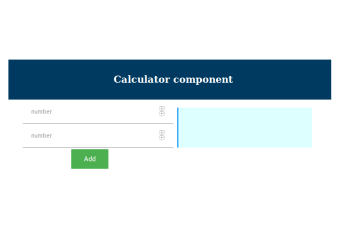
这是我们将添加到组件模板中的 HTML:
<div class="row">
    <div class="col-12">
    	<input [(ngModel)]="number1" type="number" name="" placeholder="number">
	</div>
</div>
<div class="row">
	<div class="col-12">
		<input [(ngModel)]="number2" type="number" name="" placeholder="number">
	</div>
</div>
<button (click)="add()" class="button">
    Add
</button>
<div class="result">
    <span>
		Result : {{result}}
	</span>
</div>
交互
UI呈现后,用户将对应用程序执行操作。现在,应用程序必须做出相应的响应。例如,当用户输入两个数字并单击添加时,我们的计算器必须进行添加。使用此功能连接输入框的最简单方法是通过 ngModel。在 HTML 模板文件中,每个输入都可以链接到 ngModel 变量。您可以在上面的 HTML 中看到,我们有许多 ngModel 属性将 HTML 元素链接到我们的 TypeScript 代码。这些变量将在计算器组件源代码中声明和使用。
让我们看看如何在计算器的 TypeScript 代码中使用 ngModel 变量。
//the component
import { Component } from '@angular/core';

@Component({
  selector: 'calc',
  templateUrl: 'calc.component.html',
  styleUrls: ['calc.component.css']
})
export class CalcComponent {
  public number1 : number;
  public number2 : number;
  public result : number;

  public add(){
      this.result = this.number1 + this.number2
  }
}
每次用户在输入框中输入值时,this.number1 和 this.number2 都会相应更新。为什么? ngModel 用于捕获输入。
当用户点击添加按钮时,将调用 add 函数。如何?我们利用 (click) 控件将按钮连接到 add 方法。
当调用 add 时,this.result 根据 this.number1 和 this.number2 进行更新。一旦 this.result 更新,UI 也会更新。如何? {{result}} 链接到 this.result。
这就结束了!
我希望本教程有用。现在,您应该了解 Angular 组件的基础知识。您刚刚了解了如何定义组件、利用各种生命周期挂钩,以及最终进行用户交互。这仅仅是个开始。 Angular 组件还有很多东西。
本教程中功能齐全的源代码可在 GitHub 上获取。看一看,并尝试创建您自己的 Angular 项目 - 这是最好的学习方式!
The above is the detailed content of Angular Components: A Comprehensive Guide for Beginners. For more information, please follow other related articles on the PHP Chinese website!

 JavaScript and the Web: Core Functionality and Use CasesApr 18, 2025 am 12:19 AM
The main uses of JavaScript in web development include client interaction, form verification and asynchronous communication. 1) Dynamic content update and user interaction through DOM operations; 2) Client verification is carried out before the user submits data to improve the user experience; 3) Refreshless communication with the server is achieved through AJAX technology.
 Understanding the JavaScript Engine: Implementation DetailsApr 17, 2025 am 12:05 AM
Understanding how JavaScript engine works internally is important to developers because it helps write more efficient code and understand performance bottlenecks and optimization strategies. 1) The engine's workflow includes three stages: parsing, compiling and execution; 2) During the execution process, the engine will perform dynamic optimization, such as inline cache and hidden classes; 3) Best practices include avoiding global variables, optimizing loops, using const and lets, and avoiding excessive use of closures.
 Python vs. JavaScript: The Learning Curve and Ease of UseApr 16, 2025 am 12:12 AM
Python is more suitable for beginners, with a smooth learning curve and concise syntax; JavaScript is suitable for front-end development, with a steep learning curve and flexible syntax. 1. Python syntax is intuitive and suitable for data science and back-end development. 2. JavaScript is flexible and widely used in front-end and server-side programming.
 Python vs. JavaScript: Community, Libraries, and ResourcesApr 15, 2025 am 12:16 AM
Python and JavaScript have their own advantages and disadvantages in terms of community, libraries and resources. 1) The Python community is friendly and suitable for beginners, but the front-end development resources are not as rich as JavaScript. 2) Python is powerful in data science and machine learning libraries, while JavaScript is better in front-end development libraries and frameworks. 3) Both have rich learning resources, but Python is suitable for starting with official documents, while JavaScript is better with MDNWebDocs. The choice should be based on project needs and personal interests.
 From C/C to JavaScript: How It All WorksApr 14, 2025 am 12:05 AM
The shift from C/C to JavaScript requires adapting to dynamic typing, garbage collection and asynchronous programming. 1) C/C is a statically typed language that requires manual memory management, while JavaScript is dynamically typed and garbage collection is automatically processed. 2) C/C needs to be compiled into machine code, while JavaScript is an interpreted language. 3) JavaScript introduces concepts such as closures, prototype chains and Promise, which enhances flexibility and asynchronous programming capabilities.
 JavaScript Engines: Comparing ImplementationsApr 13, 2025 am 12:05 AM
Different JavaScript engines have different effects when parsing and executing JavaScript code, because the implementation principles and optimization strategies of each engine differ. 1. Lexical analysis: convert source code into lexical unit. 2. Grammar analysis: Generate an abstract syntax tree. 3. Optimization and compilation: Generate machine code through the JIT compiler. 4. Execute: Run the machine code. V8 engine optimizes through instant compilation and hidden class, SpiderMonkey uses a type inference system, resulting in different performance performance on the same code.
 Beyond the Browser: JavaScript in the Real WorldApr 12, 2025 am 12:06 AM
JavaScript's applications in the real world include server-side programming, mobile application development and Internet of Things control: 1. Server-side programming is realized through Node.js, suitable for high concurrent request processing. 2. Mobile application development is carried out through ReactNative and supports cross-platform deployment. 3. Used for IoT device control through Johnny-Five library, suitable for hardware interaction.
 Building a Multi-Tenant SaaS Application with Next.js (Backend Integration)Apr 11, 2025 am 08:23 AM
I built a functional multi-tenant SaaS application (an EdTech app) with your everyday tech tool and you can do the same. First, what’s a multi-tenant SaaS application? Multi-tenant SaaS applications let you serve multiple customers from a sing


Hot AI Tools

Undresser.AI Undress
AI-powered app for creating realistic nude photos

AI Clothes Remover
Online AI tool for removing clothes from photos.

Undress AI Tool
Undress images for free

Clothoff.io
AI clothes remover

AI Hentai Generator
Generate AI Hentai for free.

Hot Article
Hot Tools

MinGW - Minimalist GNU for Windows
This project is in the process of being migrated to osdn.net/projects/mingw, you can continue to follow us there. MinGW: A native Windows port of the GNU Compiler Collection (GCC), freely distributable import libraries and header files for building native Windows applications; includes extensions to the MSVC runtime to support C99 functionality. All MinGW software can run on 64-bit Windows platforms.

Dreamweaver CS6
Visual web development tools

WebStorm Mac version
Useful JavaScript development tools

ZendStudio 13.5.1 Mac
Powerful PHP integrated development environment

Notepad++7.3.1
Easy-to-use and free code editor

