


Text messaging is a global technology used by almost everyone with a mobile phone. Although text message programming has a much larger reach than the smartphone market, its reach is much smaller and often remains uncapitalized. In this tutorial, I'll show you how to create a website registration form that allows users to enter their mobile number. Next I'll show you how to do server-side phone number validation using PHP to check if the mobile number entered by the user is indeed his. Along the way, we'll use jQuery to perform client-side validation and CodeIgniter as our development framework.
Step 1: Planning
Let's first outline the solution. Users will visit a registration form, select a country, and enter a mobile number. After submitting the registration form, the user needs to enter a verification code sent to the entered mobile phone number to activate the new account. If the user closes the page before entering the verification code and visits the registration form again later, the phone number form will still be displayed. OK, let's get started!
Step 2: Download CodeIgniter
Download CodeIgniter from www.codeigniter.com. Next, unzip the folder and copy it to the web root directory of your web server (you must have access to a web server that can parse PHP to complete this tutorial). Copying to your network root directory is optional, but doing so will help us better navigate the source files.
In the application directory, navigate to the config directory and open config.php. This is the main configuration where we need to set some settings as shown in the code below:
$config['base_url']      =   "http://localhost/sending_sms/";
...
$config['index_page']    =   "index.php";
...
$config['uri_protocol']	 =   "AUTO";
Next, open database.php in the same configuration folder and complete the following assignments:
db['default']['hostname']  = "localhost";
$db['default']['username'] = "root";
$db['default']['password'] = "__password__";
$db['default']['database'] = "sms_users";
Finally, open autoload.php in the config folder and add some libraries and helpers we need:
$autoload['libraries'] = array('database');
...
$autoload['helper'] = array('url', 'form', 'cookie');
Step 3: Register Controller
Let's create the registration controller. Create a file called signup.php in the application/controllers folder and let’s start coding the main registration functionality:
class Signup extends Controller {

	function Signup(){
		parent::Controller();
	}

	function index(){
		$this->load->view('signup' );
	}

}
I've created the Signup class, you'll notice it has the same name as the file and it extends Controller. I created the index() function to handle the display of the registration form. We call it index because this is the default function called when accessed using the default url, without any segments. We must also configure the default controller (signup) in config/routes.php:
$route['default_controller'] = "signup";
If you test the application now, you will receive an error message telling you "Unable to load the requested file: signup.php". This is because we haven't created the registration view yet. Let's get started now.
Step 4: Register View
Create a new file signup.php in the application/views folder and enter the following tags:
<!DOCTYPE html PUBLIC "-//W3C//DTD XHTML 1.0 Transitional//EN" "http://www.w3.org/TR/xhtml1/DTD/xhtml1-transitional.dtd">
  <html xmlns="http://www.w3.org/1999/xhtml">
  <head>
  <meta http-equiv="Content-Type" content="text/html; charset=utf-8" />
  <title>Signup</title>
  <link rel="stylesheet" href="<?php echo base_url(); ?>css/reset.css" type="text/css" />
  <link rel="stylesheet" href="<?php echo base_url(); ?>css/design.css" type="text/css" />
  </head>
  <body>
  <div id="wrap">
  <h2 id="Signup-form">Signup form</h2>
  <?php echo validation_errors('<div class="error">', '</div>'); ?>
  <?php echo form_open('signup/process', array('id'=>'form') ); ?>
  <?php echo form_label('Name:', 'name'); ?>
  <?php echo form_input( array('name'=>'name', 'id'=>'name', 'class'=>'required', 'value'=>set_value('name') ) ); ?>
  <?php echo form_label('Email:', 'email'); ?>
  <?php echo form_input( array('name'=>'email', 'id'=>'email', 'class'=>'required email', 'value'=>set_value('email') ) ); ?>
  <?php echo form_label('Country:', 'country'); ?>
  <?php echo form_dropdown('country', $countries, '','id="country" class="required"' ); ?>
  <?php echo form_label('Mobile phone:', 'mobile'); ?>
  <div><?php echo form_input( array('name'=>'prefix', 'id'=>'prefix', 'value'=>set_value('prefix') ) ); ?>
  <?php echo form_input( array('name'=>'mobile', 'id'=>'mobile', 'class'=>'required digits', 'value'=>set_value('mobile') ) ); ?>
  </div>
  <div align="center"><?php echo form_submit('register', 'Register', 'class="submit"' ); ?></div>
  </div>
  </body>
  </html>
Let me explain some tags. I added a reset.css file in the head with the usual meyerweb reset CSS rules and a design.css file which we will code later. I have placed these two files in a folder called 'css' in the root directory. I use base_url() to get the root directory in the view file.
I'm using the form helper to create the form opening, while giving the id of the form "form", I've created several labels and inputs using the same form helper. You'll notice that I'm passing an array as the second argument to the form_input() function with either id or class keys. For more information about using the form assistant, read the CodeIgniter documentation. I create a select box using form_dropdown() which passes an array of options called $countries. We don't have this array yet, but we'll make it later as well.
Step 5: Register CSS
Create the file design.css in the css directory, put it in the application/views folder, and enter the following css rules:
body {
	background-color: #CFCFCF;
	padding: 0px;
	margin: 0px;
	font-size: 12px;
	font-family: Helvetica, Verdana, Arial, sans-serif;
}

#wrap {
	width: 400px;
	margin-left: auto;
	margin-right: auto;
	margin-top: 40px;
	background-color: #ECECEC;
	border: solid 1px #FCFCFC;
	padding: 10px;
}
h2 {
	margin-bottom: 10px;
	font-size: 18px;
}

label {
	display: block;
}
input, select {
	width: 380px;
	padding: 5px;
	margin-bottom: 10px;
}
select {
	width: 390px;
}
#prefix {
	width: 50px;
	margin-right: 10px;
   	margin-bottom: 0px;
	display:inline;
}
#mobile {
	width: 305px;
	display:inline;
}
input.submit {
	background-color: #E0E0E0;
	border: solid 1px #C5C5C5;
	width: 140px;
	font-weight: bold;
	margin-top: 10px;
}
input.error, select.error {
	margin-bottom: 0px;
	border: solid 1px #FFCCCC;
}
div.error {
	padding: 5px;
	background-color: #ffeeee;
	border: solid 1px #FFCCCC;
	color: #ff0000;
}
div.ok {
	padding: 5px;
	background-color: #CCFFCC;
	border: solid 1px #44CC44;
	color:#336633;
	margin-bottom: 10px;
}
I created a wrap div style that centers it by setting margin-left and margin-right to auto. I then styled the inputs to make sure they were consistent across all browsers, and then created 3 error classes: .error, .ok, and input.error. We will use it with the jQuery validation plugin. I also used 5px padding where I felt styling was necessary.
第 6 步: 国家/地区和前缀
如果您现在进行测试,您将收到一条通知,提示“未定义的变量国家/地区”和“为 foreach() 提供的参数无效”。我们如何添加国家/地区?好吧,我们可以将它们直接嵌入到选择中,但我们将使用配置文件。这确保我们可以轻松快速地更改任何国家/地区代码。我将包含国家/地区代码的表从countrycode.org 复制到一个新文件中,并使用巧妙的 jQuery 来处理单个字符串中的所有内容,从而得到最终的配置文件。我不会详细介绍。如果你想知道,请发表评论。在 application/config 文件夹中创建一个名为“countries.php”的新文件,并使用以下模型在 #config 数组中添加国家/地区:
$config = array();
$config[''] = '';
$config['93'] = 'Afghanistan';
$config['355'] = 'Albania';
$config['213'] = 'Algeria';
...
$config['967'] = 'Yemen';
$config['260'] = 'Zambia';
$config['263'] = 'Zimbabwe';
我使用前缀代码作为数组中的键。我们如何在视图中访问它?我们将在之前创建的控制器函数 index() 中加载这个特定的配置文件:
function index(){
	$this->config->load('countries', true);
	$data['countries'] = $this->config->item('countries');

	$this->load->view('signup', $data );
}
我使用“$this->config->load()”来加载配置。您会注意到我还传递了 true 作为第二个参数。这会在全局配置中创建一个名为“国家/地区”的单独条目。如果我们不传递 true,则配置设置(来自 config 的数组)将添加到全局配置数组中。之后,我们只需将配置项分配给 $data['countries'],然后视图就会将其识别为 $countries。我还将 $data 数组作为第二个参数传递给视图。如果您现在测试该页面,您将在选择框中看到所有国家/地区!很好,对吧?
第 7 步: 使用 jQuery 进行验证
是时候做一些 jQuery 了。我们将为此使用 jquery 验证插件。该插件已经在 Microsoft 的 CDN 中,因此我们将从那里获取它,以及从 Google 的 CDN 获取 jQuery。我们还需要元数据插件才能直接在 html 中编写类:
<!-- html head --><br /><script type="text/javascript" src="http://ajax.googleapis.com/ajax/libs/jquery/1.4.2/jquery.min.js"></script><br /><script type="text/javascript" src="http://ajax.microsoft.com/ajax/jquery.validate/1.7/jquery.validate.min.js"></script><br /><script type="text/javascript" src="<?php echo base_url(); ?>js/jquery.metadata.js"></script>
<script type="text/javascript">
$(document).ready( function(){
	$('#form').validate( {'errorElement': 'div' } );
});
</script>
<!-- html head -->
验证插件的工作原理是向输入提供类名:required 用于要求非空值,email 用于验证电子邮件地址,数字 用于数字输入,以及更多我不会涉及的内容。您会注意到我对输入中的类进行了硬编码,只需查看开头的 html 即可。如果您现在进行测试,您会发现在输入后出现一个错误 div,其中包含我在 css 中编码的 .error 类。我还编写了 input.error 类,因为无效的输入也被分配了一个 .error 类。如果用户启用了 JavaScript,这将验证表单。
第 8 步:根据选择的国家/地区更改电话前缀
现在,当用户选择一个国家/地区时,我们将使用一个巧妙的事件来更改前缀输入的值。这样做只是为了视觉目的,因为在后端我们将从国家/地区值中获取前缀,但这会向用户显示如何输入他的电话。我们现在就这样做:
<script type="text/javascript">
$(document).ready( function(){
	$('#form').validate( {'errorElement': 'div' } );
    //change the prefix based on the country select
	$('#country').change( function(){
    	$('#prefix').val( $('#country option:selected').val() );
	});
});
</script>
好的,所以我创建了一个用于选择的更改事件的函数,并将所选选项的值分配给前缀输入值。没什么大不了的,但它使我们的注册表单变得非常简单。
这就是注册视图所需的全部内容。让我们创建激活函数和视图。
第9步:激活码查看
这是用户成功注册后将看到的页面。将会有一条消息告诉他检查他的手机,因为我们已经向他发送了一个他必须输入的代码。在signup.php控制器中,创建一个名为activate()的新函数:
function activate(){
    $data = array();
    $data['error'] = '';
    $this->load->view('activate', $data );
}
如果激活不正确,我已经定义了一个错误变量以在视图中使用。当我们成功输入用户详细信息并发送短信后,将访问此页面。我们还将在 application/views 文件夹中创建一个名为 activate.php 的新文件,并输入以下标记:
<!DOCTYPE html PUBLIC "-//W3C//DTD XHTML 1.0 Transitional//EN" "http://www.w3.org/TR/xhtml1/DTD/xhtml1-transitional.dtd">
  <html xmlns="http://www.w3.org/1999/xhtml">
  <head>
  <meta http-equiv="Content-Type" content="text/html; charset=utf-8" />
  <title>Activate</title>
  <link rel="stylesheet" href="<?php echo base_url(); ?>css/reset.css" type="text/css" />
  <link rel="stylesheet" href="<?php echo base_url(); ?>css/design.css" type="text/css" />
  <script type="text/javascript" src="http://ajax.googleapis.com/ajax/libs/jquery/1.4.2/jquery.min.js"></script>
  <script type="text/javascript" src="http://ajax.microsoft.com/ajax/jquery.validate/1.7/jquery.validate.min.js"></script>
  <script type="text/javascript" src="<?php echo base_url(); ?>js/jquery.metadata.js"></script>
  <script type="text/javascript">
  $(document).ready( function(){
  	$('.ok').hide().fadeIn(800);
  	$('#form').validate( {'errorElement': 'div' } );
  });
  </script>
  </head>
  <body>
<div id="wrap">
  <h2 id="Confirm-mobile-phone">Confirm mobile phone</h2>
  <div class="ok">Your account has been created. A sms has been sent to your mobile with a 5 digit activation code. Please enter the code to complete signup:</div>
  <?php echo $error; ?>
  <?php echo form_open('signup/activate', array('id'=>'form') ); ?>
  <?php echo form_label('Code:', 'code'); ?>
  <?php echo form_input( array('name'=>'code', 'id'=>'code', 'class'=>'required digits', 'value'=>set_value('code') ) ); ?>
<div align="center"><?php echo form_submit('signup', 'Complete signup', 'class="submit"' ); ?></div>
  <hr />
  If you haven't received the sms, please <a href="#">click here</a> to send it again
</div>
</body>
</html>
这里的标记非常简单。我已经包含了相同的 jQuery 和验证插件。在 document.ready 事件中,我像第一页一样调用了 jquery.validate() 。我们将使用 validate 来验证授权代码。我还淡入消息 div,以显示成功消息。我还设置了“required”和“digits”的类名,以将输入字段限制为数字和非空值。还有一条消息,其中包含供用户重新发送激活码的选项,但我不会详细介绍此功能,因为它与基本注册非常相似。
第 10 步: process() 后台函数
让我们创建一个函数来处理数据并将其插入数据库。我们还将使用验证库。在服务器上进行验证很重要,因为有些人可以关闭 JavaScript,因此验证将不起作用。这是一个后备措施,可以确保表中不会有任何无效数据。函数流程如下:
function process(){
    $this->load->library('form_validation');

    if ( $this->form_validation->run() ){
    	$signup = array();
    	$signup['name'] = $this->input->post('name');
        $signup['email'] = $this->input->post('email');
        $signup['country'] = $this->input->post('country');
        $signup['mobile'] = $this->input->post('country').$this->input->post('mobile');

        //generate the unique activation code
        mt_rand();
        $signup['activation'] = rand( 11111, 99999 );

        //insert into db
        $this->db->insert('users', $signup );
        //send auth sms

        set_cookie('signed', $this->db->insert_id(), 86500 );
        //redirect
        redirect('signup/activate');
	} else {
    	$this->config->load('countries', true);
        $data['countries'] = $this->config->item('countries');
        $this->load->view('signup', $data );
    }
}
嗯,代码太多了!让我们看一下所有主要部分:
我们首先加载表单验证库。之后,我们使用表单验证的 run() 函数来检查值是否正确。如果所有输入都通过,我们将使用 $this->input->post('input_name') 创建一个包含所有帖子数据的数组,并将数据插入到名为 users 的表中,我们将一会儿做。这里需要注意的一件事是我还生成了授权代码。我使用 mt_rand() 为随机生成器提供种子并生成唯一的 5 密码数。我们通过运行 rand() 来生成 11111 到 99999 之间的数字来实现这一点。这总是给我们提供长度为 5 个密码的数字。我没有使用 10000,因为我们可以获得一个重复其密码的数字,例如 10002,它看起来不太随机。我还使用数据库中实际插入的插入 ID 值设置了一个名为“signed”的 cookie,然后将用户重定向到激活函数。如果某些字段无效,我们会再次加载国家/地区并加载注册视图。如果您从头开始查看注册视图,您会发现我使用 set_value() 来获取上次注册的使用值。因此,如果存在无效字段,则其余字段将用最后的数据填充。但我们需要在注册视图中更新一行:
<?php echo form_dropdown('country', $countries, @$_POST['country'],'id="country" class="required"' ); ?>
我已将第三个参数替换为 $_POST['country'],确保它不会显示带有 @ 的通知。这会将选择选项设置为提交之前选择的选项。如果我们的帖子数据中没有国家/地区,我们将不会选择任何内容,就像注册开始时的情况一样。
第11步:验证规则
好吧,我打赌您会问:服务器如何知道服务器端验证的正确格式是什么?好吧,我们必须创建验证规则。幸运的是,CodeIgniter 允许您将它们写入 application/config 文件夹中名为 form_validation.php 的配置文件中。如果该文件尚不存在,则创建该文件并输入以下内容:
$config = array(
	array('field'=>'name',
		  'label'=>'Name',
		  'rules'=>'required'),

	array('field'=>'email',
		  'label'=>'Email',
		  'rules'=>'required|valid_email|callback_check_email_exists'),

	array('field'=>'country',
		  'label'=>'Country',
		  'rules'=>'required'),

	array('field'=>'mobile',
		  'label'=>'Mobile phone',
		  'rules'=>'required|numeric')

);
我使用这个多维数组来设置相应的验证规则。例如,对于名称字段,我使用“field”键设置名称字段的规则,使用“label”键设置错误消息中的字段名称(如果显示)和“rules”键来设置规则。我用管道字符(即“|”)分隔规则。有关可用规则的更多信息,请查看用户指南中的表单验证文档。我还创建了一个用户定义的回调(callback_check_email_exists)来检查电子邮件是否存在。将 callback_ 添加到规则名称中搜索控制器中的函数并调用它。该函数将检查数据库中是否存在相同的电子邮件地址,来源为:
function check_email_exists( $email ){
	$rs = $this->db->where( 'email', $email )->count_all_results('users');
	$this->form_validation->set_message('check_email_exists', "We're sorry, this email already exists!");
	if( $rs < 1 ){
		return true;
	}
	return false;
}
这是一个简单的函数,它接受一个参数(正在检查的值)并根据格式返回 true 或 false。我们检查表中是否有包含电子邮件地址的结果,如果有,则返回 false。如果我们想要验证,我们必须返回 true,如果无效则返回 false,所以这个函数名称有点尴尬。
第 12 步: MySQL 表
现在就别想测试激活了!你会得到一个严重的错误,因为我们还没有创建表!那么,您可以下载源代码并从 users.sql 文件导入 users 表,或者使用以下命令创建它:
CREATE TABLE `users`
( `uid` INT UNSIGNED NOT NULL AUTO_INCREMENT,
`name` TEXT NOT NULL,
`email` TEXT NOT NULL,
`country` INT NOT NULL,
`mobile` TEXT NOT NULL,
`activation` TEXT NOT NULL,
`active` INT NOT NULL,
PRIMARY KEY (`uid`) );
在 phpMyAdmin 中运行此代码,您将创建表。
如果您现在测试代码,您将获得所有正确的验证。您只需禁用 JavaScript 即可尝试服务器验证。您不会收到无效数据!我警告过你!
第 1 部分结束
第一部分到此结束。下一次,在本系列的第二部分中,我们将介绍如何使用第三方 SMS 网关服务实际发送 SMS。我希望您喜欢我的教程,并感谢您留下来查看全部内容!
The above is the detailed content of Part 1: Build an SMS subscription form. For more information, please follow other related articles on the PHP Chinese website!

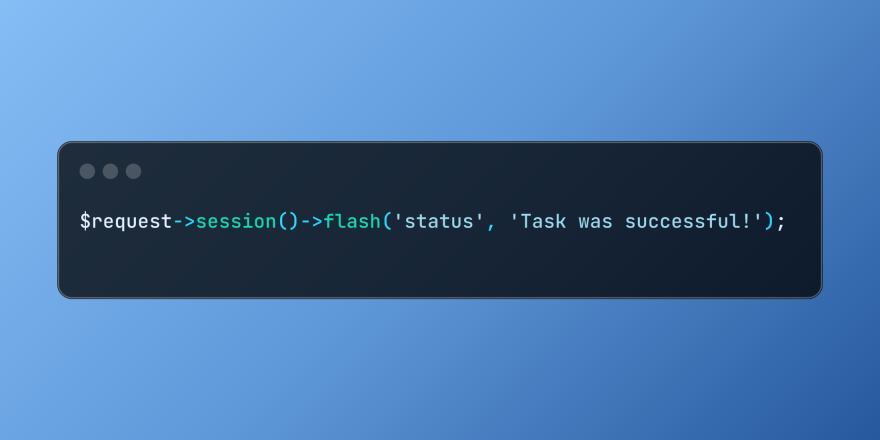 Working with Flash Session Data in LaravelMar 12, 2025 pm 05:08 PM
Laravel simplifies handling temporary session data using its intuitive flash methods. This is perfect for displaying brief messages, alerts, or notifications within your application. Data persists only for the subsequent request by default: $request-
 cURL in PHP: How to Use the PHP cURL Extension in REST APIsMar 14, 2025 am 11:42 AM
The PHP Client URL (cURL) extension is a powerful tool for developers, enabling seamless interaction with remote servers and REST APIs. By leveraging libcurl, a well-respected multi-protocol file transfer library, PHP cURL facilitates efficient execution of various network protocols, including HTTP, HTTPS, and FTP. This extension offers granular control over HTTP requests, supports multiple concurrent operations, and provides built-in security features.
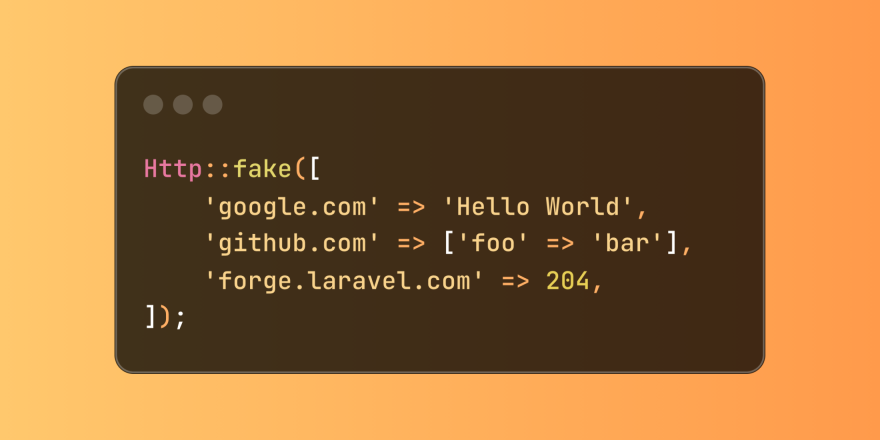 Simplified HTTP Response Mocking in Laravel TestsMar 12, 2025 pm 05:09 PM
Laravel provides concise HTTP response simulation syntax, simplifying HTTP interaction testing. This approach significantly reduces code redundancy while making your test simulation more intuitive. The basic implementation provides a variety of response type shortcuts: use Illuminate\Support\Facades\Http; Http::fake([ 'google.com' => 'Hello World', 'github.com' => ['foo' => 'bar'], 'forge.laravel.com' =>
 12 Best PHP Chat Scripts on CodeCanyonMar 13, 2025 pm 12:08 PM
Do you want to provide real-time, instant solutions to your customers' most pressing problems? Live chat lets you have real-time conversations with customers and resolve their problems instantly. It allows you to provide faster service to your custom
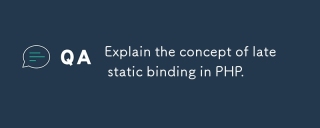 Explain the concept of late static binding in PHP.Mar 21, 2025 pm 01:33 PM
Article discusses late static binding (LSB) in PHP, introduced in PHP 5.3, allowing runtime resolution of static method calls for more flexible inheritance.Main issue: LSB vs. traditional polymorphism; LSB's practical applications and potential perfo
 PHP Logging: Best Practices for PHP Log AnalysisMar 10, 2025 pm 02:32 PM
PHP logging is essential for monitoring and debugging web applications, as well as capturing critical events, errors, and runtime behavior. It provides valuable insights into system performance, helps identify issues, and supports faster troubleshoot
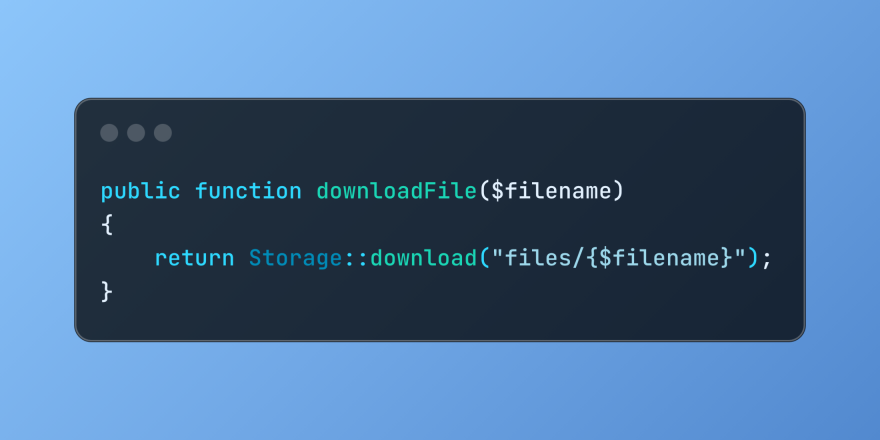 Discover File Downloads in Laravel with Storage::downloadMar 06, 2025 am 02:22 AM
The Storage::download method of the Laravel framework provides a concise API for safely handling file downloads while managing abstractions of file storage. Here is an example of using Storage::download() in the example controller:
 How to Register and Use Laravel Service ProvidersMar 07, 2025 am 01:18 AM
Laravel's service container and service providers are fundamental to its architecture. This article explores service containers, details service provider creation, registration, and demonstrates practical usage with examples. We'll begin with an ove


Hot AI Tools

Undresser.AI Undress
AI-powered app for creating realistic nude photos

AI Clothes Remover
Online AI tool for removing clothes from photos.

Undress AI Tool
Undress images for free

Clothoff.io
AI clothes remover

AI Hentai Generator
Generate AI Hentai for free.

Hot Article
Hot Tools

Dreamweaver Mac version
Visual web development tools

SublimeText3 Chinese version
Chinese version, very easy to use

SAP NetWeaver Server Adapter for Eclipse
Integrate Eclipse with SAP NetWeaver application server.

Safe Exam Browser
Safe Exam Browser is a secure browser environment for taking online exams securely. This software turns any computer into a secure workstation. It controls access to any utility and prevents students from using unauthorized resources.

VSCode Windows 64-bit Download
A free and powerful IDE editor launched by Microsoft

