


Those who have to work with image files on a daily basis often have to resize them to fit the needs of their projects and jobs. However, if you have too many images to process, resizing them individually can consume a lot of time and effort.
In this case, a tool like PowerToys can come in handy to, among other things, resize image files in batches using its image resizer utility. Here's how to set up your Image Resizer settings and start batch resizing images with PowerToys.
How to batch resize images using PowerToys
PowerToys is an all-in-one program with a variety of utilities and features to help you speed up your daily tasks. One of its utilities is Image Resizer, which, as the name suggests, allows you to batch resize images based on predetermined settings and preferences.
Before we begin, be sure to install PowerToys on your Windows PC to access the image resizer and its other utilities. Once done, follow the steps below to set your image resizing preferences and start batch resizing images.
Step 1: Enable Image Resizer
Although the Image Resizer utility is enabled by default, make sure this is the case. To do this, launch PowerToys and click on the image Adjuster on the left.

And make sure Enable Image Resizer is enabled on the right.

Step 2: Batch Resize Images
To start resizing images, navigate to the folder containing the images. Select all the images you want to resize, right-click on them and select "Resize Picture".

This will open the Image Resizer window. Click the drop-down menu under "Select a size."

and choose from one of the available presets.

Note: All of these can be configured from within PowerToys for future use, so you can get your most used presets here. See next section for the same.
If the preset sizes don't meet your requirements, you can also choose a "custom" size if you have a specific image size in mind.

Then use its options to resize the image.

#The Image Resizer window will contain some additional options that you can enable or disable based on the image and how it is resized.

If some of the files are smaller than the selected image preset size, select "Make images smaller but not larger" so they don't change during the process. Got blurry and pixelated.

By default, the Ignore image orientation option is selected to ensure that all images are the same size regardless of their orientation. However, if some pictures are in portrait mode, this option may swap the height and width in the preset to match the orientation so that the smallest number in the preset is applied to the smallest size of the picture.
If you don't want this to happen, uncheck this option so the image doesn't distort to fit the preset in a disproportionate way.

By default, Image Resizer creates a copy of an image file to resize it. This way your original file remains intact and retains its original size in case something goes wrong. Therefore, unless you are changing the original image file, leave the "Resize original picture (without creating a copy)" option unchecked.

After setting your preferences, click Resize Size.

Custom Image Resizer: How to change its settings and preferences
The Image Resizer allows you to change the available presets or add one that better suits your needs New preset for preferences. This way, you can choose a custom preset without having to create a new one every time you want to resize an image. Here's how:
1. Add and change preset image sizes
Image Resizer has some size presets that you can use to quickly batch resize images. These are:
- Small – 854 x 480 pixels
- Medium – 1366 x 768 pixels
- Large – 1920 x 1080 pixels
- Phone – 320 x 568 pixels
Each of these can be edited or deleted as desired.

1.1 – Edit Image Size Presets
To edit one of the default presets, click the pencil icon next to it.

Change the name as needed.

Then, click the Fit drop-down menu to configure how the image is scaled.

#The Fill option will fill the specified dimensions with the image, cropping it if necessary. The default option "Fit" does not crop the image and fit the image to size. And "Stretch" will fill the specified dimensions with the image. It does not crop the image, but may cause disproportionate scaling.

#If you're not sure which one to choose, stick with the default "Fit" option.
1.2 – Specify the resize size
Next, enter the width and height of the final output of the resized image. Use the arrows or enter the dimensions manually.

#To enter dimensions in different units, click the Units drop-down menu.
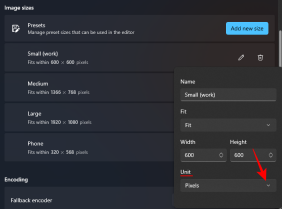
and select your unit.

Ideally, it's best to stick to pixel units, as that's what you'll mostly see in the file description.
1.3 – Add New Image Size Presets
Image Resizer already provides you with four presets for you to use. However, if you want a different preset, you can add one by clicking Add New Size.

It will be added to the preset list. Click the pencil icon next to it to start editing.

You will be able to make changes to the preset settings as shown previously.

2. Change image encoding settings
Image resizer allows you to change the image quality percentage or add a fallback encoder in case the output image fails to match the original format, such as a Windows Meta file.
To change the fallback encoder, click the drop-down menu next to the fallback encoder.


Next, use the slider next to JPEG Quality Level (%) to change the quality of the output file relative to the original file.

This comes in handy when you wish to reduce the file size.
3. Select file name format and timestamp
By default, the resized file will get the name of the original file, followed by the size of the output file in parentheses. So, for example, a file named "Image" resized using the "Medium" preset will be renamed "Image (Medium)".
This is determined by the filename format , where "%1 (%2)" is associated with the argument used for the filename.

Click the information button (i icon) next to the Filename Format field to view the available parameters.

#To change how files are named, enter the parameters in the format of your choice. In the example below, we have included the original filename (%1), the preset (%2), and the new width (%3) and height (%4) as the filename of the resized image:

Finally, you can also change the timestamp of the resized file properties by clicking the drop-down menu next to "File Modification Timestamp".

Choose between original file timestamps or resized files.

All changes to settings and preferences are applied immediately. So once you're done, Image Resizer will use these settings when you resize your image.
FREQUENTLY ASKED QUESTIONS
Let’s consider some frequently asked questions about batch resizing images using PowerToys.
Will fallback encoding convert image files?
No, the fallback encoding option in the image resizer is not a file converter. As the name suggests, it only allows image resizers to fall back to another encoder, such as JPEG, if the original file is not supported.
How to undo an image resized using PowerToys?
To undo an image resize done through PowerToys, simply press the folder containing the resized image. However, this only works if resizing the file is the last task you perform. If you perform any operations afterwards or return to the same resized file later, simple undo will not work. Ctrl ZCtrl Z
The above is the detailed content of How to batch resize images using PowerToys on Windows. For more information, please follow other related articles on the PHP Chinese website!

Hot AI Tools

Undresser.AI Undress
AI-powered app for creating realistic nude photos

AI Clothes Remover
Online AI tool for removing clothes from photos.

Undress AI Tool
Undress images for free

Clothoff.io
AI clothes remover

Video Face Swap
Swap faces in any video effortlessly with our completely free AI face swap tool!

Hot Article
Hot Tools

MinGW - Minimalist GNU for Windows
This project is in the process of being migrated to osdn.net/projects/mingw, you can continue to follow us there. MinGW: A native Windows port of the GNU Compiler Collection (GCC), freely distributable import libraries and header files for building native Windows applications; includes extensions to the MSVC runtime to support C99 functionality. All MinGW software can run on 64-bit Windows platforms.

SublimeText3 Chinese version
Chinese version, very easy to use

DVWA
Damn Vulnerable Web App (DVWA) is a PHP/MySQL web application that is very vulnerable. Its main goals are to be an aid for security professionals to test their skills and tools in a legal environment, to help web developers better understand the process of securing web applications, and to help teachers/students teach/learn in a classroom environment Web application security. The goal of DVWA is to practice some of the most common web vulnerabilities through a simple and straightforward interface, with varying degrees of difficulty. Please note that this software

Zend Studio 13.0.1
Powerful PHP integrated development environment

PhpStorm Mac version
The latest (2018.2.1) professional PHP integrated development tool

