
Home >Java >javaTutorial >How to customize a starter, are you tired of learning it?
How to customize a starter, are you tired of learning it?
- Java后端技术全栈forward
- 2023-08-15 16:02:061331browse
Two days ago, a friend was asked about starter again during an interview. When I was doing a mock interview for him, I deliberately emphasized that must write a custom starter by myself, and sure enough, he was asked about it during the interview.
Maybe some people have not experienced from Servlet to Spring MVC. If you have experienced it, you will know that the configuration is It's quite cumbersome, so Spring Boot is not included later.
Friends who have studied Spring Boot should know that there is a saying used to describe Spring Boot: Convention is greater than configuration.
Why is Spring Boot called convention greater than configuration?
The reason why Spring Boot is called "convention over configuration" is because it adopts the design concept of convention over configuration. Traditional Java development requires a large amount of configuration, such as XML files, annotations, etc., and these configurations need to be specified by the developers themselves. Spring Boot simplifies the development process by providing some default configurations and conventions, reducing the amount of manual configuration work that developers need to do.
Spring Boot automatically completes some common configuration tasks through some default configuration properties and conventions, such as automatic configuration of data sources, automatic configuration of web servers, automatic configuration of logs, etc. Developers only need to organize code and configuration files in an agreed upon manner to quickly build a working application.
This design concept of convention over configuration allows developers to no longer need to pay attention to some conventional configuration details and focus more on the implementation of business logic. At the same time, Spring Boot also provides some extensible configuration options, allowing developers to customize and expand according to their own needs.
In general, Spring Boot's design concept of convention over configuration enables developers to develop applications more quickly and efficiently, and reduces configuration complexity. This is also the reason why Spring Boot can become one of the widely used frameworks in Java development.
In the interview, I asked you to talk about the Spring Boot automatic assembly principle. We can simply answer this:
The automatic assembly principle of Spring Boot is through
@EnableAutoConfigurationAnnotations andspring.factoriesfiles are implemented.
@EnableAutoConfigurationThe annotation is used to enable the automatic assembly function. This annotation is usually placed on the main class of the application. The
spring.factoriesfile is a configuration file located in the META-INF directory, which defines the fully qualified name of each automatic assembly class.When Spring Boot starts, all
spring.factoriesfiles under the classpath will be loaded, and based on the fully qualified name of the autowiring class defined therein, they will be instantiated and added to Spring application context.Auto-assembly classes are usually annotated through the
@Configurationannotation, and various annotations are used (such as@ComponentScan,@Import, etc. ) to implement the corresponding automatic assembly logic.Through the
@EnableAutoConfigurationannotation and thespring.factoriesfile, Spring Boot can automatically load and configure the corresponding components based on the application's dependencies and configuration information, simplifying the application configuration and development process.
You may forget it after reciting it once, but you may be able to remember it roughly after reciting it again.
In fact, as long as we know how to customize a starter, it will be much easier to answer the above questions.
When we use Spring Boot to develop, the most common ones are various starters.
Common starters
There are many commonly used starters in Spring Boot. Here are some common starters:
spring-boot-starter-web: A starter for building web applications, including Spring MVC and Tomcat server. It provides functionality for handling HTTP requests and responses. spring-boot-starter-data-jpa: starter for interacting with relational databases, including Spring Data JPA and Hibernate. It simplifies interaction with the database and provides common CRUD operations. spring-boot-starter-security: A starter for adding security features, including Spring Security and OAuth2. It provides authentication, authorization, and security configuration capabilities. spring-boot-starter-test: starter for writing unit tests and integration tests, including JUnit and Spring Test. It provides a testing framework and tools to facilitate unit testing and integration testing. spring-boot-starter-actuator: A starter for monitoring and managing applications, including health checking, indicator collection and remote management functions. It provides functionality to monitor the running status of applications. spring-starter-cache: starter for adding cache support, including Spring Cache and Ehcache. It provides the ability to cache data and improve application performance. spring-boot-starter-data-redis: A starter for interacting with Redis databases, including Spring Data Redis. It simplifies interaction with Redis and provides common operation methods. spring-boot-starter-mail: starter for sending emails, including JavaMail and Spring Mail. It provides functionality for sending emails. spring-boot-starter-log4j2: A starter for logging using Log4j2. It provides logging functionality to facilitate debugging and error tracking. spring-boot-starter-thymeleaf: starter for using the Thymeleaf template engine. It provides functionality for page rendering using Thymeleaf. ......
These starters can be selected and used according to the needs of the application. They provide various functions and conveniences, Simplifies the application development and configuration process.
From the naming point of view, you will find that they all start with spring-boot-starterspring-boot-starter-xxx.
However, we have also simply done this in the project: mybatis-spring-boot-starter, which is not the naming method above.
In fact, we usually call spring-boot-starter-xxx that starts with spring-boot-starter, which is what spring officially did for us, xxx-spring-boot-starter This format was created by myself, it’s just a naming.
Why can’t we just start a starter ourselves to have fun? Hahaha, let’s do it.
Custom starter
Let’s make a redisson starter.
The first step is to create a Spring Boot project and name it: redisson-spring-boot-starter.
Among them, the key points of pom dependency:
<dependencies>
    <dependency>
        <groupId>org.springframework.boot</groupId>
        <artifactId>spring-boot-starter</artifactId>
        <version>2.3.1.RELEASE</version>
        <!-- 不让jar进行传递 避免jar包冲突-->
        <optional>true</optional>
    </dependency>
    <dependency>
        <groupId>org.redisson</groupId>
        <artifactId>redisson</artifactId>
        <version>3.13.1</version>
    </dependency>
    <dependency>
        <groupId>org.springframework.boot</groupId>
        <artifactId>spring-boot-configuration-processor</artifactId>
        <optional>true</optional>
    </dependency>
</dependencies>
Create configuration parsing class: RedissonProperties
/**
 * @author tianwc  公众号:java后端技术全栈、面试专栏
 * @version 1.0.0
 * @date 2023年07月20日 11:35
 * 在线刷题 1200+题和1000+篇干货文章:<a href="http://woaijava.cc/">博客地址</a>
 *
 * 解析配置项
 */
@ConfigurationProperties(prefix = "tian.redisson")
public class RedissonProperties {

    private String host="localhost";
    private int port=6379;
    private int timeout;

    //get set 省略
}
Auto-assembly class: RedissonAutoConfiguration
/**
 * @author tianwc  公众号:java后端技术全栈、面试专栏
 * @version 1.0.0
 * @date 2023年07月20日 11:27
 * 在线刷题 1200+题和1000+篇干货文章:<a href="http://woaijava.cc/">博客地址</a>
 */
//(条件装配)只有在我们的classpath目录下有Redisson.class 我们才自动装配RedissonClient bean
//@ConditionalOnClass(Redisson.class)
@EnableConfigurationProperties(RedissonProperties.class)
@Configuration
public class RedissonAutoConfiguration {
    private static final String PREFIX="redis://";
    @Bean
    public RedissonClient redissonClient(RedissonProperties redissonProperties){
        Config config=new Config();
        //redis单机模式
        config.useSingleServer().setAddress(PREFIX+redissonProperties.getHost()+":"+redissonProperties.getPort())
                .setConnectTimeout(redissonProperties.getTimeout());
        return Redisson.create(config);
    }
}
Then, create: META-INF directory in the resources directory, create spring.factories file in this directory, file content:
org.springframework.boot.autoconfigure.EnableAutoConfiguration=\
  com.tian.RedissonAutoConfiguration
Done, that’s it . Haven't you recovered yet?
Use a custom starter
Create a spring Boot project and introduce our custom starter.
<dependency>
<groupId>com.tian</groupId>
<artifactId>charge-sms-spring-boot-starter</artifactId>
<version>1.0-SNAPSHOT</version>
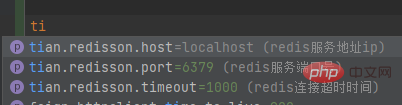
</dependency>Since we assigned default values to host and port in the RedissonProperties class, we use the default values in the application.properties file when no parameters are configured.
If configured, it is as follows:
tian.redisson.host=localhost
tian.redisson.port=6379
tian.redisson.timeout=1000
However, when you really play like this, you will find that when we usually configure something, we will basically prompt it, such as:
Wouldn’t it be nice to have this reminder?
要想有这个提示,还得在redisson-spring-boot-starter中搞点事情。
相关jar上面都已经引入了这里不再赘述。
同样是在META-INF下面创建一个文件(文件名需要注意不要写错):additional-spring-configuration-metadata.json
内容如下:
{
  "properties": [
    {
      "name": "tian.redisson.host",
      "type": "java.lang.String",
      "description": "redis服务地址ip",
      "defaultValue": "localhost"
    },
    {
      "name": "tian.redisson.port",
      "type": "java.lang.Integer",
      "description": "redis服务端口号",
      "defaultValue": 6379
    },
    {
      "name": "tian.redisson.timeout",
      "type": "java.lang.Integer",
      "description": "redis连接超时时间",
      "defaultValue": 1000
    }
  ]
}properties对应一个数组,每个配置项占一个。
name:就是我们的配置项type:配置项类型description:配置项的描述defaultValue:默认值
重新打包,在使用的项目里执行Reload All Maven。
接着,再去properties文件里配置,就会有对应的提示了。
我们写一个controller来使用:
@Slf4j
@RestController
@RequestMapping("/test")
public class TestController {

    @Resource
    private RedissonClient redissonClient;

    @GetMapping("/redisson")
    public String redisson() {
        RBucket bucket = redissonClient.getBucket("name");
        if(bucket.get()==null){
            bucket.set("公众号:java后端技术全栈");
        }
        return bucket.get().toString();
    }
}
执行结果:
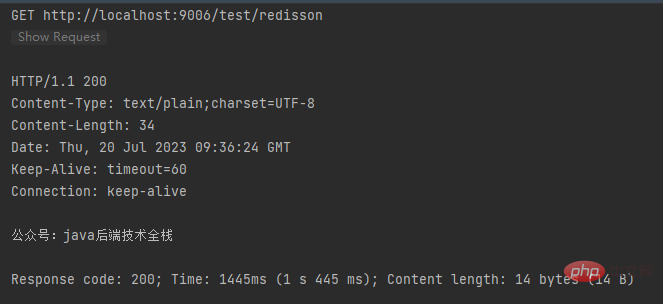
到这里,我们就搞定了一个自定义starter。
在实际项目中,在自定义starter时,可能还会用到下面这些注解,请注意收藏:
@Conditional: Judge according to certain conditions, and register the bean to the container if the conditions are met
@ConditionalOnMissingBean: The given bean does not exist When, the current Bean is instantiated
@ConditionalOnProperty: The bean is created if the properties defined in the configuration file are met, otherwise it is not created
@ConditionalOnBean: When the given bean exists, instantiate the current Bean
@ConditionalOnClass: When the given class name exists on the class path, instantiate the current Bean
@ConditionalOnMissingClass: When the given class name does not exist on the class path, instantiate the current Bean
Above we just created a stand-alone version, but actually You can create various versions of master-slave, sentinel, cluster, etc., or you can use SSL access mode.
Now that you know how to customize it, now it’s time to use it in actual projects. We can’t always stay in the demo. The best way is to use it in the project.
In the charging pile project, I used a custom starter in the function of sending text messages, and also used the template method mode.
The above is the detailed content of How to customize a starter, are you tired of learning it?. For more information, please follow other related articles on the PHP Chinese website!