


How to use Flask-RESTful to build RESTful API
Introduction:
With the rapid development of web development, RESTful API has become an important part of building back-end services. Flask-RESTful is an extension based on the Flask framework that provides convenient tools for building RESTful APIs. This article will introduce how to use Flask-RESTful to build a simple RESTful API and explain it in detail through code examples.
Step One: Install Flask-RESTful
In order to use Flask-RESTful, you first need to install it. You can install it through the pip command:
pip install flask-restful
Step 2: Create a Flask application
First, we need to create a Flask application. In the root directory of the project, create a file called app.py and enter the following code:
from flask import Flask
from flask_restful import Api, Resource

app = Flask(__name__)
api = Api(app)

class HelloWorld(Resource):
    def get(self):
        return {'hello': 'world'}

api.add_resource(HelloWorld, '/')

if __name__ == '__main__':
    app.run(debug=True)
In the above code, we imported Flask and Api classes. The Flask class is used to create a Flask application, and the Api class is used to create an API instance. Then, we created a resource class named HelloWorld, which inherits from the Resource class. The Resource class is a base class provided by Flask-RESTful and is used to define API resources.
In the HelloWorld class, we define a get method to handle GET requests. In this example, we returned a JSON response containing hello: world.
Next, we add the resource class HelloWorld to the route through the api.add_resource method. Among them, the first parameter is the name of the resource class, and the second parameter is the routing address /.
Finally, we start the Flask application through the app.run method and set the debug parameter to True to run the application in development mode.
Step 3: Run the application
In the terminal, enter the root directory of the project and run the following command to start the application:
python app.py
Open the browser and visit http:// localhost:5000, you should be able to see the returned JSON response {"hello": "world"}.
Step 4: Add more resources
Flask-RESTful allows us to define multiple resources. For example, we can add a resource named User to handle user-related requests.
class User(Resource):
    def get(self, user_id):
        # 获取特定用户的信息
        pass

    def post(self):
        # 创建一个新用户
        pass

    def put(self, user_id):
        # 更新特定用户的信息
        pass

    def delete(self, user_id):
        # 删除特定用户
        pass

api.add_resource(User, '/users', '/users/<int:user_id>')
In the above code, we define a resource class named User. This class contains methods for handling GET, POST, PUT and DELETE requests.
In the api.add_resource method, we can see that the second parameter is a special routing address, where <user_id></user_id> represents a path Parameter used to receive the user's ID. In this way, we can access specific user resources through the user ID in the URL.
In this way, we can add more resources and corresponding request processing methods according to needs.
Step 5: Request parameter analysis
In RESTful API, it is often necessary to obtain parameters from the request and process them. Flask-RESTful provides a reqparse module for parsing request parameters.
from flask_restful import reqparse

parser = reqparse.RequestParser()
parser.add_argument('name', type=str)
parser.add_argument('age', type=int)

class User(Resource):
    def post(self):
        args = parser.parse_args()
        name = args['name']
        age = args['age']
        # 处理参数
        pass
In the above code, we first imported the reqparse module. Then, a RequestParser object is created, and two parameters name and age are added through the add_argument method.
In the post method of the User resource, we parse the request parameters through the parser.parse_args() method and assign them to the corresponding variable. Then, we can process the parameters according to actual needs.
Summary:
Through the above steps, we have successfully built a simple RESTful API using Flask-RESTful, and learned how to add resources, define request processing methods, and parse request parameters.
Of course, Flask-RESTful also provides many other functions and extensions, such as authentication, resource nesting, etc. It can be further studied and used to meet the needs of different projects.
The above is the detailed content of How to build a RESTful API using Flask-RESTful. For more information, please follow other related articles on the PHP Chinese website!

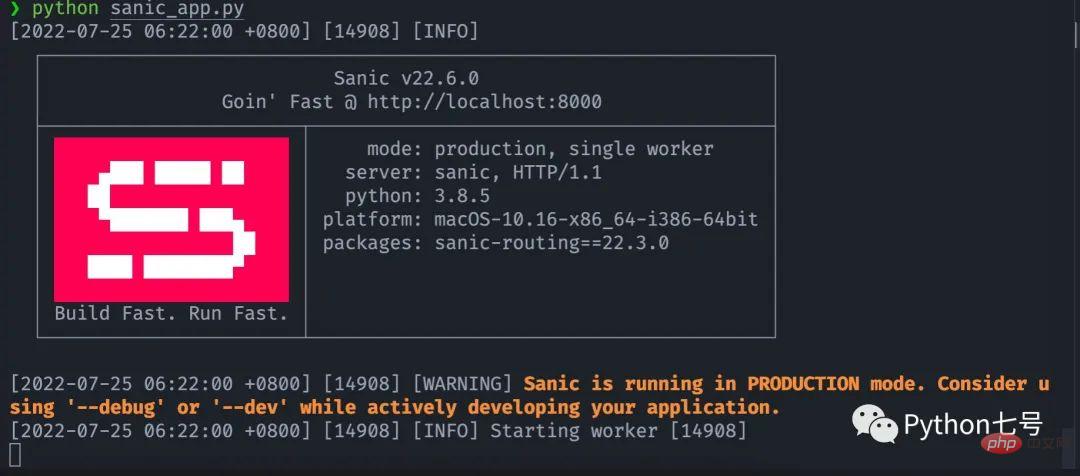 如何快速把你的 Python 代码变为 APIApr 14, 2023 pm 06:28 PM
提到API开发,你可能会想到DjangoRESTFramework,Flask,FastAPI,没错,它们完全可以用来编写API,不过,今天分享的这个框架可以让你更快把现有的函数转化为API,它就是Sanic。Sanic简介Sanic[1],是Python3.7+Web服务器和Web框架,旨在提高性能。它允许使用Python3.5中添加的async/await语法,这可以有效避免阻塞从而达到提升响应速度的目的。Sanic致力于提供一种简单且快速,集创建和启动于一体的方法
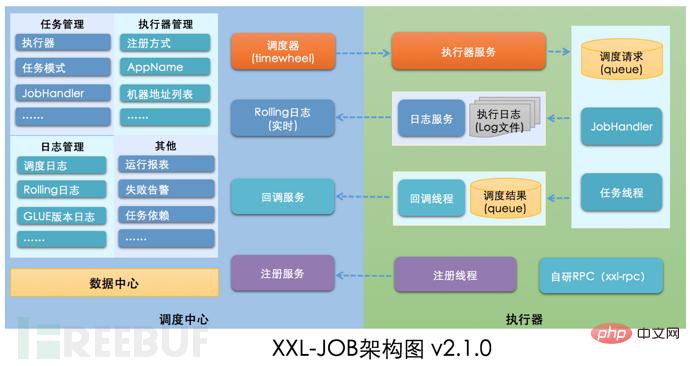 如何进行XXL-JOB API接口未授权访问RCE漏洞复现May 12, 2023 am 09:37 AM
XXL-JOB描述XXL-JOB是一个轻量级分布式任务调度平台,其核心设计目标是开发迅速、学习简单、轻量级、易扩展。现已开放源代码并接入多家公司线上产品线,开箱即用。一、漏洞详情此次漏洞核心问题是GLUE模式。XXL-JOB通过“GLUE模式”支持多语言以及脚本任务,该模式任务特点如下:●多语言支持:支持Java、Shell、Python、NodeJS、PHP、PowerShell……等类型。●WebIDE:任务以源码方式维护在调度中心,支持通过WebIDE在线开发、维护。●动态生效:用户在线通
 PHP8.0中的API客户端库:GuzzleMay 14, 2023 am 08:54 AM
随着网络技术的发展,Web应用程序和API应用程序越来越普遍。为了访问这些应用程序,需要使用API客户端库。在PHP中,Guzzle是一个广受欢迎的API客户端库,它提供了许多功能,使得在PHP中访问Web服务和API变得更加容易。Guzzle库的主要目标是提供一个简单而又强大的HTTP客户端,它可以处理任何形式的HTTP请求和响应,并且支持并发请求处理。在
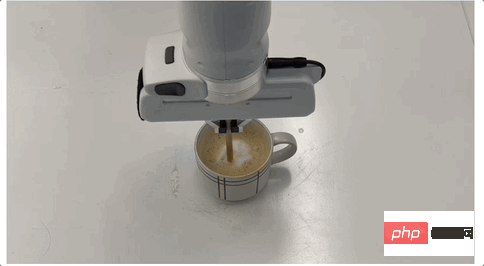 让机器人学会咖啡拉花,得从流体力学搞起!CMU&MIT推出流体模拟平台Apr 07, 2023 pm 04:46 PM
机器人也能干咖啡师的活了!比如让它把奶泡和咖啡搅拌均匀,效果是这样的:然后上点难度,做杯拿铁,再用搅拌棒做个图案,也是轻松拿下:这些是在已被ICLR 2023接收为Spotlight的一项研究基础上做到的,他们推出了提出流体操控新基准FluidLab以及多材料可微物理引擎FluidEngine。研究团队成员分别来自CMU、达特茅斯学院、哥伦比亚大学、MIT、MIT-IBM Watson AI Lab、马萨诸塞大学阿默斯特分校。在FluidLab的加持下,未来机器人处理更多复杂场景下的流体工作也都
 Vue3 Composition API怎么优雅封装第三方组件May 11, 2023 pm 07:13 PM
前言对于第三方组件,如何在保持第三方组件原有功能(属性props、事件events、插槽slots、方法methods)的基础上,优雅地进行功能的扩展了?以ElementPlus的el-input为例:很有可能你以前是这样玩的,封装一个MyInput组件,把要使用的属性props、事件events和插槽slots、方法methods根据自己的需要再写一遍://MyInput.vueimport{computed}from'vue'constprops=define
 设计API接口时,要注意这些地方!Jan 09, 2023 am 11:10 AM
本篇文章给大家带来了关于API的相关知识,其中主要介绍了设计API需要注意哪些地方?怎么设计一个优雅的API接口,感兴趣的朋友,下面一起来看一下吧,希望对大家有帮助。
 Windows 11 正在获得一项新的 API 支持的功能来解决网络问题Apr 20, 2023 pm 02:28 PM
当您的WindowsPC出现网络问题时,问题出在哪里并不总是很明显。很容易想象您的ISP有问题。然而,Windows笔记本电脑上的网络并不总是顺畅的,Windows11中的许多东西可能会突然导致Wi-Fi网络中断。随机消失的Wi-Fi网络是Windows笔记本电脑上报告最多的问题之一。网络问题的原因各不相同,也可能因Microsoft的驱动程序或Windows而发生。Windows是大多数情况下的问题,建议使用内置的网络故障排除程序。在Windows11
 SpringBoot怎么实现api加密May 15, 2023 pm 11:10 PM
SpringBoot的API加密对接在项目中,为了保证数据的安全,我们常常会对传递的数据进行加密。常用的加密算法包括对称加密(AES)和非对称加密(RSA),博主选取码云上最简单的API加密项目进行下面的讲解。下面请出我们的最亮的项目rsa-encrypt-body-spring-boot项目介绍该项目使用RSA加密方式对API接口返回的数据加密,让API数据更加安全。别人无法对提供的数据进行破解。SpringBoot接口加密,可以对返回值、参数值通过注解的方式自动加解密。什么是RSA加密首先我


Hot AI Tools

Undresser.AI Undress
AI-powered app for creating realistic nude photos

AI Clothes Remover
Online AI tool for removing clothes from photos.

Undress AI Tool
Undress images for free

Clothoff.io
AI clothes remover

AI Hentai Generator
Generate AI Hentai for free.

Hot Article
Hot Tools

PhpStorm Mac version
The latest (2018.2.1) professional PHP integrated development tool

Safe Exam Browser
Safe Exam Browser is a secure browser environment for taking online exams securely. This software turns any computer into a secure workstation. It controls access to any utility and prevents students from using unauthorized resources.

SublimeText3 English version
Recommended: Win version, supports code prompts!

Dreamweaver CS6
Visual web development tools

SublimeText3 Mac version
God-level code editing software (SublimeText3)

