
 Web Front-endH5 TutorialExample of using HTML5 to draw 3D graphics composed of points, lines and surfaces_html5 tutorial skills
Example of using HTML5 to draw 3D graphics composed of points, lines and surfaces_html5 tutorial skills

I have been playing with Canvas for two or three weeks, and playing with flat objects is just the same, so I started to mess around with 3D.
Because the Canvas canvas is still flat after all, so if you want to have 3D, you must abstract a Z-axis. Then convert the 3D coordinates into 2D coordinates, draw them on the canvas, and then use rotation and other transformation effects to create a 3D feeling. Doing 3D generally involves going from points to lines, and then from lines to surfaces.
【Point】
If you click on it, I have written a blog post about 3D before Parsing 3D tag cloud is actually very simple Although this blog post talks about the 3D tag cloud implemented using div, but the root cause is The principle of 3D is the same, it is the simplest 3D composed of points. Each label is a point. You can also watch this DEMO directly: 
3DBall
There are a total of five hundred point objects in it. Each point object changes its size and transparency according to their Z axis, and then evenly distributes it on the sphere. It forms a point sphere.
【Line】
Once you know how to make dots, the line will be easy, just connect the dots. I haven't done a DEMO on this, but it's really not difficult. Just loop moveTo, then lineTo, and the line will come out.
【Noodles】
This blog post mainly talks about face.
Without further ado, let’s do a DEMO first: 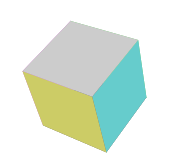
To make a cube, I used three objects: point object, area object, and the cube itself:
The following is a point object. x, y, z are the three-dimensional coordinates of the point. The _get2d method converts the three-dimensional coordinates to the two-dimensional level. fallLength is the focal length.
- var Vector = function(x,y,z){
- this.x = x;
- this.y = y;
- this.z = z;
- this._get2d = function(){
- var scale = fallLength/(fallLength this.z);
- var x = centerX this.x*scale;
- var y = centerY this.y*scale;
- return {x:x, y:y};
-
Then the target audience:The property page of the face object is easy to understand. A face is a square, v1v2v3v4 are the four vertices of the face. The zIndex attribute is very important. It represents the level of the face, whether it is on the outside or inside. This must be Yes, so that when drawing with canvas, this surface can be drawn at the front and will not be covered by other surfaces. The value of zIndex is also easy to understand. It is the average z-axis coordinate of the vertex, which is actually the z-axis coordinate of the center point. The color is the color of this surface.
XML/HTML CodeCopy content to clipboard- var Face = function(vector1,vector2,vector3,vector4,color){
- this.v1 = vector1;
- this.v2 = vector2;
- this.v3 = vector3;
- this.v4 = vector4;
- this.color = color;
- this.zIndex = (this.v1.z this.v2.z this.v3.z this.v4.z)/4;
- this.draw = function(){
- ctx.save();
- ctx.beginPath();
- ctx.moveTo(this.v1._get2d().x , this.v1._get2d().y);
- ctx.lineTo(this.v2._get2d().x , this.v2._get2d().y);
- ctx.lineTo(this.v3._get2d().x , this.v3._get2d().y);
- ctx.lineTo(this.v4._get2d().x , this.v4._get2d().y);
- ctx.closePath();
- // ctx.fillStyle = "rgba(" parseInt(Math.random()*255) "," parseInt(Math.random()*255) "," parseInt(Math.random()*255) ",0.2)";
- ctx.fillStyle = this.color;
- ctx.fill();
- }
- }
最后是立方体本身对象:因为立方体最后要旋转,所以,立方体对象里面不仅有面对象,还要有点对象,点旋转后才会引起面的旋转。length是立方体的边长,_initVector是初始化立方体的各个顶点,_draw方法就是把所有点形成面,将面放入数组,然后对面进行排序(就是根据面里的zIndex排序),排序好后,调用每个面里的draw方法。立方体就出来了。
XML/HTML Code复制内容到剪贴板- var Cube = function(length){
- this.length = length;
- this.faces = [];
- this.vectors = [];
- }
- Cube.prototype = {
- _initVector:function(){
- this.vectors[0] = new Vector(-this.length/2 , -this.length/2 , this.length/2);
- this.vectors[1] = new Vector(-this.length/2 , this.length/2 , this.length/2);
- this.vectors[2] = new Vector(this.length/2 , -this.length/2 , this.length/2);
- this.vectors[3] = new Vector(this.length/2 , this.length/2 , this.length/2);
- this.vectors[4] = new Vector(this.length/2 , -this.length/2 , -this.length/2);
- this.vectors[5] = new Vector(this.length/2 , this.length/2 , -this.length/2);
- this.vectors[6] = new Vector(-this.length/2 , -this.length/2 , -this.length/2);
- this.vectors[7] = new Vector(-this.length/2 , this.length/2 , -this.length/2);
- },
- _draw:function(){
- this.faces[0] = new Face(this.vectors[0] , this.vectors[1] , this.vectors[3] , this.vectors[2] , "#6c6");
- this.faces[1] = new Face(this.vectors[2] , this.vectors[3] , this.vectors[5] , this.vectors[4] , "#6cc");
- this.faces[2] = new Face(this.vectors[4] , this.vectors[5] , this.vectors[7] , this.vectors[6] , "#cc6");
- this.faces[3] = new Face(this.vectors[6] , this.vectors[7] , this.vectors[1] , this.vectors[0] , "#c6c");
- this.faces[4] = new Face(this.vectors[1] , this.vectors[3] , this.vectors[5] , this.vectors[7] , "#666");
- this.faces[5] = new Face(this.vectors[0] , this.vectors[2] , this.vectors[4] , this.vectors[6] , "#ccc");
- this.faces.sort(function(a , b){
- return b.zIndex - a.zIndex;
- });
- this.faces.foreach(function(){
- this.draw();
- })
- }
- }
立方体做好了,接下来就可以让它动起来了。根据鼠标位置改变立方体转动的角度。rotateX和rotateY方法就是让所有点绕X轴旋转以及绕Y轴旋转。这个的原理我在之前那个博文上好像有说过。。。。如果想了解更多,可以自己去百度一下计算机图形学3D变换。绕X轴和绕Y轴是最简单的旋转矩阵了。当然,如果有兴趣的还可以去搜一下绕任意轴旋转矩阵。。。这个有点复杂,我本来想用它来做个魔方,不过遇到一些问题,暂时还没解决。好吧,扯远了。通过rotateX和rotateY两个方法可以让每个点获得下一帧的位置,在动画循环中重绘。这样,转动的立方体就做出来了。XML/HTML Code复制内容到剪贴板- if("addEventListener" in window){
- window.addEventListener("mousemove" , function(event){
- var x = event.clientX - canvas.offsetLeft - centerX;
- var y = event.clientY - canvas.offsetTop - centerY;
- angleY = x*0.0001;
- angleX = y*0.0001;
- });
- }
- else {
- window.attachEvent("onmousemove" , function(event){
- var x = event.clientX - canvas.offsetLeft - centerX;
- var y = event.clientY - canvas.offsetTop - centerY;
- angleY = x*0.0001;
- angleX = y*0.0001;
- });
- }
- function rotateX(vectors){
- var cos = Math.cos(angleX);
- var sin = Math.sin(angleX);
- vectors.foreach(function(){
- var y1 = this.y * cos - this.z * sin;
- var z1 = this.z * cos this.y * sin;
- this.y = y1;
- this.z = z1;
- });
- }
- function rotateY(vectors){
- var cos = Math.cos(angleY);
- var sin = Math.sin(angleY);
- vectors.foreach(function(){
- var x1 = this.x * cos - this.z * sin;
- var z1 = this.z * cos this.x * sin;
- this.x = x1;
- this.z = z1;
- })
- }
- cube = new Cube(80);
- cube._initVector();
- function initAnimate(){
- cube._draw();
- animate();
- }
- function animate(){
- ctx.clearRect(0,0,canvas.width,canvas.height)
- rotateY(cube.vectors);
- rotateX(cube.vectors);
- cube._draw();
- if("requestAnimationFrame" in window){
- requestAnimationFrame(animate);
- }
- else if("webkitRequestAnimationFrame" in window){
- webkitRequestAnimationFrame(animate);
- }
- else if("msRequestAnimationFrame" in window){
- msRequestAnimationFrame(animate);
- }
- else if("mozRequestAnimationFrame" in window){
- mozRequestAnimationFrame(animate);
- }
- else {
- setTimeout(animate , 16);
- }
- }
I won’t post all the code, you can see it through the console in the DEMO. I didn't reference any other frameworks or anything like that, just copy it and you can use it.After you can write a rotating cube, you can also create multiple rotating cubes.

Poke DEMO: Face: 3D Cube 2 3D Cube Line (I just think this is cooler without faces)


 Mastering Microdata: A Step-by-Step Guide for HTML5May 14, 2025 am 12:07 AM
MicrodatainHTML5enhancesSEOanduserexperiencebyprovidingstructureddatatosearchengines.1)Useitemscope,itemtype,anditempropattributestomarkupcontentlikeproductsorevents.2)TestmicrodatawithtoolslikeGoogle'sStructuredDataTestingTool.3)ConsiderusingJSON-LD
 What's New in HTML5 Forms? Exploring the New Input TypesMay 13, 2025 pm 03:45 PM
HTML5introducesnewinputtypesthatenhanceuserexperience,simplifydevelopment,andimproveaccessibility.1)automaticallyvalidatesemailformat.2)optimizesformobilewithanumerickeypad.3)andsimplifydateandtimeinputs,reducingtheneedforcustomsolutions.
 Understanding H5: The Meaning and SignificanceMay 11, 2025 am 12:19 AM
H5 is HTML5, the fifth version of HTML. HTML5 improves the expressiveness and interactivity of web pages, introduces new features such as semantic tags, multimedia support, offline storage and Canvas drawing, and promotes the development of Web technology.
 H5: Accessibility and Web Standards ComplianceMay 10, 2025 am 12:21 AM
Accessibility and compliance with network standards are essential to the website. 1) Accessibility ensures that all users have equal access to the website, 2) Network standards follow to improve accessibility and consistency of the website, 3) Accessibility requires the use of semantic HTML, keyboard navigation, color contrast and alternative text, 4) Following these principles is not only a moral and legal requirement, but also amplifying user base.
 What is the H5 tag in HTML?May 09, 2025 am 12:11 AM
The H5 tag in HTML is a fifth-level title that is used to tag smaller titles or sub-titles. 1) The H5 tag helps refine content hierarchy and improve readability and SEO. 2) Combined with CSS, you can customize the style to enhance the visual effect. 3) Use H5 tags reasonably to avoid abuse and ensure the logical content structure.
 H5 Code: A Beginner's Guide to Web StructureMay 08, 2025 am 12:15 AM
The methods of building a website in HTML5 include: 1. Use semantic tags to define the web page structure, such as, , etc.; 2. Embed multimedia content, use and tags; 3. Apply advanced functions such as form verification and local storage. Through these steps, you can create a modern web page with clear structure and rich features.
 H5 Code Structure: Organizing Content for ReadabilityMay 07, 2025 am 12:06 AM
A reasonable H5 code structure allows the page to stand out among a lot of content. 1) Use semantic labels such as, etc. to organize content to make the structure clear. 2) Control the rendering effect of pages on different devices through CSS layout such as Flexbox or Grid. 3) Implement responsive design to ensure that the page adapts to different screen sizes.
 H5 vs. Older HTML Versions: A ComparisonMay 06, 2025 am 12:09 AM
The main differences between HTML5 (H5) and older versions of HTML include: 1) H5 introduces semantic tags, 2) supports multimedia content, and 3) provides offline storage functions. H5 enhances the functionality and expressiveness of web pages through new tags and APIs, such as and tags, improving user experience and SEO effects, but need to pay attention to compatibility issues.


Hot AI Tools

Undresser.AI Undress
AI-powered app for creating realistic nude photos

AI Clothes Remover
Online AI tool for removing clothes from photos.

Undress AI Tool
Undress images for free

Clothoff.io
AI clothes remover

Video Face Swap
Swap faces in any video effortlessly with our completely free AI face swap tool!

Hot Article
Hot Tools

SublimeText3 English version
Recommended: Win version, supports code prompts!

MinGW - Minimalist GNU for Windows
This project is in the process of being migrated to osdn.net/projects/mingw, you can continue to follow us there. MinGW: A native Windows port of the GNU Compiler Collection (GCC), freely distributable import libraries and header files for building native Windows applications; includes extensions to the MSVC runtime to support C99 functionality. All MinGW software can run on 64-bit Windows platforms.

ZendStudio 13.5.1 Mac
Powerful PHP integrated development environment

Zend Studio 13.0.1
Powerful PHP integrated development environment

Notepad++7.3.1
Easy-to-use and free code editor

