How to use one-click ghost system software in win10? Many friends who have installed ghostwin10 system do not know how to use one-click ghost. In fact, ghostwin10 is a very good system software, very stable and convenient. Today I have Detailed installation instructions. Let’s take a look at the practical process of applying one-click ghost in Win10.
The process of using one-key ghost in win10
1. Run the one-key ghost recovery tool, click "Backup System", select the backup path, and click Disk Partition C drive, clear.

#2. Partition the backup disk to the D drive, prompt whether to restart the computer, click "Restart Now", restart and then enter the system backup operation. Waiting to proceed.

#3. The backup is completed, enter the path where the system backup belongs, and the win10.gho file is successfully created, which is the backup of the win10 system.

#4. Go to the main interface of Easy Backup and select System Backup under the Backup column. Select a system image storage path for C drive and C drive. Click "Back Up Gradually".

5. U disk installation: Use ultraiso software to open the downloaded system installation disk file (ISO file), execute "load image file" and insert the U disk Go to the computer, click "OK" and wait for the program to finish. Then the USB disk for running and reinstalling the system is ready. After using the prepared system USB disk to boot the device, you can successfully restart the system. .

6. Hard disk installation: The prerequisite is that there must be a Windows system that can operate correctly. Get the "*.GHO" and " "Reinstall System.EXE" to a non-disk partition on the computer, then run "Reinstall System.EXE", press Enter immediately to confirm the resumption operation, confirm again to execute the automatic installation process, and be sure to back up important data on the C drive before execution.

The above is the detailed content of The process of applying one-click ghost in win10. For more information, please follow other related articles on the PHP Chinese website!
 如何自动切换特定应用程序的iPhone方向锁定Jun 06, 2023 am 08:22 AM
在iOS中,当您将iPhone从纵向旋转到横向时,许多App会显示不同的视图。根据应用程序及其使用方式,这种行为并不总是可取的,这就是Apple在“控制中心”中包含方向锁定选项的原因。但是,某些应用程序在禁用方向锁定的情况下工作得更有用-想想YouTube或照片应用程序,将设备旋转到横向可以提供更好的全屏观看体验。如果您倾向于保持锁定状态,则必须在每次打开这些类型的应用程序时在“控制中心”中禁用它以获得全屏体验。然后,当您关闭应用程序时,您必须记住重新打开方向锁定,这并不理想。幸运的是,您可以创
 在虚拟 Windows 11 桌面上应用自定义壁纸的简单技巧May 02, 2023 pm 02:01 PM
如果您每天都使用虚拟桌面,那么我们有好消息要告诉您!在Windows10InsiderBuilds上进行多次测试后,在虚拟桌面上应用自定义壁纸的功能现在已成为Windows11的一部分。虽然现在,在Windows10上,您可以打开多个桌面,但不可能在每个桌面上使用不同的壁纸。随着下周第一个Windows11InsiderBuild版本的发布,您将能够轻松地做到这一点。通常,虚拟桌面用于特定的应用程序和操作,并且大部分时间用于保持事物井井有条。但是,如果您还想使用自定义壁纸个性化
 Go语言中的RPC框架原理与应用Jun 01, 2023 pm 03:01 PM
一、RPC框架的概念在分布式系统中,常常需要在不同的服务端和客户端之间传递数据,RPC(RemoteProcedureCall)框架是一种常用的技术手段。RPC框架允许应用程序通过远程消息传递调用另一个执行环境的函数或方法,从而使程序能够在不同的计算机上运行。目前市面上有很多RPC框架,如Google的gRPC、Thrift、Hessian等,本文主要介
 基于对抗梯度的探索模型及其在点击预估中的应用Apr 13, 2023 pm 11:34 PM
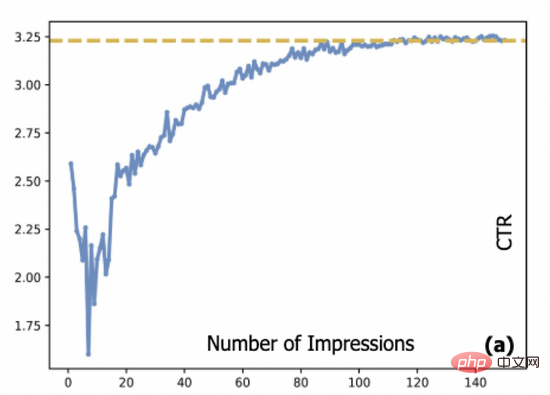
1. 摘要排序模型在广告、推荐和搜索系统中起到了至关重要的作用。在排序模块中,点击率预估技术又是重中之重。目前工业界的点击率预估技术大多采用深度学习算法,基于数据驱动来训练深度神经网络,然而数据驱动带来的相应问题是推荐系统中的新进项目会存在冷启动问题。探索与利用(Exploration-Exploitation,E&E)方法通常用于处理大规模在线推荐系统中的数据循环问题。过去的研究通常认为模型预估不确定度高意味着潜在收益也较高,因此大部分研究文献聚焦到对不确定度的估计上。对于采用
 AI人必看!外媒总结最佳AI应用,你用过几个?May 27, 2023 pm 07:42 PM
人工智能是一种有前途的技术,在许多领域都变得不可或缺。它集成到一系列应用程序和软件中,以显著提高生产力。对于许多专家来说,最能掌握人工智能工作方式的公司和人员无疑将成为明天世界的领导者。然后,重要的是要识别这些工具并控制它们的工作方式。目前,人工智能市场已经拥有许多技术,这些技术具有非常有趣且特殊的特征。对此,国外媒体评选出了2023年25个最好的人工智能产品或应用。1.ChatGPTChatGPT聊天由美国人工智能公司OPENAI开发,现在被视为人工智能革命的引擎。它确实是一个强大的工具,能够
 她用10年日记训练GPT-3,对话童年的自己,网友:AI最治愈的应用Apr 12, 2023 pm 04:25 PM
“这是我目前听过关于AI最好、最治愈的一个应用。”到底是什么应用,能让网友给出如此高度的评价?原来,一个脑洞大开的网友Michelle,用GPT-3造了一个栩栩如生的“童年Michelle”。然后她和童年的自己聊起了天,对方甚至还写来一封信。“童年Michelle”的“学习资料”也很有意思——是Michelle本人的日记,而且是连续十几年,几乎每天都写的那种。日记内容中有她的快乐和梦想,也有恐惧和抱怨;还有很多小秘密,包括和Crush聊天时紧张到眩晕…(不爱写日记的我真的给跪了……)厚厚一叠日记
 浅析:ChatGPT应用的底层原理Apr 13, 2023 am 08:37 AM
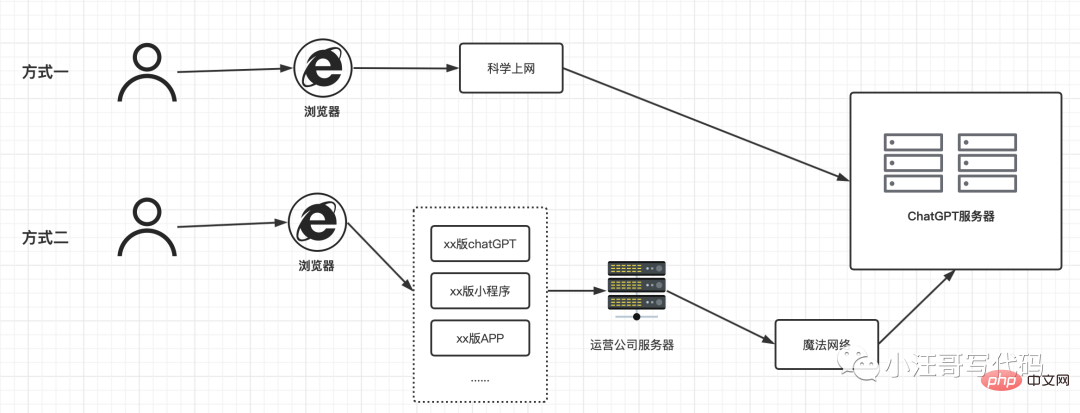
ChatGPT 无疑是最近网络中最靓的仔,小汪哥通过这段时间的使用,加上对一些资料的查阅,了解了一些背后的原理,试图讲解一下ChatGPT应用的底层原理。如果有不正确的地方,欢迎指正。阅读本文可能为会你解答以下问题:为什么有的ChatGPT 收费,有的不收费?为什么ChatGPT是一个字一个字地回答的?为什么中文问题的答案有时候让人啼笑皆非?为什么你问它今天是几号,它的回答是过去的某个时间?为什么有的问题会拒绝回答?“ChatGPT 国内版” 运行原理随着ChatGPT的爆火,出现了很多国内版,
 Java语言中的数据分析应用介绍Jun 10, 2023 pm 08:51 PM
Java语言是当前应用最广泛的程序设计语言之一,它的优越性能和多样化的开发环境,让它成为许多大企业以及中小企业的首选编程语言。在数据分析领域中,Java语言也有着广泛的应用,本文将介绍Java语言中的数据分析应用。一、Java语言的数据分析优势Java语言具有很强的数据处理能力,它支持多线程,能够处理大规模数据集,而且拥有分布式计算能力。这使Java语言具备

Hot AI Tools

Undresser.AI Undress
AI-powered app for creating realistic nude photos

AI Clothes Remover
Online AI tool for removing clothes from photos.

Undress AI Tool
Undress images for free

Clothoff.io
AI clothes remover

AI Hentai Generator
Generate AI Hentai for free.

Hot Article

Hot Tools

Notepad++7.3.1
Easy-to-use and free code editor

SAP NetWeaver Server Adapter for Eclipse
Integrate Eclipse with SAP NetWeaver application server.

EditPlus Chinese cracked version
Small size, syntax highlighting, does not support code prompt function

PhpStorm Mac version
The latest (2018.2.1) professional PHP integrated development tool

SublimeText3 Chinese version
Chinese version, very easy to use


