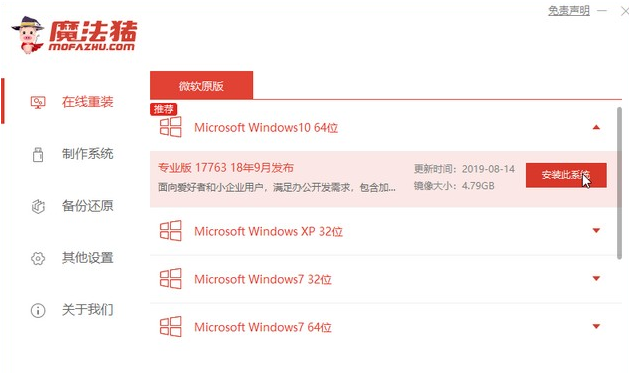
With the great improvement of living standards, notebook computers have now entered people's homes, and ASUS notebooks are yearned for by many users. The brand notebooks they use, but it is inevitable that computer systems will appear. If it crashes and cannot run, then how to reinstall the win7 system? Next, the editor will teach you how to reinstall the win7 system of ASUS notebook.
1. First download Xiaobai’s one-click system reinstallation tool to create a U disk boot disk (download address: http://www.xiaobaixitong.com), insert your U disk, select U disk mode, and click one button Make a USB bootable disk.

#2. Select an operating system you want to install.

#3. Start downloading the PE system image file. After the download is completed, the U disk boot disk will be created. The following interface appears, indicating that the creation is successful.

#4. Restart the computer and keep pressing the shortcut keys when turning on the computer. Select the USB option in the interface that comes up (some do not write USB). U disk.

5. After entering the PE system desktop, the PE installation tool will automatically pop up. Here, check the Windows system you downloaded, and select your system disk as the target partition ( Usually C drive), then click to install the system.

#6. Wait patiently for the download to complete and prepare to restart.

#7. Finally, the installation of win7 ultimate system can be completed.

The above is a detailed introduction to installing the win7 system on ASUS laptops. I hope it can help everyone.
The above is the detailed content of Detailed steps to install win7 on ASUS laptop. For more information, please follow other related articles on the PHP Chinese website!
 ipad与笔记本电脑的区别是什么May 19, 2023 pm 03:42 PM
ipad与笔记本电脑的区别:1、系统不同,iPad是iOS系统,笔记本电脑是windows或Mac OS系统;2、输入法不同,iPad通过触屏或语音输入,笔记本电脑通过鼠标和键盘输入;3、功能差异,iPad偏重娱乐方面,笔记本电脑是全能型设备,应用范围广;4、架构不同,iPad是ARM架构,不能兼容笔记本的程序,笔记本是X86架构,不能兼容iPad程序;5、大小,价格不同等等。
 如何重新排列 OneNote 分区和页面面板May 09, 2023 pm 01:16 PM
OneNote应用程序是一个可以保存所有笔记、研究、数据等的地方。它们易于共享、打印和查找信息。最好的部分是您所有的笔记本都在线存储,因此您可以在任何地方访问它们。它们具有多种功能。每个笔记本都会自动组织成部分,这些部分的页面可以根据我们的需要进行排列。默认情况下,当我们创建一个notebook时,section会出现在notebook的顶部,pages会出现在notebook的右侧。但是我们可以重新排列这些,并将页面和部分移到左边,很少有用户喜欢它放在一个地方以便于访问。在本文中,让我
 笔记本wifi功能消失了为什么只有飞行模式Jul 06, 2023 am 11:02 AM
笔记本WiFi功能消失只有飞行模式的原因:1、WiFi硬件故障,飞行模式是通过不同的硬件电路实现的;2、WiFi驱动程序问题,飞行模式是不依赖于驱动程序;3、操作系统问题,飞行模式通常是一个独立的开关;4、用户设置问题,飞行模式可以在禁用Wi-Fi功能的情况下使用。
 华为笔记本电脑win10系统下载安装方法Jul 10, 2023 am 10:17 AM
华为笔记本电脑win10系统下载安装方法是什么呢?如今华为笔记本电脑的用户群体不少,所以在使用的过程中会遇到一些问题,就需要通过重装系统来解决问题,那么华为笔记本电脑系统下载地址在哪里?以及华为笔记本电脑win10系统怎么安装呢?下面将介绍华为笔记本电脑win10系统下载安装方法。华为笔记本电脑win10系统下载华为笔记本电脑win10系统下载安装方法如下:1、下载并打开魔法猪系统重装大师软件,点击在线重装,选择适合的win10系统版本。2、选择需要的软件,点击勾选进行下一步。3、等待系统重装资
 笔记本个别按键失灵怎么办Mar 07, 2023 am 10:33 AM
笔记本个别按键失灵是因为电脑键盘内部线路板有问题,其解决办法:1、清理键盘,将里面的污垢灰尘清理干净;2、把坏了的几个键帽扣起来,查看里面的硅胶冒是否有移位,拿个小螺丝刀拨回来即可。
 dell笔记本重装系统教程Jul 21, 2023 am 08:33 AM
戴尔近几年卖的是相当火热,外形时尚轻便,性能强大,高性价比,受到了很多上班族和学生群体的追捧。最近也收到一些小伙伴的咨询怎样给dell笔记本重装系统,下面小编就给大家演示戴尔笔记本重装系统全过程。 1、首先需先下载一个装机吧重装软件(可百度装机吧官网进行下载),下载后打开装机吧界面 2、进行本地环境检测 3、选择需要安装的系统进行下载 4、选择想要安装的电脑软件 5、开始下载 6、部署安装环境 7、环境部署完成,点击立即重启 8、重启后进入pe界面,选择第二项 9、开始安装
 把握机会,今天就入手 AI 加速的 RTX 40 系笔记本Oct 31, 2023 am 08:01 AM
今年的11.11大促正在进行中,久等了!一直持币观望笔记本产品的小伙伴,因为11月的到来意味着Steam秋季大促也近在咫尺了,现在正是换新好时机。小编今天给大家挑选了几款性价比还不错的游戏本,全部搭载了RTX40系列笔记本电脑GPU。RTX40系列显卡基于NVIDIAAdaLovelace架构,在大家最关心的游戏表现上,借助NVIDIADLSS3这项AI渲染技术,可实现性能倍增,已有超过350款游戏和应用支持DLSS,现在更是支持到最新的DLSS3.5,采用光线重建技术,对于如《赛博朋克2077
 16g512g笔记本什么意思Mar 06, 2023 am 11:37 AM
16g512g笔记本的意思是电脑运行内存是16g,并且配置了512g的固态硬盘;内存是计算机的重要部件之一,它是外存与CPU进行沟通的桥梁,计算机中所有程序的运行都在内存中进行;电脑硬盘是计算机最主要的存储设备,是由一个或者多个铝制或者玻璃制的碟片组成。

Hot AI Tools

Undresser.AI Undress
AI-powered app for creating realistic nude photos

AI Clothes Remover
Online AI tool for removing clothes from photos.

Undress AI Tool
Undress images for free

Clothoff.io
AI clothes remover

AI Hentai Generator
Generate AI Hentai for free.

Hot Article

Hot Tools

SublimeText3 Chinese version
Chinese version, very easy to use

Dreamweaver Mac version
Visual web development tools

WebStorm Mac version
Useful JavaScript development tools

Notepad++7.3.1
Easy-to-use and free code editor

SecLists
SecLists is the ultimate security tester's companion. It is a collection of various types of lists that are frequently used during security assessments, all in one place. SecLists helps make security testing more efficient and productive by conveniently providing all the lists a security tester might need. List types include usernames, passwords, URLs, fuzzing payloads, sensitive data patterns, web shells, and more. The tester can simply pull this repository onto a new test machine and he will have access to every type of list he needs.


