How to use the NFC function in Uniapp
NFC (Near Field Communication) is a short-range wireless communication technology that allows simple and secure data transmission between devices. As one of the important functions of mobile devices, NFC is widely used in payment, access control, smart tags and other fields. In Uniapp, we can use plug-ins to realize the calling and operation of NFC functions.
1. Preparation
Before starting to use the NFC function of Uniapp, we need to ensure that the following conditions are met:
-
Need to be in the App Enable NFC support on the client, usually configured in
manifest.json, as shown below:{ "nfcPermission": { "support": true } } -
needs to be added in
pages.jsonnfcThe reference of the plug-in is as follows:{ "pages": [ { "path": "pages/index/index", "nfc": { "powered": true, "drawStage": "front" } } ] }
2. Using the plug-in
We can use uni-nfc# in Uniapp ##Plug-in to operate NFC function. First, we need to install the uni-nfc plug-in in the project. The installation command is as follows:
npm install uni-nfcNext, we can introduce
uni-nfc# into the pages that need to use NFC. ## Plug-in, and get the NFC instance, the code example is as follows: <pre class='brush:php;toolbar:false;'>// 引入uni-nfc插件
import uniNfc from 'uni-nfc';
export default {
data() {
return {
nfcInstance: null,
};
},
methods: {
// 初始化NFC实例
initNfcInstance() {
this.nfcInstance = uniNfc.init();
},
// 监听NFC标签
listenNfcTag() {
this.nfcInstance.listenTag({
success: (res) => {
console.log('监听NFC标签成功', res);
// 处理NFC标签数据
this.handleTagData(res.data);
},
fail: (err) => {
console.log('监听NFC标签失败', err);
},
});
},
// 处理NFC标签数据
handleTagData(data) {
// 处理NFC标签数据逻辑
},
},
created() {
// 初始化NFC实例
this.initNfcInstance();
// 监听NFC标签
this.listenNfcTag();
},
};</pre> In the above code, we first introduce the
plug-in, and then define it in data A nfcInstance variable is created to store the NFC instance. In the initNfcInstance method, we initialize the NFC instance by calling uniNfc.init() and assign it to nfcInstance. Next, in the listenNfcTag method, we call this.nfcInstance.listenTag() to listen for the NFC tag. If the listening is successful, the success callback is executed and the tag is Data is processed through the this.handleTagData method. 3. NFC tag processing
After successfully monitoring the NFC tag, we can perform further operations through the tag data returned in the callback function. According to specific needs, we can read, write, parse and other operations on tag data. The following is a simple sample code:
// 处理NFC标签数据
handleTagData(data) {
  console.log('NFC标签数据', data);
  // 读取标签数据
  this.readTagData();
  // 写入标签数据
  const newData = 'New Data';
  this.writeTagData(newData);
},
// 读取标签数据
readTagData() {
  this.nfcInstance.read({
    success: (res) => {
      console.log('读取标签数据成功', res);
      // 处理读取的标签数据
      this.handleReadData(res.data);
    },
    fail: (err) => {
      console.log('读取标签数据失败', err);
    },
  });
},
// 写入标签数据
writeTagData(newData) {
  this.nfcInstance.write({
    data: newData,
    success: (res) => {
      console.log('写入标签数据成功', res);
    },
    fail: (err) => {
      console.log('写入标签数据失败', err);
    },
  });
},
// 处理读取的标签数据
handleReadData(data) {
  // 处理读取的标签数据逻辑
},
In the above code, we read the NFC tag data by calling the
readTagData method in the handleTagData method. In the readTagData method, we call this.nfcInstance.read() to read the tag data. After the reading is successful, the success callback is executed and the read The data is processed through the this.handleReadData method. Similarly, in the
method, we call the writeTagData method to write the NFC tag data. In the writeTagData method, we call this.nfcInstance.write() and pass in the data to be written. After the writing is successful, the success callback is executed. Through the above sample code, we can implement the operation of using the NFC function in Uniapp and process NFC tag data according to specific needs. Of course, in actual projects, we can also expand more NFC functions according to business needs, such as parsing tag data, verifying tag identity, etc. I hope this article will be helpful to learn and use the NFC function of Uniapp.
The above is the detailed content of How to use NFC function in uniapp. For more information, please follow other related articles on the PHP Chinese website!
 如何在uniapp中实现图片预览功能Jul 04, 2023 am 10:36 AM
如何在uni-app中实现图片预览功能引言:在移动应用开发中,图片预览是一项常用的功能。在uni-app中,我们可以通过使用uni-ui插件或自定义组件来实现图片预览功能。本文将介绍如何在uni-app中实现图片预览功能,并附带代码示例。一、使用uni-ui插件实现图片预览功能uni-ui是由DCloud开发的一套基于Vue.js的组件库,提供了丰富的UI组
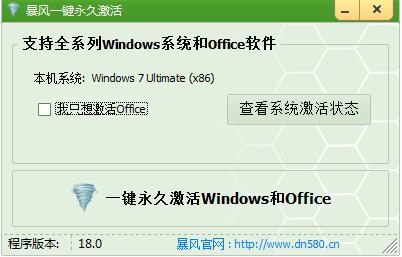 暴风激活工具怎么用?-暴风激活工具win10被拦截怎么办?Mar 19, 2024 pm 12:19 PM
暴风激活工具怎么用?1.在本站下载暴风激活工具,下载后直接打开运行即可。以下小编以Win7系统为例为大家继续讲解如果使用暴风激活工具激活windows系统或office软件。由于暴风激活工具属于新的激活工具,还没有完全经过各大杀毒软件的检测,为了广大用户的激活成功率,先关闭电脑上的杀毒软件!打开后会看到如下界面,可以选择激活Office软件或同时激活Windows和Office软件。根据个人需求进行选择。3.选择要激活的选项后等待激活即可。4.系统激活完成后就会看到如下图,需要我们重启电脑激活信
 如何在uniapp中实现相机拍照功能Jul 04, 2023 am 09:40 AM
如何在uniapp中实现相机拍照功能现在的手机功能越来越强大,几乎每个手机都配备了高像素的相机。在UniApp中实现相机拍照功能,可以为你的应用程序增添更多的交互性和丰富性。本文将针对UniApp,介绍如何使用uni-app插件来实现相机拍照功能,并提供代码示例供参考。一、安装uni-app插件首先,我们需要安装一个uni-app的插件,该插件可以方便地在u
 Vue Router中的命名路由是如何使用的?Jul 23, 2023 pm 05:49 PM
VueRouter中的命名路由是如何使用的?在Vue.js中,VueRouter是一种官方提供的路由管理器,它可以用于构建单页应用程序。VueRouter允许开发者定义路由并将其映射到特定的组件,以控制页面之间的跳转和导航。命名路由是其中一个非常有用的特性,它允许我们在路由定义中指定一个名称,然后可以通过名称来跳转到相应的路由,使得路由跳转更
 手把手教你uniapp和小程序分包(图文)Jul 22, 2022 pm 04:55 PM
本篇文章给大家带来了关于uniapp跨域的相关知识,其中介绍了uniapp和小程序分包的相关问题,每个使用分包小程序必定含有一个主包。所谓的主包,即放置默认启动页面/TabBar 页面,以及一些所有分包都需用到公共资源/JS 脚本;而分包则是根据开发者的配置进行划分,希望对大家有帮助。
 uniapp中如何使用地理位置获取功能Jul 04, 2023 am 08:58 AM
uniapp是一种基于Vue.js的跨平台开发框架,它可以同时开发微信小程序、App和H5页面。在uniapp中,我们可以通过使用uni-api来访问设备的各种功能,包括地理位置获取功能。本文将介绍在uniapp中如何使用地理位置获取功能,并附上代码示例。首先,在uniapp中使用地理位置获取功能,我们需要在manifest.json文件中申请权限。在man
 uniapp中如何使用视频播放器组件Jul 04, 2023 am 10:13 AM
uniapp中如何使用视频播放器组件随着移动互联网的发展,视频已成为人们日常生活中不可或缺的娱乐方式之一。在uniapp中,我们可以通过使用视频播放器组件来实现视频的播放和控制。本文将介绍如何在uniapp中使用视频播放器组件,并提供相应的代码示例。一、引入视频播放器组件在uniapp中,我们需要先引入视频播放器组件才能使用它的功能。可以通过在页面的json
 UniApp实现性能监控与瓶颈分析的最佳实践Jul 04, 2023 am 08:46 AM
UniApp实现性能监控与瓶颈分析的最佳实践随着移动应用的快速发展,开发人员对应用性能的需求也日益增加。对于UniApp开发者来说,实现性能监控和瓶颈分析是非常重要的一项工作。本文将介绍UniApp中实现性能监控和瓶颈分析的最佳实践,并提供一些代码示例供参考。一、性能监控的重要性在现代移动应用中,用户体验是非常重要的。性能问题会导致应用加载速度慢、卡顿等问题


Hot AI Tools

Undresser.AI Undress
AI-powered app for creating realistic nude photos

AI Clothes Remover
Online AI tool for removing clothes from photos.

Undress AI Tool
Undress images for free

Clothoff.io
AI clothes remover

AI Hentai Generator
Generate AI Hentai for free.

Hot Article

Hot Tools

EditPlus Chinese cracked version
Small size, syntax highlighting, does not support code prompt function

Safe Exam Browser
Safe Exam Browser is a secure browser environment for taking online exams securely. This software turns any computer into a secure workstation. It controls access to any utility and prevents students from using unauthorized resources.

SAP NetWeaver Server Adapter for Eclipse
Integrate Eclipse with SAP NetWeaver application server.

ZendStudio 13.5.1 Mac
Powerful PHP integrated development environment

VSCode Windows 64-bit Download
A free and powerful IDE editor launched by Microsoft


