 Web Front-end
 uni-app
 Configuration and usage guide for UniApp to implement e-commerce product display and shopping cart functions
UniApp is a cross-platform application development framework developed based on Vue.js, which can be used to develop WeChat applets, H5 applications, Apps, etc. Among them, realizing e-commerce product display and shopping cart functions is one of the essential functions when developing e-commerce applications. This article will introduce how to configure and use these functions in UniApp, and provide corresponding code examples.
First of all, what we need to prepare is product data. You can use a JavaScript array to store product information, including product name, price, pictures, etc. For example:
var goodsList = [
  {
    name: '商品1',
    price: 10,
    image: 'image1.jpg'
  },
  {
    name: '商品2',
    price: 20,
    image: 'image2.jpg'
  },
  ...
];
Next, we need to create a page to display the product list. You can create a new goodsList folder under the pages folder and create the goodsList.vue file in it. In the file, we can use the v-for directive to loop through the product list and use the uni-image component to display product images. The sample code is as follows:
<template>
  <view>
    <view v-for="(item, index) in goodsList" :key="index">
      <uni-image :src="item.image"></uni-image>
      <text>{{ item.name }}</text>
      <text>¥{{ item.price }}</text>
      <button @click="addToCart(item)">加入购物车</button>
    </view>
  </view>
</template>

<script>
export default {
  data() {
    return {
      goodsList: goodsList
    };
  },
  methods: {
    addToCart(item) {
      // 将商品加入购物车
    }
  }
};
</script>
In the above code, we use the v-for directive and the :src binding attribute to loop through rendering the product list and display product images . At the same time, listen to the click event of the button through @click, and call the addToCart method to implement the function of adding products to the shopping cart.
Next, we need to create a shopping cart page. Also create a new cart folder under the pages folder and create the cart.vue file in it. In the file, we can use an array to store the product information in the shopping cart, and use the v-for instruction to loop through the list of products in the shopping cart. At the same time, we can use the uni-badge component to display the product quantity. The sample code is as follows:
<template>
  <view>
    <view v-for="(item, index) in cartList" :key="index">
      <uni-image :src="item.image"></uni-image>
      <text>{{ item.name }}</text>
      <text>¥{{ item.price }}</text>
      <button @click="removeFromCart(item)">删除</button>
    </view>
    <uni-badge :content="cartList.length"></uni-badge>
  </view>
</template>

<script>
export default {
  data() {
    return {
      cartList: []
    };
  },
  methods: {
    removeFromCart(item) {
      // 从购物车中移除商品
    }
  }
};
</script>
In the above code, we use the v-for directive and the :src binding attribute to loop through the list of items in the shopping cart. and display product images. At the same time, listen to the click event of the button through @click, and call the removeFromCart method to implement the function of removing the product from the shopping cart. In addition, we use the uni-badge component to display the number of items in the shopping cart.
Finally, add jump links on the page where the product list and shopping cart need to be displayed. For example, add a button to the homepage and jump to the product list page after clicking it. The sample code is as follows:
<button @click="goToGoodsList">商品列表</button>
In the corresponding script, add the method goToGoodsList and use it within the method uni.navigateTo method to jump to the page. The sample code is as follows:
goToGoodsList() {
  uni.navigateTo({
    url: '/pages/goodsList/goodsList'
  });
}
In this way, when the "Product List" button on the homepage is clicked, the page will jump to the product list page.
Through the above code examples, we can complete the configuration and use of e-commerce product display and shopping cart functions in UniApp. Developers can modify and extend the code accordingly according to their own needs. I hope this article will be helpful to everyone in UniApp development!
The above is the detailed content of Configuration and usage guide for UniApp to implement e-commerce product display and shopping cart functions. For more information, please follow other related articles on the PHP Chinese website!
 如何利用Vue实现图片的缩略图生成和展示?Aug 21, 2023 pm 09:58 PM
如何利用Vue实现图片的缩略图生成和展示?Vue是一款流行的JavaScript框架,用于构建用户界面。它提供了丰富的功能和灵活的设计,使得开发者能够轻松地构建交互性强,响应迅速的应用程序。本文将介绍如何利用Vue实现图片的缩略图生成和展示。安装和引入Vue.js首先,需要安装Vue.js。可以通过CDN引入Vue.js,或者使用npm进行安装。通过CDN引
 电商包括哪些平台Aug 24, 2023 am 11:05 AM
电商平台有亚马逊、阿里巴巴、京东、eBay、Walmart等。详细介绍:1、亚马逊,全球最大的电商平台之一,提供了各种商品的在线购买服务,拥有自己的物流系统,能够快速配送商品;2、阿里巴巴,中国最大的电商平台,旗下拥有淘宝、天猫等知名品牌,为消费者提供了丰富的商品选择;3、京东,中国第二大电商平台,也是一家综合性的电商企业;4、eBay、Walmart等国际知名的电商平台等等。
 手把手教你uniapp和小程序分包(图文)Jul 22, 2022 pm 04:55 PM
本篇文章给大家带来了关于uniapp跨域的相关知识,其中介绍了uniapp和小程序分包的相关问题,每个使用分包小程序必定含有一个主包。所谓的主包,即放置默认启动页面/TabBar 页面,以及一些所有分包都需用到公共资源/JS 脚本;而分包则是根据开发者的配置进行划分,希望对大家有帮助。
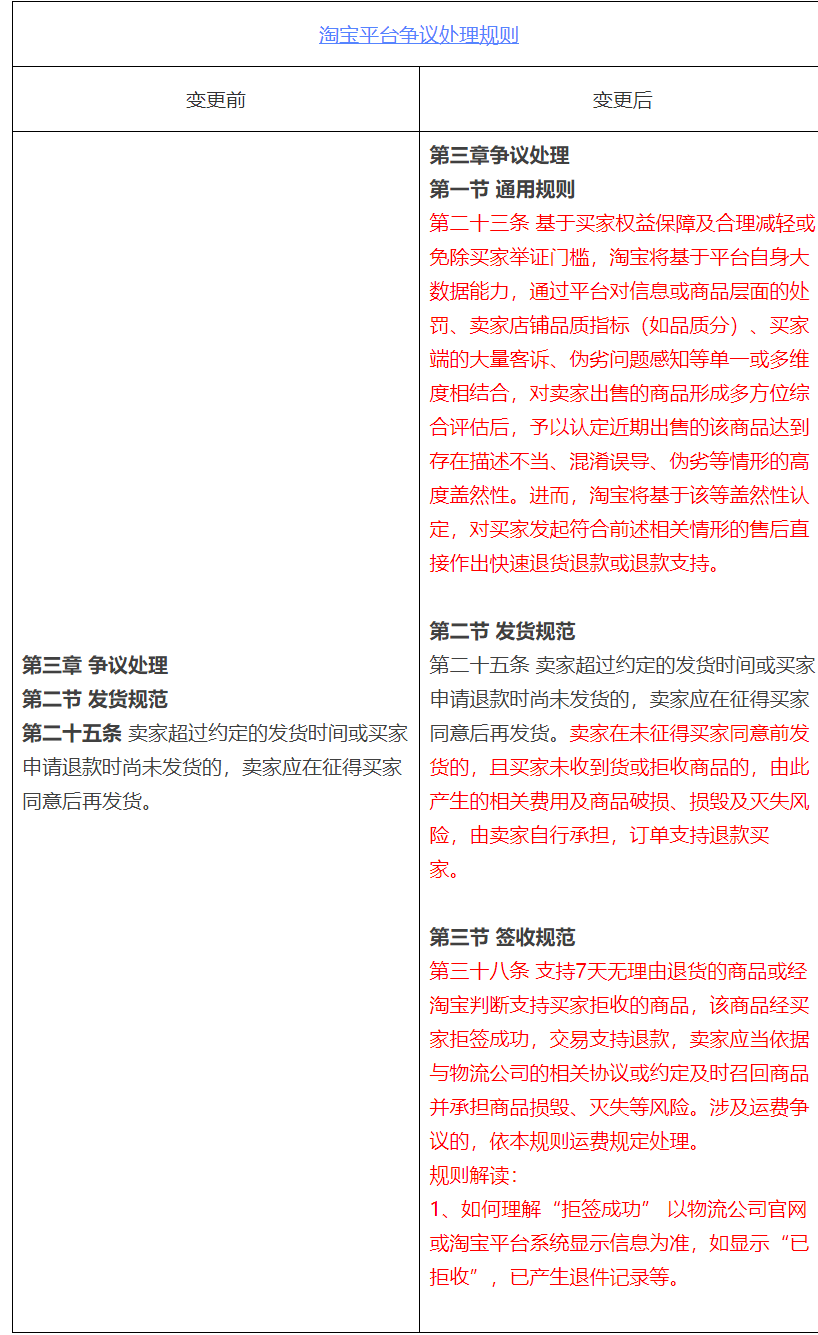
 淘宝平台改动争议处理规则,促进迅速退货退款Dec 31, 2023 pm 08:56 PM
本站12月26日消息,淘宝发布公示,拟变更淘宝平台争议处理规则的相关规则,今日起正式生效。从新规上看,如果卖家差评或者违规情况过多,可能在收到投诉后直接被判定退货退款或退款。核心变更点淘宝新增了基于平台自身大数据能力的功能,可以识别多个方面的信息,并根据买家发起的符合相关情况的售后要求,制定快速退款或退货退款的规则依据为了解决卖家延迟发货、强制发货且未经买家同意的问题,我们需要补充钱款处理方向的规则依据新增对于支持7天无理由退货或经平台判定可支持买家拒收的商品,针对买家成功拒签的情况,支持退款处
 如何使用HTML、CSS和jQuery制作一个幻灯片展示Oct 26, 2023 am 08:03 AM
如何使用HTML、CSS和jQuery制作一个幻灯片展示幻灯片展示是网页设计中常见的一种方式,可以用来呈现图片、文字或视频等内容。在本文中,我们将会学习如何使用HTML、CSS和jQuery来制作一个简单的幻灯片展示,让您能够轻松实现网页上的图片切换效果。首先,我们需要准备一些基本的HTML结构。在HTML文件中创建一个div元素,并给它一个唯一的ID,如"
 如何使用Vue实现地图展示功能Nov 07, 2023 pm 03:00 PM
如何使用Vue实现地图展示功能,需要具体代码示例一、背景介绍地图展示功能在现代web应用中非常常见,例如地图导航、位置标注等。Vue是一款流行的前端框架,它提供了方便的数据绑定和组件化开发的功能。本文将介绍如何使用Vue实现地图展示功能,并给出具体的代码示例。二、准备工作在开始之前,我们需要准备以下工作:安装Vue和Vue-cli。Vue可以通过npm安装,
 迎接王子公主们的巡视!OPL秋季赛总决赛支持活动Dec 29, 2023 pm 09:19 PM
阴阳师大大们的观赛热情太高涨啦,现场观赛的门票已经全部售罄!为了给各位线下观赛的大大带来更好的观赛氛围,O盟在杭州置办了一份“产业”,为玩家大大们承包了拱墅区的六大商场大屏和300屏丰巢屏幕!活动时间为2023年12月18日至2023年12月23日,欢迎王子公主们回家巡视前往打卡!一、六大商场大屏大屏的播出时间为12月18日至23日每日10:00-22:00,六个大屏所在的商超每日17:00-19:10期间会暂停播放,请各位前去打卡的大大注意时间哟!以下是六大商场大屏的地点:1.杭州金地广场(南
 如何使用Vue实现电商商品分类特效Sep 19, 2023 am 11:54 AM
如何使用Vue实现电商商品分类特效在电商网站中,商品分类是一个非常重要的功能,它可以帮助用户快速找到自己感兴趣的商品。而使用Vue框架实现商品分类特效可以使用户在浏览商品时具有良好的用户体验。本文将介绍如何使用Vue实现电商商品分类特效,并给出详细的代码示例。首先,我们需要创建一个Vue实例,并在模板中定义商品分类的结构。假设我们的商品分类有三个级别,分别为


Hot AI Tools

Undresser.AI Undress
AI-powered app for creating realistic nude photos

AI Clothes Remover
Online AI tool for removing clothes from photos.

Undress AI Tool
Undress images for free

Clothoff.io
AI clothes remover

AI Hentai Generator
Generate AI Hentai for free.

Hot Article

Hot Tools

PhpStorm Mac version
The latest (2018.2.1) professional PHP integrated development tool

SublimeText3 Mac version
God-level code editing software (SublimeText3)

mPDF
mPDF is a PHP library that can generate PDF files from UTF-8 encoded HTML. The original author, Ian Back, wrote mPDF to output PDF files "on the fly" from his website and handle different languages. It is slower than original scripts like HTML2FPDF and produces larger files when using Unicode fonts, but supports CSS styles etc. and has a lot of enhancements. Supports almost all languages, including RTL (Arabic and Hebrew) and CJK (Chinese, Japanese and Korean). Supports nested block-level elements (such as P, DIV),

Notepad++7.3.1
Easy-to-use and free code editor

Safe Exam Browser
Safe Exam Browser is a secure browser environment for taking online exams securely. This software turns any computer into a secure workstation. It controls access to any utility and prevents students from using unauthorized resources.


