Home  >  Article  >  How to connect Win11 wireless printer to computer

How to connect Win11 wireless printer to computer

王林
王林forward
2023-07-03 10:13:527380browse

 How to connect Win11 wireless printer to the computer? Printer is one of the necessary equipment for our office. If you want to use the printer normally, the first step is to connect the printer to the computer. So how should you operate it? The editor below will bring you several methods to add a wireless printer to Win11 system. Let’s take a look.

How to connect Win11 wireless printer to computer

## Tutorial on adding a wireless printer to Win11 system [Picture and text]

1. Automatically add a new printer

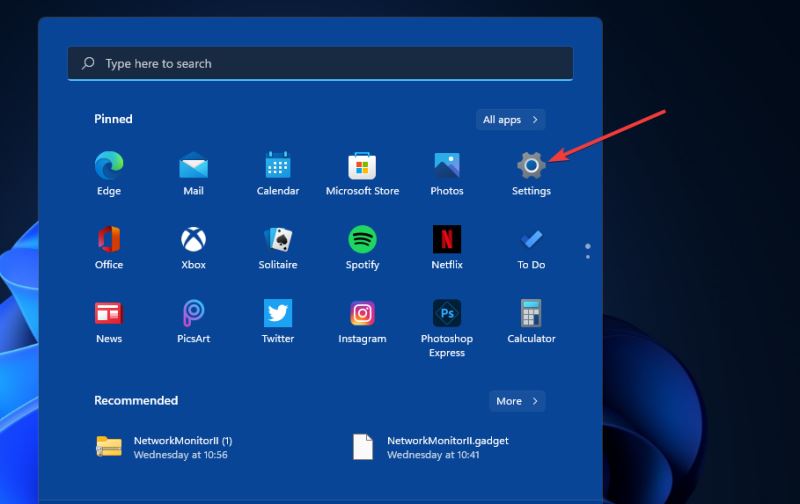
1. First, click Start on the taskbar to bring up this menu.

 2. Select Settings on the start menu.

How to connect Win11 wireless printer to computer

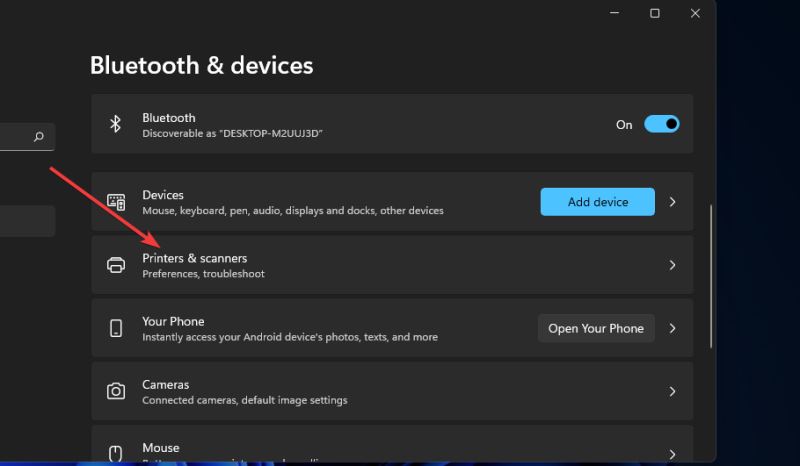
 3. Click the Bluetooth and Devices tab in Settings.

 4. Then select the printer and scanner on this tab.

How to connect Win11 wireless printer to computer

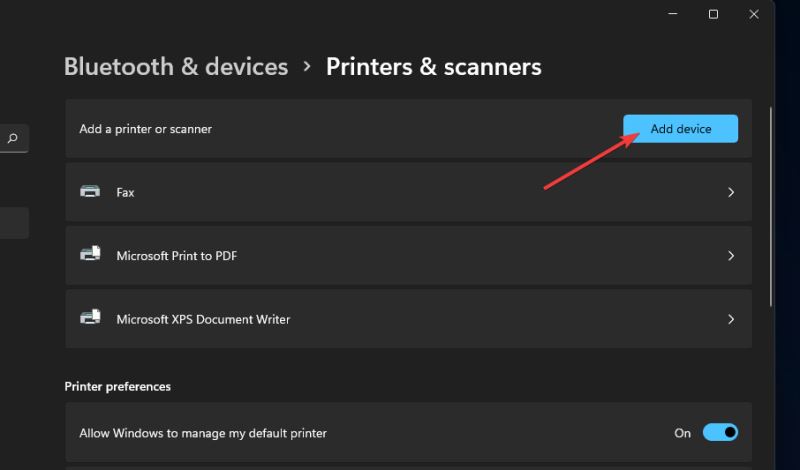
5. Press the Add Device button.

How to connect Win11 wireless printer to computer

 6. Click the Add Device button of the detected wireless printer.

After clicking Add Device, some users may also need to enter a password or PIN authentication for their wireless printer.

 2. Manually add a wireless printer

 1. Open the settings introduced in the first method.

 2. Click Printers and Scanners on the Bluetooth and Devices tab in Settings.

 3. Press the Add Device button.

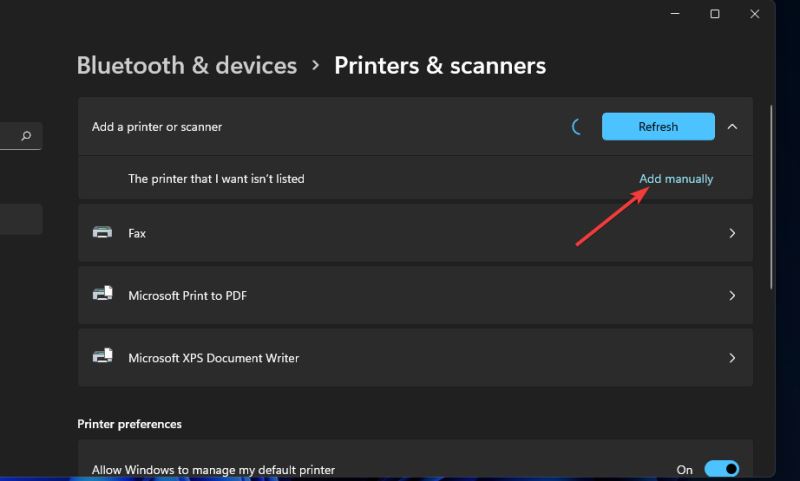
 4. Then click the Manual Add option.

How to connect Win11 wireless printer to computer

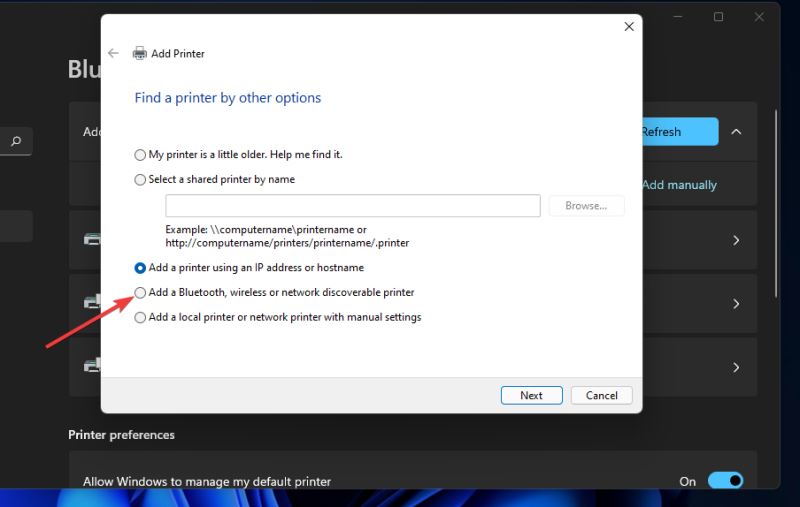
 5. Select the option to add a Bluetooth, wireless or network discoverable printer.

How to connect Win11 wireless printer to computer

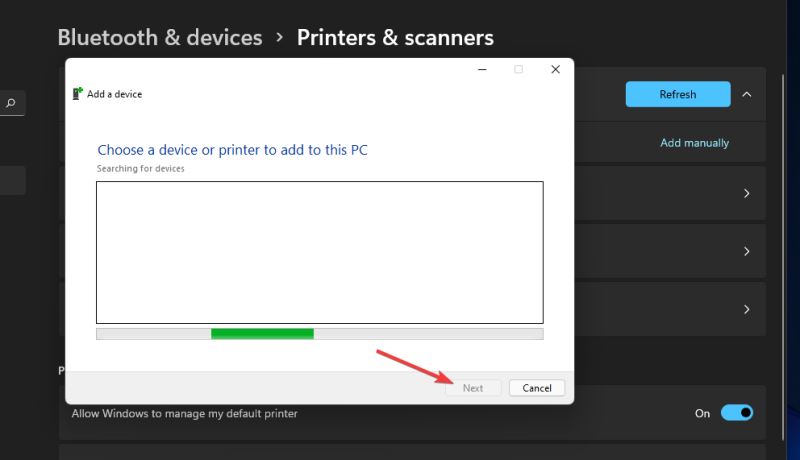
 6. Then select your wireless printer in the Add Device window and click the Next button.

How to connect Win11 wireless printer to computer

7. After that, follow the other instructions in the Add Printer Wizard to complete the operation.

3. Add a new printer through the control panel

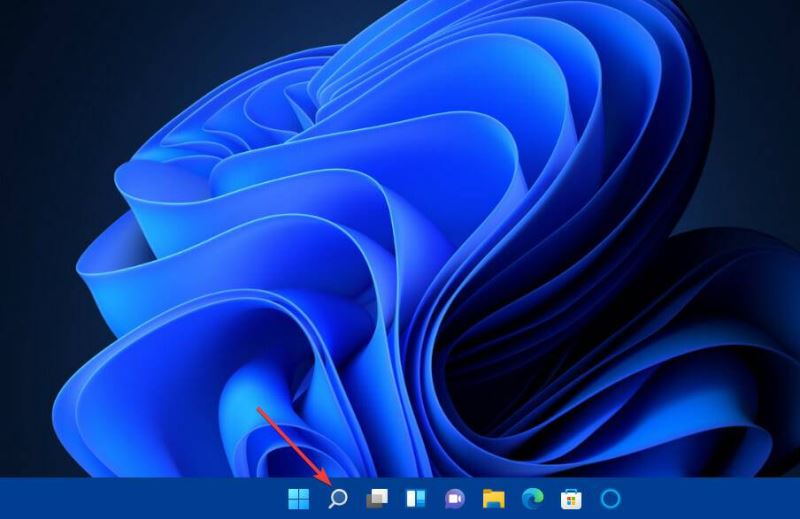
1. Click the magnifying glass icon on the taskbar.

How to connect Win11 wireless printer to computer

 2. Type control panel and open the search tool.

 3. Select Control Panel to open this window.

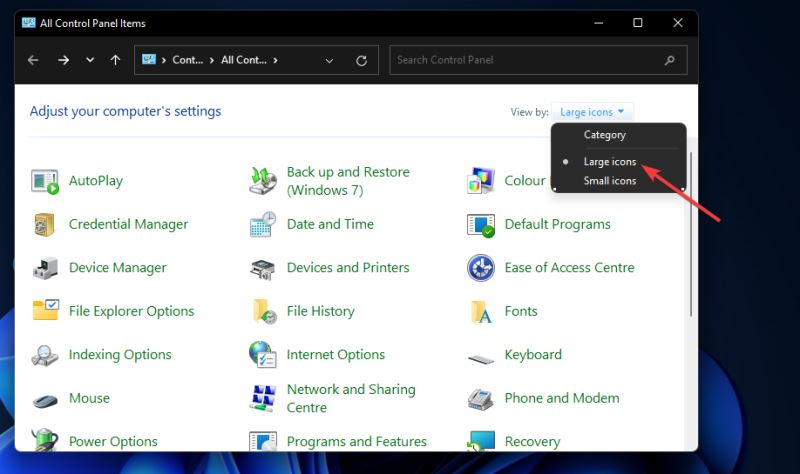
 4. Next, select Large icons in the View by drop-down menu.

How to connect Win11 wireless printer to computer

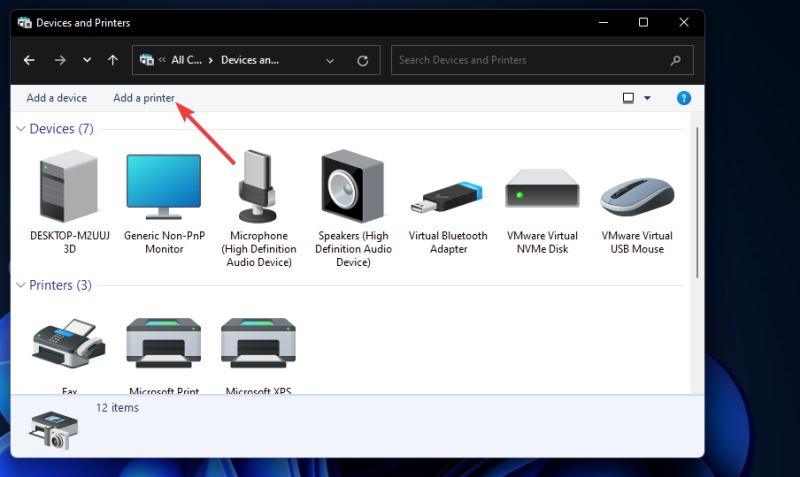
 5. Click Devices and Printers in the Control Panel.

 6. Then click the Add Printer button.

How to connect Win11 wireless printer to computer

 7. Select the printer in the Add Device window, and then press the Next button to install.

 8. After adding the printer, press the Finish button.

 How to set the printer as the default printer?

After adding a printer, make sure it is your PC's default printer. Printing of all documents will then be selected by default. You can set the printer as the default printer through the control panel:

 1. Press the Windows key R hotkey.

 2. Type this run command in the open box: control printers

 3. Click the OK button of Run.

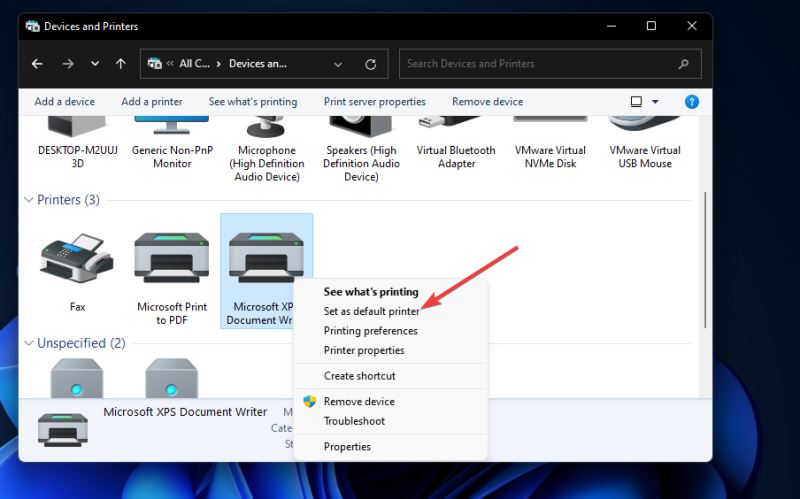
4. Next, right-click the wireless printer you added to Windows 11 and select the Set as default printer option.

How to connect Win11 wireless printer to computer

5. Press the OK button in the confirmation prompt. Your default wireless printer will now display a green check mark in the control panel.

 How to delete a printer in Windows 11?

When you get a new printer, you should delete the old printer from Windows 11. You can delete the added printer through settings, as shown below:

1. Press the Windows key I keyboard shortcut to open Settings.

 2. Click Bluetooth and Devices on the left side of Settings.

 3. Select Printers and Scanners to view the printers you added.

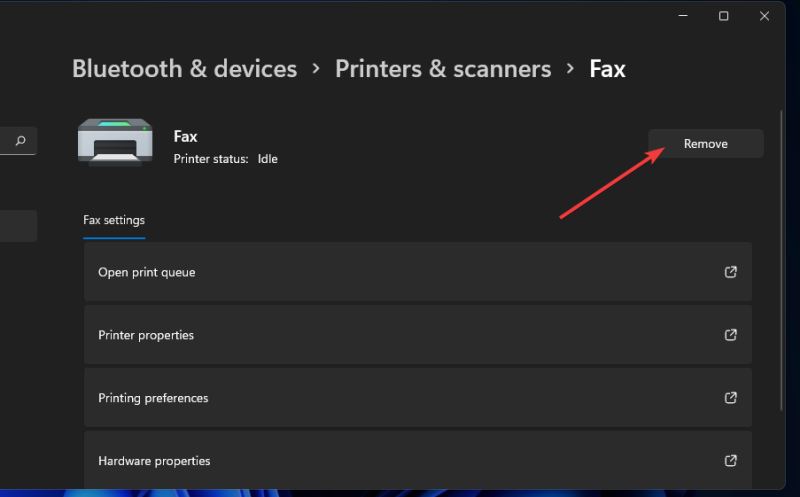
 4. Double-click the added printer to be deleted to open its settings.

 5. Then press the delete button.

How to connect Win11 wireless printer to computer

 6. Click Yes to confirm that you want to remove the printer.

Why is my wireless printer not detected when I try to add it?

 Network discovery needs to be enabled for Windows 11 to detect it. If your wireless printer is not detected, it may be because the feature is disabled on your PC. Here's how to enable network discovery on your computer:

1. Open Control Panel as described in the first three steps of the third method.

 2. Select the Network and Internet category.

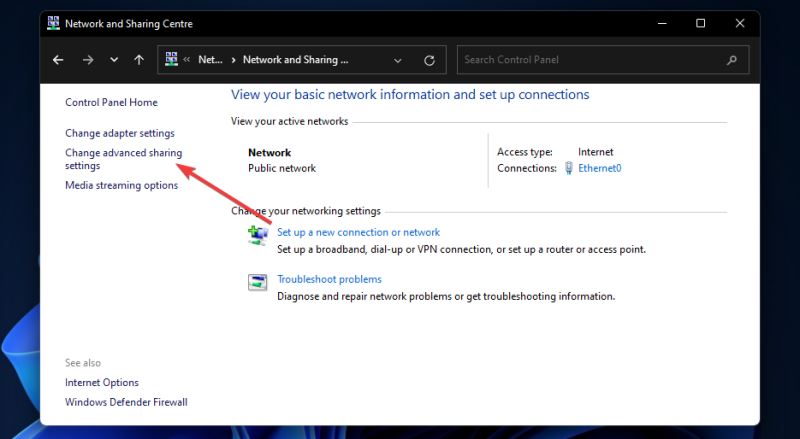
 3. Click Network and Sharing Center to open the applet.
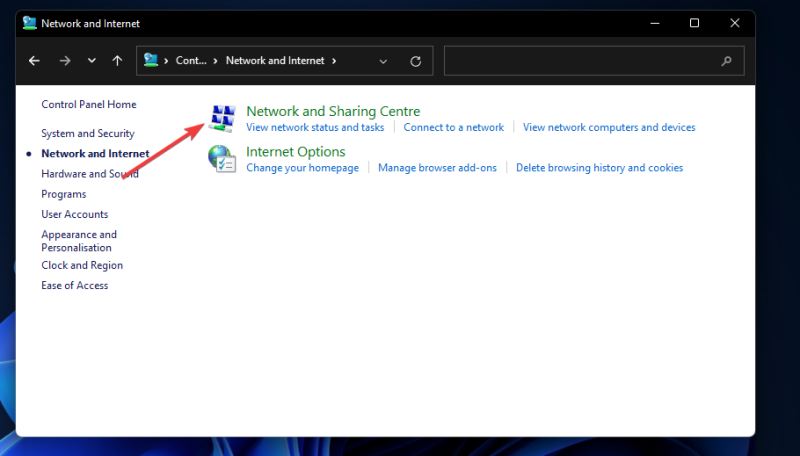
How to connect Win11 wireless printer to computer

 4. Next, click Change advanced sharing settings on the left side of the window.
How to connect Win11 wireless printer to computer

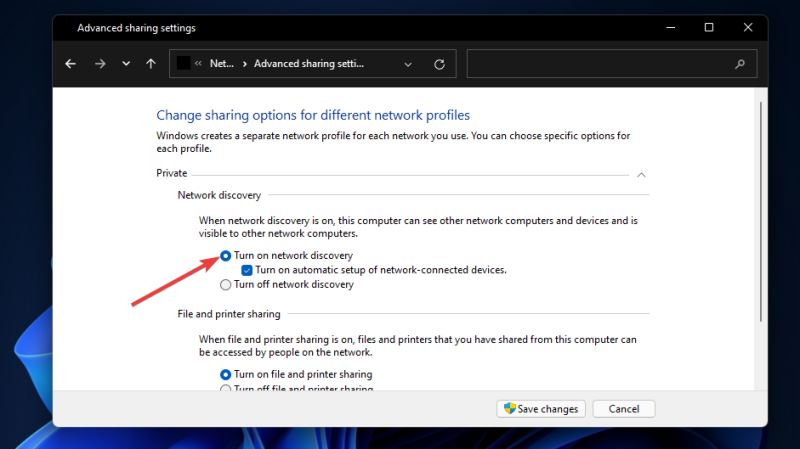
5. If this option is disabled, select the Turn on network discovery radio button for your private profile.
How to connect Win11 wireless printer to computer

6. Additionally, click the Turn on automatic settings for network connected devices check box to select this option.

 7. Press the Save Changes button to apply the settings.

Some larger manufacturers have printers with supporting software. Therefore, you can also add a printer to Windows 11 using its supporting app instead. If your printer model has supporting software, you may be able to download it from the Microsoft Store.

 However, you can always add a wireless or non-wireless printer to Windows 11 using its built-in options. Adding a wireless printer to the platform is usually quick and easy using the three methods above.

The above is the entire content of [How to connect a Win11 wireless printer to the computer - Tutorial on adding a wireless printer to the Win11 system [Pictures and Text]]. More exciting tutorials are available on this site!

The above is the detailed content of How to connect Win11 wireless printer to computer. For more information, please follow other related articles on the PHP Chinese website!

Statement:
This article is reproduced at:chromezj.com. If there is any infringement, please contact admin@php.cn delete