 Backend Development
 PHP Tutorial
 PHP Implementation Framework: Zend Framework Getting Started Tutorial
PHP Implementation Framework: Zend Framework Getting Started Tutorial
Zend Framework is an open source website framework developed by PHP. It is currently maintained by Zend Technologies. Zend Framework adopts the MVC design pattern and provides a series of reusable Code library for implementing Web 2.0 applications and Web services. Zend Framework is very popular and respected by PHP developers and has a wide range of user base and usage examples.
This article will introduce the basic knowledge of Zend Framework and help beginners understand how to use Zend Framework to build PHP applications.
- Installing Zend Framework
Installing Zend Framework is very simple, just use Composer. First, add the following line to the composer.json file:
{
    "require": {
        "zendframework/zendframework": "^3.0"
    }
}
Then run the command in the terminal:
composer install
Composer will automatically download and install Zend Framework.
- Create Zend Framework application
Use the following command to create a Zend Framework application in the terminal:
php vendor/bin/zf.php create project myproject
After creation, cd into the myproject directory , and run the following command to start the development server:
php -S 0.0.0.0:8080 -t public/ public/index.php
At this time, accessing http://localhost:8080/ will display "Welcome to the Zend Framework".
- MVC structure
Zend Framework adopts the MVC design pattern, M represents Model, V represents View, and C represents Controller.
Model is the data access layer of the application. It handles database reading and writing and other data access. For each data that needs to be stored, there is a corresponding Model class and form.
View is the presentation layer of the application. It is responsible for displaying data and interacting with the user. Each data type has a corresponding View file.
Controller is the control layer of the application. It is responsible for processing user input, presenting data to the user, and handling the application's logic. Each system function has a corresponding Controller class.
- Router
Zend Framework’s Router component maps URLs to corresponding Controllers and Actions. By default, Zend uses the Segment router.
In the myproject/module/Application/config/module.config.php file, configure the router as follows:
'router' => [
    'routes' => [
        'home' => [
            'type' => Segment::class,
            'options' => [
                'route' => '/[:action]',
                'constraints' => [
                    'action' => '[a-zA-Z][a-zA-Z0-9_-]*',
                ],
                'defaults' => [
                    'controller' => ControllerIndexController::class,
                    'action' => 'index',
                ],
            ],
        ],
    ],
],
This will enable all routing for the application. For example, if you visit http://localhost:8080/my-action, the my-action method of IndexController will be called.
- View
Zend Framework supports PHP as the View template engine. It also supports other template engines such as Twig.
In the myproject/module/Application/config/module.config.php file, configure the view:
'view_manager' => [
    'template_path_stack' => [
        __DIR__ . '/../view',
    ],
],
Now, in myproject/module/Application/view/index/index.phtml Create a view template file that will render the HTML content of the IndexAction:
<html>
<head>
    <title>My ZF Application</title>
</head>
<body>
    <h1 id="Welcome-to-my-ZF-Application">Welcome to my ZF Application</h1>
    <p><?= $this->someVariable ?></p>
</body>
</html>
This will display a title, a welcome message and a PHP variable value in the browser.
- Database
Zend Framework supports multiple types of databases, including MySQL, Postgres, MSSQL, SQLite, etc.
In the myproject/config/autoload/global.php file, configure the database:
return [
    'db' => [
        'driver' => 'Pdo',
        'dsn' => 'mysql:dbname=mydatabase;hostname=localhost',
        'username' => 'myusername',
        'password' => 'mypassword',
    ],
];
Now, use Drivers in the Controller and instantiate the corresponding Adapter instance as needed:
use ZendDbAdapterAdapter;

class SomeController
{
    protected $db;

    public function __construct(Adapter $db)
    {
        $this->db = $db;
    }

    public function someAction()
    {
        // Perform database queries here using $this->db adapter
    }
} - Conclusion
This tutorial only introduces the basic concepts and usage of Zend Framework. To know more details, please refer to the official Zend Framework documentation. Good luck!
The above is the detailed content of PHP Implementation Framework: Zend Framework Getting Started Tutorial. For more information, please follow other related articles on the PHP Chinese website!
 解读CRISP-ML(Q):机器学习生命周期流程Apr 08, 2023 pm 01:21 PM
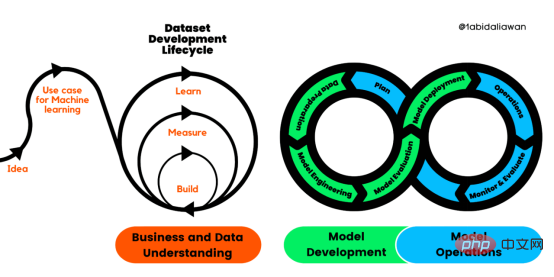
译者 | 布加迪审校 | 孙淑娟目前,没有用于构建和管理机器学习(ML)应用程序的标准实践。机器学习项目组织得不好,缺乏可重复性,而且从长远来看容易彻底失败。因此,我们需要一套流程来帮助自己在整个机器学习生命周期中保持质量、可持续性、稳健性和成本管理。图1. 机器学习开发生命周期流程使用质量保证方法开发机器学习应用程序的跨行业标准流程(CRISP-ML(Q))是CRISP-DM的升级版,以确保机器学习产品的质量。CRISP-ML(Q)有六个单独的阶段:1. 业务和数据理解2. 数据准备3. 模型
 thinkphp是不是国产框架Sep 26, 2022 pm 05:11 PM
thinkphp是国产框架。ThinkPHP是一个快速、兼容而且简单的轻量级国产PHP开发框架,是为了简化企业级应用开发和敏捷WEB应用开发而诞生的。ThinkPHP从诞生以来一直秉承简洁实用的设计原则,在保持出色的性能和至简的代码的同时,也注重易用性。
 Python 强大的任务调度框架 Celery!Apr 12, 2023 pm 09:55 PM
什么是 celery这次我们来介绍一下 Python 的一个第三方模块 celery,那么 celery 是什么呢? celery 是一个灵活且可靠的,处理大量消息的分布式系统,可以在多个节点之间处理某个任务; celery 是一个专注于实时处理的任务队列,支持任务调度; celery 是开源的,有很多的使用者; celery 完全基于 Python 语言编写;所以 celery 本质上就是一个任务调度框架,类似于 Apache 的 airflow,当然 airflow 也是基于 Python
 6个推荐的Python框架,用于构建可解释的人工智能系统(XAI)Apr 26, 2023 am 10:49 AM
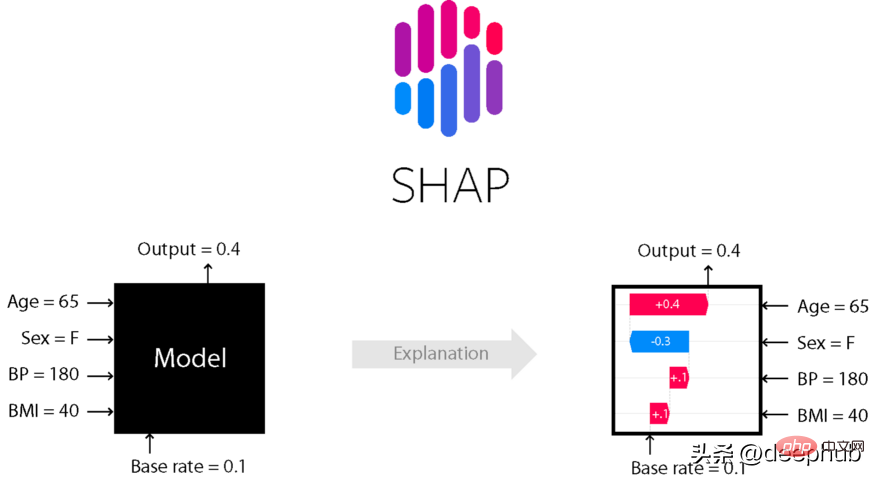
AI就像一个黑匣子,能自己做出决定,但是人们并不清楚其中缘由。建立一个AI模型,输入数据,然后再输出结果,但有一个问题就是我们不能解释AI为何会得出这样的结论。需要了解AI如何得出某个结论背后的原因,而不是仅仅接受一个在没有上下文或解释的情况下输出的结果。可解释性旨在帮助人们理解:如何学习的?学到了什么?针对一个特定输入为什么会做出如此决策?决策是否可靠?在本文中,我将介绍6个用于可解释性的Python框架。SHAPSHapleyAdditiveexplanation(SHapleyAdditi
 如何在PHP中使用AOP框架May 19, 2023 pm 01:21 PM
AOP(面向切面编程)是一种编程思想,用于解耦业务逻辑和横切关注点(如日志、权限等)。在PHP中,使用AOP框架可以简化编码,提高代码可维护性和可扩展性。本文将介绍在PHP中使用AOP框架的基本原理和实现方法。一、AOP的概念和原理面向切面编程,指的是将程序的业务逻辑和横切关注点分离开来,通过AOP框架来实现统一管理。横切关注点指的是在程序中需要重复出现并且
 Microsoft .NET Framework 4.5.2、4.6 和 4.6.1 将于 2022 年 4 月终止支持Apr 17, 2023 pm 02:25 PM
已安装Microsoft.NET版本4.5.2、4.6或4.6.1的MicrosoftWindows用户如果希望Microsoft将来通过产品更新支持该框架,则必须安装较新版本的Microsoft框架。据微软称,这三个框架都将在2022年4月26日停止支持。支持日期结束后,产品将不会收到“安全修复或技术支持”。大多数家庭设备通过Windows更新保持最新。这些设备已经安装了较新版本的框架,例如.NETFramework4.8。未自动更新的设备可能
 KB5013943 2022 年 5 月更新使 Windows 11 上的应用程序崩溃Apr 16, 2023 pm 10:52 PM
如果你在Windows11上安装了2022年5月累积更新,你可能已经注意到你一直使用的许多应用程序都不像以前那样工作了。强制性安全更新KB5013943正在使某些使用.NET框架的应用程序崩溃。在某些情况下,用户会收到错误代码:0xc0000135。可选更新中报告了类似的问题,但并不普遍。随着2022年5月的更新,该错误似乎已进入生产渠道,这次有更多用户受到影响。崩溃在使用.NETFramework的应用程序中很常见,Discord或MicrosoftTeams等
 朱军团队在清华开源了首个基于Transformer的多模态扩散大型模型,经过文本和图像改写全部完成。May 08, 2023 pm 08:34 PM
据悉GPT-4将于本周发布,多模态将成为其一大亮点。当前的大语言模型正在成为理解各种模态的通用接口,能够根据不同模态信息来给出回复文本,但大语言模型生成的内容也仅仅局限于文本。另一方面,当前的扩散模型DALL・E2、Imagen、StableDiffusion等在视觉创作上掀起一场革命,但这些模型仅仅支持文到图的单一跨模态功能,离通用式生成模型还有一定距离。而多模态大模型将能够打通各种模态能力,实现任意模态之间转化,被认为是通用式生成模型的未来发展方向。清华大学计算机系朱军教授带领的TSAI


Hot AI Tools

Undresser.AI Undress
AI-powered app for creating realistic nude photos

AI Clothes Remover
Online AI tool for removing clothes from photos.

Undress AI Tool
Undress images for free

Clothoff.io
AI clothes remover

AI Hentai Generator
Generate AI Hentai for free.

Hot Article

Hot Tools

SAP NetWeaver Server Adapter for Eclipse
Integrate Eclipse with SAP NetWeaver application server.

EditPlus Chinese cracked version
Small size, syntax highlighting, does not support code prompt function

Dreamweaver Mac version
Visual web development tools

Notepad++7.3.1
Easy-to-use and free code editor

VSCode Windows 64-bit Download
A free and powerful IDE editor launched by Microsoft


