In recent years, deep learning has become a hot topic in the field of artificial intelligence. In the deep learning technology stack, Recurrent Neural Networks (RNN for short) is a very important algorithm. Python is a very popular programming language in the field of artificial intelligence. Python's deep learning library TensorFlow also provides a wealth of RNN algorithm implementations. This article will introduce the recurrent neural network algorithm in Python and give a practical application example.
1. Introduction to Recurrent Neural Networks
Recurrent Neural Networks (RNN for short) is an artificial neural network that can process sequence data. Unlike traditional neural networks, RNN can use previous information to help understand the current input data. This "memory mechanism" makes RNN very effective when processing sequential data such as language, time series, and video.
The core of the recurrent neural network is its cyclic structure. In a time series, the input at each time point not only affects the current output, but also affects the output at the next time point. RNN implements a memory mechanism by combining the output of the current time point with the output of the previous time point. During the training process, RNN automatically learns how to save historical information and use it to guide current decisions.
2. Implementation of Recurrent Neural Network Algorithm in Python
In Python, the most popular deep learning framework for implementing RNN algorithm is TensorFlow. TensorFlow provides users with various RNN algorithm models, including basic RNN, LSTM (long short-term memory network) and GRU (gated recurrent unit), etc.
Next, let’s look at an example of a recurrent neural network implemented based on TensorFlow.
We will use a text generation task to demonstrate the application of recurrent neural networks. Our goal is to generate new text using known training text.
First, we need to prepare training data. In this example, we will use Shakespeare's Hamlet as our training text. We need to preprocess the text, convert all characters to the abbreviated character set, and convert them to numbers.
Next, we need to build a recurrent neural network model. We will use LSTM model. The following is the implementation of the code:
import tensorflow as tf

#定义超参数
num_epochs = 50
batch_size = 50
learning_rate = 0.01

#读取训练数据
data = open('shakespeare.txt', 'r').read()
chars = list(set(data))
data_size, vocab_size = len(data), len(chars)
char_to_ix = { ch:i for i,ch in enumerate(chars) }
ix_to_char = { i:ch for i,ch in enumerate(chars) }

#定义模型架构
inputs = tf.placeholder(tf.int32, shape=[None, None], name='inputs')
targets = tf.placeholder(tf.int32, shape=[None, None], name='targets')
keep_prob = tf.placeholder(tf.float32, shape=[], name='keep_prob')

#定义LSTM层
lstm_cell = tf.contrib.rnn.BasicLSTMCell(num_units=512)
dropout_cell = tf.contrib.rnn.DropoutWrapper(cell=lstm_cell, output_keep_prob=keep_prob)
outputs, final_state = tf.nn.dynamic_rnn(dropout_cell, inputs, dtype=tf.float32)

#定义输出层
logits = tf.contrib.layers.fully_connected(outputs, num_outputs=vocab_size, activation_fn=None)
predictions = tf.nn.softmax(logits)

#定义损失函数和优化器
loss = tf.reduce_mean(tf.nn.sparse_softmax_cross_entropy_with_logits(logits=logits, labels=targets))
optimizer = tf.train.AdamOptimizer(learning_rate).minimize(loss)
In this model, we use a single-layer LSTM neural network and define a dropout layer to prevent the model from overfitting. The output layer adopts a fully connected layer and uses the softmax function to normalize the generated text.
Before training the model, we also need to implement some auxiliary functions. For example, a function for generating a random sequence of samples, and a function for converting numbers back to characters. The following is the implementation of the code:
import random

#生成序列数据样本
def sample_data(data, batch_size, seq_length):
    num_batches = len(data) // (batch_size * seq_length)
    data = data[:num_batches * batch_size * seq_length]
    x_data = np.array(data)
    y_data = np.copy(x_data)
    y_data[:-1] = x_data[1:]
    y_data[-1] = x_data[0]
    x_batches = np.split(x_data.reshape(batch_size, -1), num_batches, axis=1)
    y_batches = np.split(y_data.reshape(batch_size, -1), num_batches, axis=1)
    return x_batches, y_batches

#将数字转换回字符
def to_char(num):
    return ix_to_char[num]
With these auxiliary functions, we can start training the model. During the training process, we divide the training data into small blocks according to batch_size and seq_length, and send them to the model in batches for training. The following is the code implementation:
import numpy as np

#启动会话
with tf.Session() as sess:
    sess.run(tf.global_variables_initializer())

    #开始训练模型
    for epoch in range(num_epochs):
        epoch_loss = 0
        x_batches, y_batches = sample_data(data, batch_size, seq_length)

        for x_batch, y_batch in zip(x_batches, y_batches):
            inputs_, targets_ = np.array(x_batch), np.array(y_batch)
            inputs_ = np.eye(vocab_size)[inputs_]
            targets_ = np.eye(vocab_size)[targets_]
            last_state, _ = sess.run([final_state, optimizer],
                                     feed_dict={inputs:inputs_, targets:targets_, keep_prob:0.5})
            epoch_loss += loss.eval(feed_dict={inputs:inputs_, targets:targets_, keep_prob:1.0})

        #在每个epoch结束时输出损失函数
        print('Epoch {:2d} loss {:3.4f}'.format(epoch+1, epoch_loss))

        #生成新的文本
        start_index = random.randint(0, len(data) - seq_length)
        sample_seq = data[start_index:start_index+seq_length]
        text = sample_seq
        for _ in range(500):
            x_input = np.array([char_to_ix[ch] for ch in text[-seq_length:]])
            x_input = np.eye(vocab_size)[x_input]
            prediction = sess.run(predictions, feed_dict={inputs:np.expand_dims(x_input, 0), keep_prob:1.0})
            prediction = np.argmax(prediction, axis=2)[0]
            text += to_char(prediction[-1])

        print(text)
3. Conclusion
By combining the current input and previous information, the recurrent neural network can be more accurate and efficient in processing sequence data. In Python, we can use the RNN algorithm provided in the TensorFlow library to easily implement the recurrent neural network algorithm. This article provides a Python implementation example based on LSTM, which can be applied to text generation tasks.
The above is the detailed content of Recurrent neural network algorithm example in Python. For more information, please follow other related articles on the PHP Chinese website!
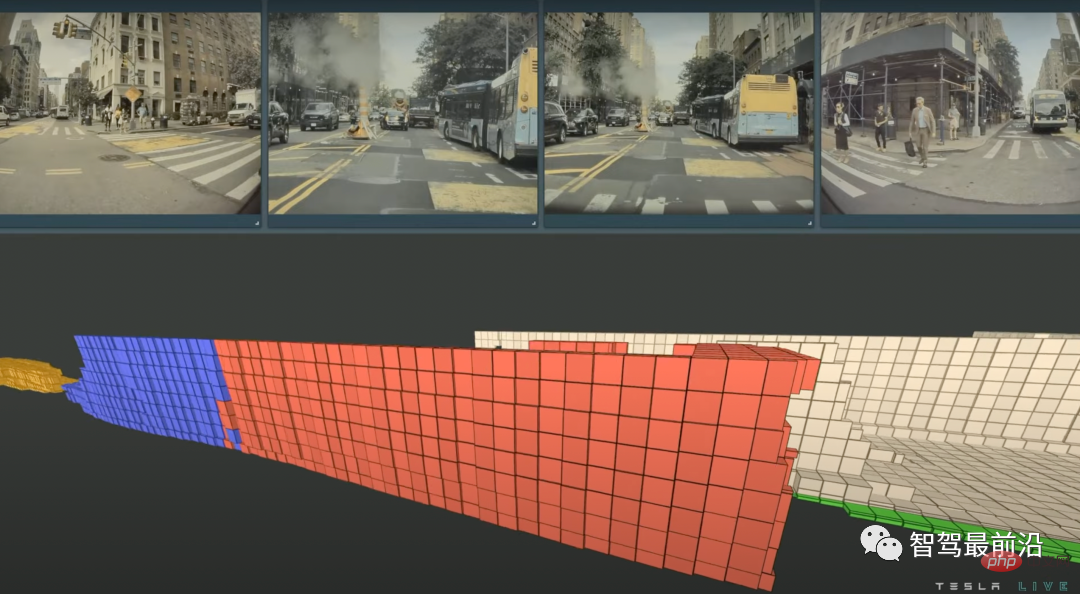 特斯拉自动驾驶算法和模型解读Apr 11, 2023 pm 12:04 PM
特斯拉是一个典型的AI公司,过去一年训练了75000个神经网络,意味着每8分钟就要出一个新的模型,共有281个模型用到了特斯拉的车上。接下来我们分几个方面来解读特斯拉FSD的算法和模型进展。01 感知 Occupancy Network特斯拉今年在感知方面的一个重点技术是Occupancy Network (占据网络)。研究机器人技术的同学肯定对occupancy grid不会陌生,occupancy表示空间中每个3D体素(voxel)是否被占据,可以是0/1二元表示,也可以是[0, 1]之间的
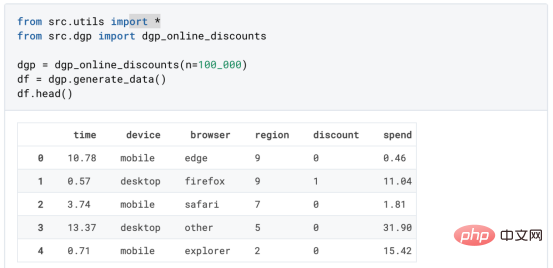 基于因果森林算法的决策定位应用Apr 08, 2023 am 11:21 AM
译者 | 朱先忠审校 | 孙淑娟在我之前的博客中,我们已经了解了如何使用因果树来评估政策的异质处理效应。如果你还没有阅读过,我建议你在阅读本文前先读一遍,因为我们在本文中认为你已经了解了此文中的部分与本文相关的内容。为什么是异质处理效应(HTE:heterogenous treatment effects)呢?首先,对异质处理效应的估计允许我们根据它们的预期结果(疾病、公司收入、客户满意度等)选择提供处理(药物、广告、产品等)的用户(患者、用户、客户等)。换句话说,估计HTE有助于我
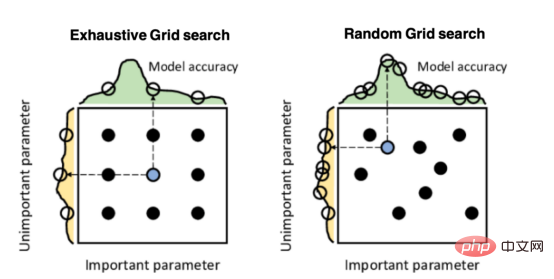 Mango:基于Python环境的贝叶斯优化新方法Apr 08, 2023 pm 12:44 PM
译者 | 朱先忠审校 | 孙淑娟引言模型超参数(或模型设置)的优化可能是训练机器学习算法中最重要的一步,因为它可以找到最小化模型损失函数的最佳参数。这一步对于构建不易过拟合的泛化模型也是必不可少的。优化模型超参数的最著名技术是穷举网格搜索和随机网格搜索。在第一种方法中,搜索空间被定义为跨越每个模型超参数的域的网格。通过在网格的每个点上训练模型来获得最优超参数。尽管网格搜索非常容易实现,但它在计算上变得昂贵,尤其是当要优化的变量数量很大时。另一方面,随机网格搜索是一种更快的优化方法,可以提供更好的
 因果推断主要技术思想与方法总结Apr 12, 2023 am 08:10 AM
导读:因果推断是数据科学的一个重要分支,在互联网和工业界的产品迭代、算法和激励策略的评估中都扮演者重要的角色,结合数据、实验或者统计计量模型来计算新的改变带来的收益,是决策制定的基础。然而,因果推断并不是一件简单的事情。首先,在日常生活中,人们常常把相关和因果混为一谈。相关往往代表着两个变量具有同时增长或者降低的趋势,但是因果意味着我们想要知道对一个变量施加改变的时候会发生什么样的结果,或者说我们期望得到反事实的结果,如果过去做了不一样的动作,未来是否会发生改变?然而难点在于,反事实的数据往往是
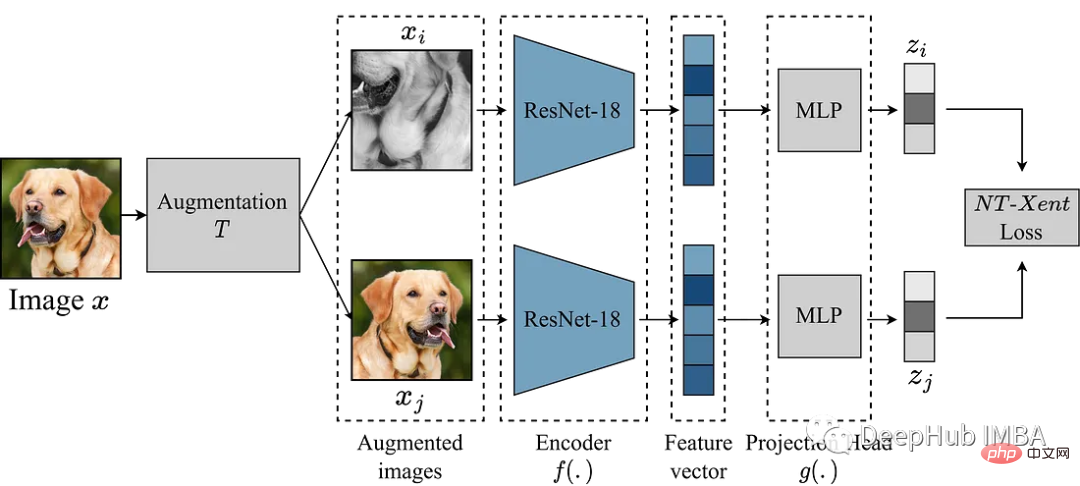 使用Pytorch实现对比学习SimCLR 进行自监督预训练Apr 10, 2023 pm 02:11 PM
SimCLR(Simple Framework for Contrastive Learning of Representations)是一种学习图像表示的自监督技术。 与传统的监督学习方法不同,SimCLR 不依赖标记数据来学习有用的表示。 它利用对比学习框架来学习一组有用的特征,这些特征可以从未标记的图像中捕获高级语义信息。SimCLR 已被证明在各种图像分类基准上优于最先进的无监督学习方法。 并且它学习到的表示可以很容易地转移到下游任务,例如对象检测、语义分割和小样本学习,只需在较小的标记
 盒马供应链算法实战Apr 10, 2023 pm 09:11 PM
一、盒马供应链介绍1、盒马商业模式盒马是一个技术创新的公司,更是一个消费驱动的公司,回归消费者价值:买的到、买的好、买的方便、买的放心、买的开心。盒马包含盒马鲜生、X 会员店、盒马超云、盒马邻里等多种业务模式,其中最核心的商业模式是线上线下一体化,最快 30 分钟到家的 O2O(即盒马鲜生)模式。2、盒马经营品类介绍盒马精选全球品质商品,追求极致新鲜;结合品类特点和消费者购物体验预期,为不同品类选择最为高效的经营模式。盒马生鲜的销售占比达 60%~70%,是最核心的品类,该品类的特点是用户预期时
 人类反超 AI:DeepMind 用 AI 打破矩阵乘法计算速度 50 年记录一周后,数学家再次刷新Apr 11, 2023 pm 01:16 PM
10 月 5 日,AlphaTensor 横空出世,DeepMind 宣布其解决了数学领域 50 年来一个悬而未决的数学算法问题,即矩阵乘法。AlphaTensor 成为首个用于为矩阵乘法等数学问题发现新颖、高效且可证明正确的算法的 AI 系统。论文《Discovering faster matrix multiplication algorithms with reinforcement learning》也登上了 Nature 封面。然而,AlphaTensor 的记录仅保持了一周,便被人类
 机器学习必知必会十大算法!Apr 12, 2023 am 09:34 AM
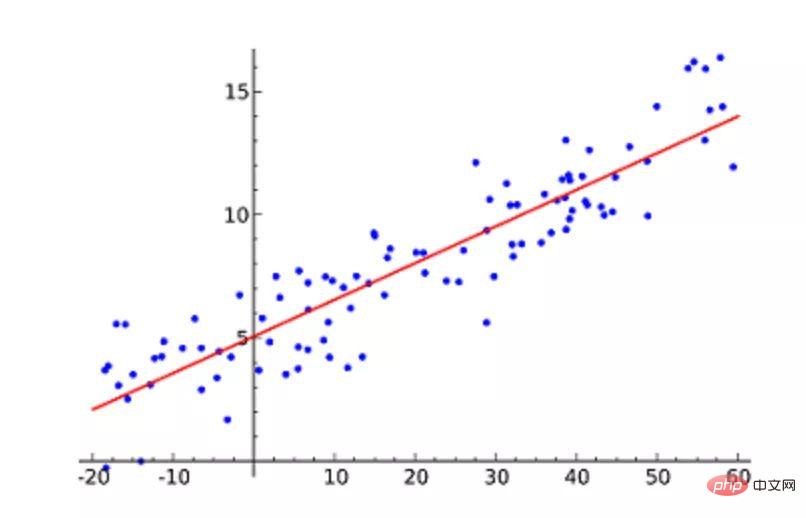
1.线性回归线性回归(Linear Regression)可能是最流行的机器学习算法。线性回归就是要找一条直线,并且让这条直线尽可能地拟合散点图中的数据点。它试图通过将直线方程与该数据拟合来表示自变量(x 值)和数值结果(y 值)。然后就可以用这条线来预测未来的值!这种算法最常用的技术是最小二乘法(Least of squares)。这个方法计算出最佳拟合线,以使得与直线上每个数据点的垂直距离最小。总距离是所有数据点的垂直距离(绿线)的平方和。其思想是通过最小化这个平方误差或距离来拟合模型。例如


Hot AI Tools

Undresser.AI Undress
AI-powered app for creating realistic nude photos

AI Clothes Remover
Online AI tool for removing clothes from photos.

Undress AI Tool
Undress images for free

Clothoff.io
AI clothes remover

AI Hentai Generator
Generate AI Hentai for free.

Hot Article

Hot Tools

MantisBT
Mantis is an easy-to-deploy web-based defect tracking tool designed to aid in product defect tracking. It requires PHP, MySQL and a web server. Check out our demo and hosting services.

PhpStorm Mac version
The latest (2018.2.1) professional PHP integrated development tool

VSCode Windows 64-bit Download
A free and powerful IDE editor launched by Microsoft

Notepad++7.3.1
Easy-to-use and free code editor

Atom editor mac version download
The most popular open source editor


