
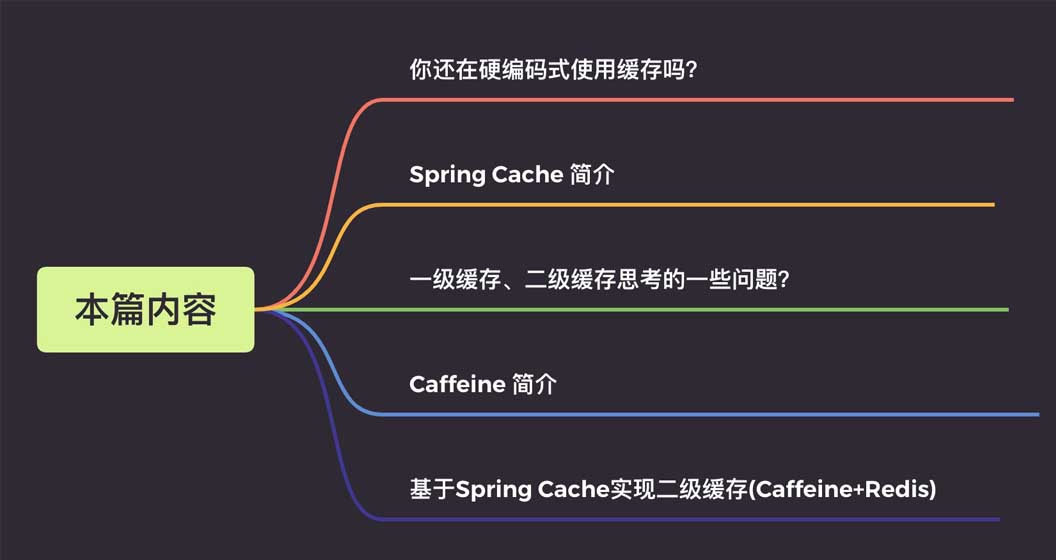
How to implement Caffeine+Redis second-level cache based on Spring Cache

- WBOYWBOYWBOYWBOYWBOYWBOYWBOYWBOYWBOYWBOYWBOYWBOYWBforward
- 2023-06-01 10:13:461782browse
The details are as follows:
1. Let’s talk about what is hard-coded cache?
Before learning Spring Cache, I often used caching in a hard-coded way.
Let’s take a practical example. In order to improve the query efficiency of user information, we use caching for user information. The sample code is as follows:
    @Autowire
    private UserMapper userMapper;

    @Autowire
    private RedisCache redisCache;

    //查询用户
    public User getUserById(Long userId) {
        //定义缓存key
        String cacheKey = "userId_" + userId;
        //先查询redis缓存
        User user = redisCache.get(cacheKey);
        //如果缓存中有就直接返回,不再查询数据库
        if (user != null) {
            return user;
        }
        //没有再查询数据库
        user = userMapper.getUserById(userId);

        //数据存入缓存,这样下次查询就能到缓存中获取
        if (user != null) {
            stringCommand.set(cacheKey, user);
        }

        return user;
    }
I believe many students have written similar styles. The code, this style is in line with process-oriented programming thinking and is very easy to understand. But it also has some disadvantages:
The code is not elegant enough. Business logic has four typical actions: storage, reading, modifying, and deleting. Each operation needs to define a cache Key and call the API of the cache command, which generates a lot of repeated code;
The code coupling between the cache operation and the business logic is high, and it is highly intrusive to the business logic. . The intrusiveness mainly reflects the following two points:
During the development and joint debugging stage, the cache needs to be removed, and the cache operation code can only be commented or temporarily deleted, which is also prone to errors;
In some scenarios, cache components need to be replaced. Each cache component has its own API, and the replacement cost is quite high.
If it were like this, wouldn't it be much more elegant?
@Mapper
public interface UserMapper  {

    /**
     * 根据用户id获取用户信息
     *
     * 如果缓存中有直接返回缓存数据,如果没有那么就去数据库查询,查询完再插入缓存中,这里缓存的key前缀为cache_user_id_,+传入的用户ID
     */
    @Cacheable(key = "'cache_user_id_' + #userId")
    User getUserById(Long userId);
}
Look at the implementation class again
    @Autowire
    private UserMapper userMapper;

    //查询用户
    public User getUserById(Long userId) {
        return userMapper.getUserById(userId);
    }
Let’s see if it is completely separated from the cache. If the cache needs to be removed during the development and joint debugging stage, then just comment out the annotation directly, right? very perfect.
And there is no need to write this entire set of implementations manually. Spring Cache has already defined the relevant understandings and interfaces for me, and we can easily implement the above functions.
2. Introduction to Spring Cache
Spring Cache is an annotation-based caching component provided in the Spring-context package. It defines some standard interfaces. By implementing these interfaces, you can
Add annotations to the method to implement caching. This avoids the problem of coupling caching code with business processing.
There are only two core interfaces of Spring Cache: Cache and CacheManager
1. Cache interface
This interface definition provides Specific operations of the cache, such as placing, reading, and cleaning the cache:
package org.Springframework.cache;
import java.util.concurrent.Callable;

public interface Cache {

	// cacheName,缓存的名字,默认实现中一般是CacheManager创建Cache的bean时传入cacheName
	String getName();

	//得到底层使用的缓存,如Ehcache
	Object getNativeCache();

	// 通过key获取缓存值,注意返回的是ValueWrapper,为了兼容存储空值的情况,将返回值包装了一层,通过get方法获取实际值
	ValueWrapper get(Object key);

	// 通过key获取缓存值,返回的是实际值,即方法的返回值类型
	<T> T get(Object key, Class<T> type);

	// 通过key获取缓存值,可以使用valueLoader.call()来调使用@Cacheable注解的方法。当@Cacheable注解的sync属性配置为true时使用此方法。
	// 因此方法内需要保证回源到数据库的同步性。避免在缓存失效时大量请求回源到数据库
	<T> T get(Object key, Callable<T> valueLoader);

	// 将@Cacheable注解方法返回的数据放入缓存中
	void put(Object key, Object value);

	// 当缓存中不存在key时才放入缓存。返回值是当key存在时原有的数据
	ValueWrapper putIfAbsent(Object key, Object value);

	// 删除缓存
	void evict(Object key);

	// 清空缓存
	void clear();

	// 缓存返回值的包装
	interface ValueWrapper {

	// 返回实际缓存的对象
		Object get();
	}
}
2. CacheManager interface
mainly provides the creation of Cache implementation beans, which can be accessed through cacheName in each application. Cache is isolated, and each cacheName corresponds to a Cache implementation.
package org.Springframework.cache;
import java.util.Collection;

public interface CacheManager {

	// 通过cacheName创建Cache的实现bean,具体实现中需要存储已创建的Cache实现bean,避免重复创建,也避免内存缓存
        //对象(如Caffeine)重新创建后原来缓存内容丢失的情况
	Cache getCache(String name);

	// 返回所有的cacheName
	Collection<String> getCacheNames();
}
3. Commonly used annotations
@Cacheable: Mainly applied to methods of querying data.
public @interface Cacheable {

    // cacheNames,CacheManager就是通过这个名称创建对应的Cache实现bean
	@AliasFor("cacheNames")
	String[] value() default {};

	@AliasFor("value")
	String[] cacheNames() default {};

    // 缓存的key,支持SpEL表达式。默认是使用所有参数及其计算的hashCode包装后的对象(SimpleKey)
	String key() default "";

	// 缓存key生成器,默认实现是SimpleKeyGenerator
	String keyGenerator() default "";

	// 指定使用哪个CacheManager,如果只有一个可以不用指定
	String cacheManager() default "";

	// 缓存解析器
	String cacheResolver() default "";

	// 缓存的条件,支持SpEL表达式,当达到满足的条件时才缓存数据。在调用方法前后都会判断
	String condition() default "";

    // 满足条件时不更新缓存,支持SpEL表达式,只在调用方法后判断
	String unless() default "";

	// 回源到实际方法获取数据时,是否要保持同步,如果为false,调用的是Cache.get(key)方法;如果为true,调用的是Cache.get(key, Callable)方法
	boolean sync() default false;

}@CacheEvict: Clear cache, mainly used to delete data. Compared with Cacheable, it has two more attributes
public @interface CacheEvict {

  // ...相同属性说明请参考@Cacheable中的说明
	// 是否要清除所有缓存的数据,为false时调用的是Cache.evict(key)方法;为true时调用的是Cache.clear()方法
	boolean allEntries() default false;

	// 调用方法之前或之后清除缓存
	boolean beforeInvocation() default false;
}@CachePut: put into cache, mainly used for updating data. For attribute description, please refer to @Cacheable
@Caching: Used to configure multiple annotations on one method
@EnableCaching: Enable Spring cache caching, As a general switch, this annotation needs to be added to the SpringBoot startup class or configuration class for it to take effect
3. Some issues that need to be considered when using the second-level cache?
We know that relational database (Mysql) data is ultimately stored on the disk. If it is read from the database every time, the reading speed will be affected by the IO of the disk itself, so there is
Memory cache like redis.
Memory caching can indeed greatly improve the query speed, but if the same query has a very large concurrency and frequent redis queries, there will also be obvious network IO consumption,
Then for this kind of very frequently queried data (hot key), can we consider storing it in the in-application cache, such as caffeine.
When the in-application cache has qualified data, it can be used directly without having to obtain it from redis through the network, thus forming a two-level cache.
The in-application cache is called the first-level cache, and the remote cache (such as redis) is called the second-level cache.
The entire process is as follows
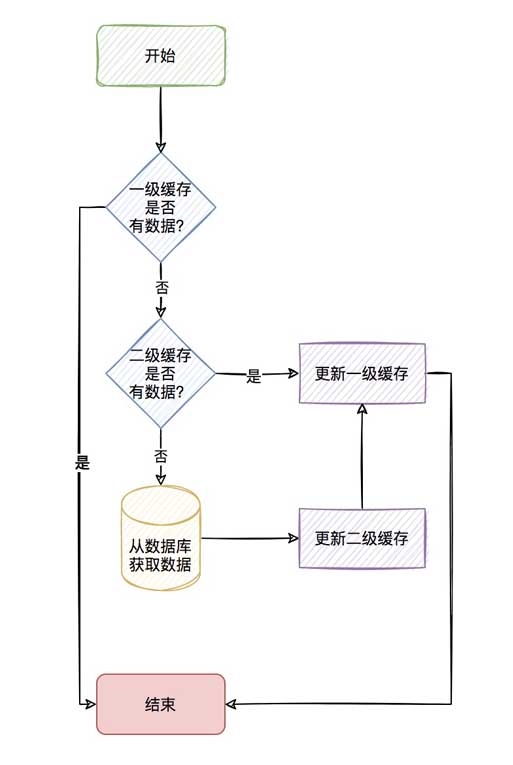
The process looks very refreshing, but in fact there are many points to consider in the second level cache.
1.How to ensure the consistency of the first-level cache of distributed nodes?
We say that the first-level cache is an in-application cache, so when your project is deployed on multiple nodes, how to ensure that when you modify or delete a certain key, other nodes# What about
##'s first-level cache consistency? 2.Is it allowed to store null values?
Is cache preheating required?
也就是说,我们会觉得某些key一开始就会非常的热,也就是热点数据,那么我们是否可以一开始就先存储到缓存中,避免缓存击穿。
4.一级缓存存储数量上限的考虑?
既然一级缓存是应用内缓存,那你是否考虑一级缓存存储的数据给个限定最大值,避免存储太多的一级缓存导致OOM。
5.一级缓存过期策略的考虑?
我们说redis作为二级缓存,redis是淘汰策略来管理的。具体可参考redis的8种淘汰策略。那你的一级缓存策略呢?就好比你设置一级缓存
数量最大为5000个,那当第5001个进来的时候,你是怎么处理呢?是直接不保存,还是说自定义LRU或者LFU算法去淘汰之前的数据?
6.一级缓存过期了如何清除?
我们说redis作为二级缓存,我们有它的缓存过期策略(定时、定期、惰性),那你的一级缓存呢,过期如何清除呢?
这里4、5、6小点如果说用我们传统的Map显然实现是很费劲的,但现在有更好用的一级缓存库那就是Caffeine。
四、Caffeine 简介
Caffeine,一个用于Java的高性能缓存库。
缓存和Map之间的一个根本区别是缓存会清理存储的项目。
1、写入缓存策略
Caffeine有三种缓存写入策略:手动、同步加载和异步加载。
2、缓存值的清理策略
Caffeine有三种缓存值的清理策略:基于大小、基于时间和基于引用。
基于容量:当缓存大小超过配置的大小限制时会发生回收。
基于时间:
写入后到期策略。
访问后过期策略。
到期时间由 Expiry 实现独自计算。
基于引用:启用基于缓存键值的垃圾回收。
Caffeine可以将值封装为弱引用或软引用,并且Java中还有强引用和虚引用这两种引用类型。
软引用:如果一个对象只具有软引用,则内存空间足够,垃圾回收器就不会回收它;如果内存空间不足了,就会回收这些对象的内存。
弱引用:在垃圾回收器线程扫描它所管辖的内存区域的过程中,一旦发现了只具有弱引用的对象,不管当前内存空间足够与否,都会
回收它的内存。
3、统计
Caffeine提供了一种记录缓存使用统计信息的方法,可以实时监控缓存当前的状态,以评估缓存的健康程度以及缓存命中率等,方便后
续调整参数。
4、高效的缓存淘汰算法
缓存淘汰算法的目的是利用有限的资源,尽量预测哪些数据将会在短期内被频繁使用,以此来提高缓存的命中率。常用的缓存淘汰算法有
LRU、LFU、FIFO等。
FIFO:先进先出。选择最先进入的数据优先淘汰。
LRU:最近最少使用。选择最近最少使用的数据优先淘汰。
LFU:最不经常使用。选择在一段时间内被使用次数最少的数据优先淘汰。
LRU(Least Recently Used)算法认为最近访问过的数据将来被访问的几率也更高。
LRU通常使用链表来实现,如果数据添加或者被访问到则把数据移动到链表的头部,链表的头部为热数据,链表的尾部如冷数据,当
数据满时,淘汰尾部的数据。
LFU(Least Frequently Used)算法根据数据的历史访问频率来淘汰数据,其核心思想是“如果数据过去被访问多次,那么将来被访问
的频率也更高”。根据LFU的思想,如果想要实现这个算法,需要额外的一套存储用来存每个元素的访问次数,会造成内存资源的浪费。
Caffeine采用了一种结合LRU、LFU优点的算法:W-TinyLFU,其特点:高命中率、低内存占用。
5、其他说明
底层数据存储使用了ConcurrentHashMap。因为Caffeine面向JDK8,在jdk8中ConcurrentHashMap增加了红黑树,在hash冲突
严重时也能有良好的读性能。
五、基于Spring Cache实现二级缓存(Caffeine+Redis)
前面说了,使用了redis缓存,也会存在一定程度的网络传输上的消耗,所以会考虑应用内缓存,但有点很重要的要记住:
应用内缓存可以理解成比redis缓存更珍惜的资源,所以,caffeine 不适用于数据量大,并且缓存命中率极低的业务场景,如用户维度的缓存。
当前项目针对应用都部署了多个节点,一级缓存是在应用内的缓存,所以当对数据更新和清除时,需要通知所有节点进行清理缓存的操作。
可以有多种方式来实现这种效果,比如:zookeeper、MQ等,但是既然用了redis缓存,redis本身是有支持订阅/发布功能的,所以就
不依赖其他组件了,直接使用redis的通道来通知其他节点进行清理缓存的操作。
只需通过发布订阅机制通知其他节点删除该key在本地一级缓存中的条目,即可在key更新或删除操作后实现同步。
具体具体项目代码这里就不再粘贴出来了,这样只粘贴如何引用这个starter包。
1、maven引入使用
   <dependency>
            <groupId>com.jincou</groupId>
            <artifactId>redis-caffeine-cache-starter</artifactId>
            <version>1.0.0</version>
   </dependency>
2、application.yml
添加二级缓存相关配置
# 二级缓存配置
# 注:caffeine 不适用于数据量大,并且缓存命中率极低的业务场景,如用户维度的缓存。请慎重选择。
l2cache:
  config:
    # 是否存储空值,默认true,防止缓存穿透
    allowNullValues: true
    # 组合缓存配置
    composite:
      # 是否全部启用一级缓存,默认false
      l1AllOpen: false
      # 是否手动启用一级缓存,默认false
      l1Manual: true
      # 手动配置走一级缓存的缓存key集合,针对单个key维度
      l1ManualKeySet:
      - userCache:user01
      - userCache:user02
      - userCache:user03
      # 手动配置走一级缓存的缓存名字集合,针对cacheName维度
      l1ManualCacheNameSet:
      - userCache
      - goodsCache
    # 一级缓存
    caffeine:
      # 是否自动刷新过期缓存 true 是 false 否
      autoRefreshExpireCache: false
      # 缓存刷新调度线程池的大小
      refreshPoolSize: 2
      # 缓存刷新的频率(秒)
      refreshPeriod: 10
      # 写入后过期时间(秒)
      expireAfterWrite: 180
      # 访问后过期时间(秒)
      expireAfterAccess: 180
      # 初始化大小
      initialCapacity: 1000
      # 最大缓存对象个数,超过此数量时之前放入的缓存将失效
      maximumSize: 3000

    # 二级缓存
    redis:
      # 全局过期时间,单位毫秒,默认不过期
      defaultExpiration: 300000
      # 每个cacheName的过期时间,单位毫秒,优先级比defaultExpiration高
      expires: {userCache: 300000,goodsCache: 50000}
      # 缓存更新时通知其他节点的topic名称 默认 cache:redis:caffeine:topic
      topic: cache:redis:caffeine:topic
3、启动类上增加@EnableCaching
/**
 *  启动类
 */
@EnableCaching
@SpringBootApplication
public class CacheApplication {

	public static void main(String[] args) {
		SpringApplication.run(CacheApplication.class, args);
	}

}
4、在需要缓存的方法上增加@Cacheable注解
/**
* 测试
*/
@Service
public class CaffeineCacheService {
private final Logger logger = LoggerFactory.getLogger(CaffeineCacheService.class);
/**
* 用于模拟db
*/
private static Map<String, UserDTO> userMap = new HashMap<>();
{
userMap.put("user01", new UserDTO("1", "张三"));
userMap.put("user02", new UserDTO("2", "李四"));
userMap.put("user03", new UserDTO("3", "王五"));
userMap.put("user04", new UserDTO("4", "赵六"));
}
/**
* 获取或加载缓存项
*/
@Cacheable(key = "'cache_user_id_' + #userId", value = "userCache")
public UserDTO queryUser(String userId) {
UserDTO userDTO = userMap.get(userId);
try {
Thread.sleep(1000);// 模拟加载数据的耗时
} catch (InterruptedException e) {
e.printStackTrace();
}
logger.info("加载数据:{}", userDTO);
return userDTO;
}
/**
* 获取或加载缓存项
* <p>
* 注:因底层是基于caffeine来实现一级缓存,所以利用的caffeine本身的同步机制来实现
* sync=true 则表示并发场景下同步加载缓存项,
* sync=true,是通过get(Object key, Callable<T> valueLoader)来获取或加载缓存项,此时valueLoader(加载缓存项的具体逻辑)会被缓存起来,所以CaffeineCache在定时刷新过期缓存时,缓存项过期则会重新加载。
* sync=false,是通过get(Object key)来获取缓存项,由于没有valueLoader(加载缓存项的具体逻辑),所以CaffeineCache在定时刷新过期缓存时,缓存项过期则会被淘汰。
* <p>
*/
@Cacheable(value = "userCache", key = "#userId", sync = true)
public List<UserDTO> queryUserSyncList(String userId) {
UserDTO userDTO = userMap.get(userId);
List<UserDTO> list = new ArrayList();
list.add(userDTO);
logger.info("加载数据:{}", list);
return list;
}
/**
* 更新缓存
*/
@CachePut(value = "userCache", key = "#userId")
public UserDTO putUser(String userId, UserDTO userDTO) {
return userDTO;
}
/**
* 淘汰缓存
*/
@CacheEvict(value = "userCache", key = "#userId")
public String evictUserSync(String userId) {
return userId;
}
}The above is the detailed content of How to implement Caffeine+Redis second-level cache based on Spring Cache. For more information, please follow other related articles on the PHP Chinese website!