


The computer starts using the Windows installation media patch

When upgrading your computer version, an error report may appear in the Windows Installation box stating - "The computer declared using Windows installation media . The first thing you should do if you end up encountering this issue The solution is to detach the device from the computer and then restart it. Even if restarting the device does not resolve the issue, follow these steps.
Fix 1 – Have Registry Keys
Specific Registry item is causing this issue. You cannot easily delete it due to lack of appropriate permissions. Follow the steps below to adjust the permissions and then delete it.
1. You can easily open the Registry Editor. To do this, please Type "Registry Editor" in the search box.
2. There, click on "Registry Editor" to open it.

3. When you open the Registry Editor page, reach this point –
HKEY_LOCAL_MACHINE\SYSTEM\CurrentControlSet\Control
4. In the left pane, try to identify the name “MiniNT" key.
5. Now, right-click on the key and click on "Permissions".

add your account.

Advanced" to continue .

Find Now" to open the complete list of user groups.
10.Here ,Select your account name and double-click it to continue.

OK" to finish The process.

Check The "Let" box next to the "Full Control" option.
This allows you to allow the user account to have full permissions on this key.
Apply" and then "OK" to save the changes.

Delete".

is" to delete the key from the device.

restart the system. The next time you restart the system, you will not encounter the error again.
Fix 2 – Format the DriveFormatting the drive you are trying Windows on may help as this eliminates any possibility of inconsistencies between the old and new installation files. 1. Insert the installation media device into the computer. 2. Then, start the computer. 2. Once you see the "Press any key to boot from CD..." message,press any key to boot using the CD/USB device.
The Windows installation process will begin. 3. Now on the first screen you can change the "Languages to install:" and other parameters if needed. 4. Now, click "Next" to continue.

Install Now”.

I don’t have a product key” to proceed to the next step.

7. Select the version of Windows you want to install and click "Next".

8. Continue the setup process, and in the "Which installation type is required" prompt, select "Custom" options.
8. On the next page, you can see the prompt "Where do you want to install Windows?" prompt.
Here you can view all disk drives.
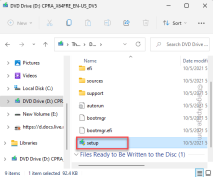
9. Select the volume on which you are trying to install the operating system, and then click "Format" to format.
After formatting the drive, you can easily upgrade to Windows without any hassle. Test if this works.
Fix 3 – Upgrade using Windows 11 ISO
There is another way to solve this problem. The latest version of the W11 ISO file will be automatically installed on top of the existing operating system.
Step 1 – Download the Windows 11 ISO
1. Go to the Windows 11 Download Center.
2. Here, go to the "Download Windows 11 Disk Image (ISO)" area, select "Windows 11 (Multiple Edition ISO)" from the list, and click "Download" Download the ISO file with .
3. Select the installation language as needed. Or, just leave it at that.
4. Finally, click "Confirm" to download the ISO file to your computer.

5. Next, click "64-bitDownload" to download the file.

Wait patiently for the ISO file to download. Once the download is complete, you can close the browser.
Step 2 – Run the installation file
You can now load the ISO and run the installation file to install the update.
1. You can open File Explorer. Just press the Win key I to open it.
2. Now, go to the location of the ISO image file.
3. Next, Double-click the ISO to mount the image file.

#When Windows installs the Windows 11 ISO, it should automatically open it.
4. Find the "settings.exe" tool. Just double-click to start the installation.
5. Wait for the installation media to load.
Now, click on the "Change how the installer downloads updates" option.

6. Now, select the “Download Updates, Drivers and Optional Features (Recommended)” option.
7. Just click "Next".

After this, let this installer install the latest version of Windows
The above is the detailed content of The computer starts using the Windows installation media patch. For more information, please follow other related articles on the PHP Chinese website!

Hot AI Tools

Undresser.AI Undress
AI-powered app for creating realistic nude photos

AI Clothes Remover
Online AI tool for removing clothes from photos.

Undress AI Tool
Undress images for free

Clothoff.io
AI clothes remover

Video Face Swap
Swap faces in any video effortlessly with our completely free AI face swap tool!

Hot Article
Hot Tools

Atom editor mac version download
The most popular open source editor

Notepad++7.3.1
Easy-to-use and free code editor

Dreamweaver Mac version
Visual web development tools

Safe Exam Browser
Safe Exam Browser is a secure browser environment for taking online exams securely. This software turns any computer into a secure workstation. It controls access to any utility and prevents students from using unauthorized resources.

SecLists
SecLists is the ultimate security tester's companion. It is a collection of various types of lists that are frequently used during security assessments, all in one place. SecLists helps make security testing more efficient and productive by conveniently providing all the lists a security tester might need. List types include usernames, passwords, URLs, fuzzing payloads, sensitive data patterns, web shells, and more. The tester can simply pull this repository onto a new test machine and he will have access to every type of list he needs.

