


Environment: Docker (Redis:5.0.5 * 3)
1. Pull the image
docker pull redis:5.0.5

2. Create a Redis container
Create three redis containers:
redis-node1:6379
- ##redis-node2:6380
- redis-node3:6381
docker create --name redis-node1 -v /data/redis-data/node1:/data -p 6379:6379 redis:5.0.5 --cluster-enabled yes --cluster-config-file nodes-node-1.conf

docker create --name redis-node2 -v /data/redis-data/node2:/data -p 6380:6379 redis:5.0.5 --cluster-enabled yes --cluster-config-file nodes-node-2.conf

docker create --name redis-node3 -v /data/redis-data/node3:/data -p 6381:6379 redis:5.0.5 --cluster-enabled yes --cluster-config-file nodes-node-3.conf

docker start:


Exited (1) 3 seconds ago, you can view it through docker logs:

chmod -R 777 /dataAfter successful startup, as shown below:

执行「docker inspect redis-node1」得到 redis-node1 ip 信息为:172.17.0.4
执行「docker inspect redis-node2」得到 redis-node2 ip 信息为:172.17.0.3
执行「docker inspect redis-node3」得到 redis-node3 ip 信息为:172.17.0.2

# 这里以进入 node1 为例
docker exec -it redis-node1 /bin/bash

# 接着执行组建集群命令(请根据自己的ip信息进行拼接)
redis-cli --cluster create 172.17.0.2:6379  172.17.0.3:6379  172.17.0.4:6379 --cluster-replicas 0

redis-cli -c command to connect to the cluster node, and then set the value. After the set value, it will automatically redirect to the 0.2 ip address, and then pass Get Get it. Successful acquisition proves that the cluster is valid.

ip address is assigned internally by the dock, such as: 172.17.0.2 etc. If the project using redis cluster is not on the same server as the cluster, then the project is You can't use the cluster because access is blocked.

Docker use the host mode network connection type, Docker in Containers created using host mode do not have their own independent network namespace. They share a network space with the physical machine, and can then share all ports and IP of the physical machine. In this way This allows the public network to directly access the container. Although this method has security risks, no other feasible mode has been found yet.
host mode and re-create the container:
docker stop redis-node1 redis-node2 redis-node3
2. Delete The previously created container docker rm redis-node1 redis-node2 redis-node3
# 清空上面创建的配置文件
rm -rf /data/redis-data/node*
3. Re-create it based on the host mode docker create --name redis-node1 --net host -v /data/redis-data/node1:/data redis:5.0.5 --cluster-enabled yes --cluster-config-file nodes-node-1.conf --port 6379
docker create --name redis-node2 --net host -v /data/redis-data/node2:/data redis:5.0.5 --cluster-enabled yes --cluster-config-file nodes-node-2.conf --port 6380
docker create --name redis-node3 --net host -v /data/redis-data/node3:/data redis:5.0.5 --cluster-enabled yes --cluster-config-file nodes-node-3.conf --port 6381
is different from the previous creation command. First, the --net network type is specified host, secondly, in this case, there is no need for port mapping, such as -p 6379:6379, because the container port service needs to be shared externally at this time, so you only need to specify the externally exposed port -p 6379, -p 6380, etc.

# 启动命令
docker start redis-node1 redis-node2 redis-node3
# 进入某一个容器
docker exec -it redis-node1 /bin/bash
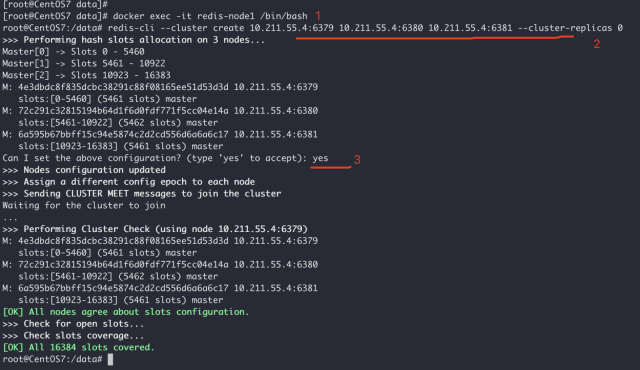
# 组建集群,10.211.55.4为当前物理机的ip地址
redis-cli --cluster create 10.211.55.4:6379 10.211.55.4:6380 10.211.55.4:6381 --cluster-replicas 0
root@CentOS7:/data# redis-cli
127.0.0.1:6379> cluster nodes
72c291c32815194b64d1f6d0fdf771f5cc04e14a 10.211.55.4:6380@16380 master - 0 1590905997358 2 connected 5461-10922
6a595b67bbff15c94e5874c2d2cd556d6a6a6c17 10.211.55.4:6381@16381 master - 0 1590905998362 3 connected 10923-16383
4e3dbdc8f835dcbc38291c88f08165ee51d53d3d 10.211.55.4:6379@16379 myself,master - 0 1590905997000 1 connected 0-5460
127.0.0.1:6379>
6. Test the cluster Use redis-cli -c to connect to the cluster, set a value, and then get the value from other nodes to see if it is successful:
root@CentOS7:/data# redis-cli -c
127.0.0.1:6379> set wxiaowei 123
-> Redirected to slot [7515] located at 10.211.55.4:6380
OK
10.211.55.4:6380> get wxiaowei
"123"

The above is the detailed content of How to build a Redis cluster based on Docker. For more information, please follow other related articles on the PHP Chinese website!

 docker中rm和rmi有什么区别Jul 14, 2022 am 11:02 AM
docker中rm和rmi的区别:rm命令用于删除一个或者多个容器,而rmi命令用于删除一个或者多个镜像;rm命令的语法为“docker rm [OPTIONS] CONTAINER [CONTAINER...]”,rmi命令的语法为“docker rmi [OPTIONS] IMAGE [IMAGE...]”。
 docker官方镜像有哪些May 12, 2022 pm 02:23 PM
docker官方镜像有:1、nginx,一个高性能的HTTP和反向代理服务;2、alpine,一个面向安全应用的轻量级Linux发行版;3、busybox,一个集成了三百多个常用Linux命令和工具的软件;4、ubuntu;5、PHP等等。
 docker是免费的吗Jul 08, 2022 am 11:21 AM
docker对于小型企业、个人、教育和非商业开源项目来说是免费的;2021年8月31日,docker宣布“Docker Desktop”将转变“Docker Personal”,将只免费提供给小型企业、个人、教育和非商业开源项目使用,对于其他用例则需要付费订阅。
 docker容器重启后数据会丢吗Jun 17, 2022 am 10:41 AM
docker容器重启后数据会丢失的;但是可以利用volume或者“data container”来实现数据持久化,在容器关闭之后可以利用“-v”或者“–volumes-from”重新使用以前的数据,docker也可挂载宿主机磁盘目录,用来永久存储数据。
 docker能安装oracle吗Jul 08, 2022 pm 04:07 PM
docker能安装oracle。安装方法:1、拉取Oracle官方镜像,可以利用“docker images”查看镜像;2、启动容器后利用“docker exec -it oracle11g bash”进入容器,并且编辑环境变量;3、利用“sqlplus /nolog”进入oracle命令行即可。
 docker存储空间不足怎么办Jul 22, 2022 pm 03:44 PM
解决方法:1、停止docker服务后,利用“rsync -avz /var/lib/docker 大磁盘目录/docker/lib/”将docker迁移到大容量磁盘中;2、编辑“/etc/docker/daemon.json”添加指定参数,将docker的目录迁移绑定;3、重载和重启docker服务即可。
 什么是docker最早支持的存储引擎May 12, 2022 pm 03:27 PM
AUFS是docker最早支持的存储引擎。AUFS是一种Union File System,是文件级的存储驱动,是Docker早期用的存储驱动,是Docker18.06版本之前,Ubuntu14.04版本前推荐的,支持xfs、ext4文件。
 docker容器管理ui有哪些May 11, 2022 pm 03:39 PM
容器管理ui工具有:1、Portainer,是一个轻量级的基于Web的Docker管理GUI;2、Kitematic,是一个GUI工具,可以更快速、更简单的运行容器;3、LazyDocker,基于终端的一个可视化查询工具;4、DockStation,一款桌面应用程序;5、Docker Desktop,能为Docker设置资源限制,比如内存,CPU,磁盘镜像大小;6、Docui。


Hot AI Tools

Undresser.AI Undress
AI-powered app for creating realistic nude photos

AI Clothes Remover
Online AI tool for removing clothes from photos.

Undress AI Tool
Undress images for free

Clothoff.io
AI clothes remover

AI Hentai Generator
Generate AI Hentai for free.

Hot Article
Hot Tools

Dreamweaver CS6
Visual web development tools

WebStorm Mac version
Useful JavaScript development tools

Zend Studio 13.0.1
Powerful PHP integrated development environment

SAP NetWeaver Server Adapter for Eclipse
Integrate Eclipse with SAP NetWeaver application server.

Safe Exam Browser
Safe Exam Browser is a secure browser environment for taking online exams securely. This software turns any computer into a secure workstation. It controls access to any utility and prevents students from using unauthorized resources.

