What is the method for implementing delay queue in Redis?
- WBOYWBOYWBOYWBOYWBOYWBOYWBOYWBOYWBOYWBOYWBOYWBOYWBforward
- 2023-05-30 11:29:252562browse
1. Foreword
1.1. What is a delay queue
The biggest difference between a delay queue and an ordinary queue is reflected in its delay attribute. The elements of an ordinary queue are First-in, first-out, processing is performed in the order in which they are queued. Elements in the delay queue are assigned a delay time when they are queued, indicating that they hope to be processed after the specified time. The structure of a delay queue is more like a time-weighted ordered heap structure than a traditional queue.
1.2. Application scenarios
In some business scenarios, we often encounter functions that need to be executed at a specific time node or after a period of time. For example, the following scenarios:
Create a new order. If the payment is not made within the specified time, the takeout or taxi needs to be automatically canceled. Ten minutes before the expected arrival time, the rider or driver will be reminded that the timeout will be exceeded. After the express delivery is received, the delivery will be delivered within the specified time. If the user does not confirm the receipt, the delivery will be automatically confirmed. For scheduled meetings, ten minutes before the start of the meeting, you will be reminded to join the meeting as soon as possible. Daily weekly reports will remind you to submit as soon as possible half an hour before the deadline.
1.3. Why use it? Delay queue
For some projects with small data volume and low requirements on data timeliness, the simplest and most effective method is to write a scheduled task to scan the database to achieve business realization. When the amount of data reaches millions or tens of millions, it is easy to get hit if the database is scanned regularly. I believe everyone knows that when the data reaches this level, it will be very inefficient to scan the table regularly. Even for those situations where the timing interval is relatively small, the next scan will start before the scan is completed. . At this time, it may be very effective to use a delay queue.
Several ways to implement delay queue
Quartz scheduled task
DelayQueue delay queue
Redis sorted set Redis
Expired key listening callback
RabbitMQ dead letter queue
-
RabbitMQ implements delay queue based on plug-in
wheel time wheel algorithm
2, Redis sorted set
In Redis In, zet is an ordered set. You can use its ordered characteristics to add tasks to zset, use the task's expiration time as the score, and use the default ordered characteristics of zset to obtain the element with the smallest score value (that is, the most recent Expired task), judge the system time and the expiration time of the task. If the expiration time is reached, execute the business, delete the expired task, and continue to judge the next element. If it has not expired, sleep for a period of time. (eg 1 second), if the collection is empty, it will also sleep for a period of time.

Add elements to the queue delayqueue through the zadd command, and set the score value to indicate the expiration time of the element; add three order1, order2, and order3 to the delayqueue, each of which is 10 seconds. , expires after 20 seconds, and 30 seconds.
zadd delayqueue 3 order3
The consumer polls the queue delayqueue, sorts the elements and compares the minimum time with the current time. If it is less than the current time, it means the key has expired and been removed.
/**
 * 消费消息
 */
public void pollOrderQueue() {
    while (true) {
        Set<Tuple> set = jedis.zrangeWithScores(DELAY_QUEUE, 0, 0);
        String value = ((Tuple) set.toArray()[0]).getElement();
        int score = (int) ((Tuple) set.toArray()[0]).getScore();
        Calendar cal = Calendar.getInstance();
        int nowSecond = (int) (cal.getTimeInMillis() / 1000);
        if (nowSecond >= score) {
            jedis.zrem(DELAY_QUEUE, value);
            System.out.println(sdf.format(new Date()) + " removed key:" + value);
        }
        if (jedis.zcard(DELAY_QUEUE) <= 0) {
            System.out.println(sdf.format(new Date()) + " zset empty ");
            return;
        }
        Thread.sleep(1000);
    }
}
We see that the execution results are in line with expectations:
2020-05-07 13:24:09 add finished.
2020-05-07 13:24:19 removed key:order1
2020-05-07 13:24:29 removed key:order2
2020-05-07 13:24:39 removed key:order3
2020-05-07 13:24: 39 zset empty
3. Redis expired key monitoring callback
Redis’ key expiration callback event can also achieve the effect of delaying the queue. Simply put, we enable monitoring of whether the key has expired. Event, once the key expires, a callback event will be triggered.
To enable notify-keyspace-events Ex, you need to edit the redis.conf file. notify-keyspace-events Ex
Redis listening configuration, inject Bean RedisMessageListenerContainer.
Secondly, configure the redis listener. Finally, write the redis key expiration listening callback method.
@Configuration
public class RedisListenerConfig {
@Bean
RedisMessageListenerContainer container(RedisConnectionFactory connectionFactory) {
        RedisMessageListenerContainer container = new RedisMessageListenerContainer();
        container.setConnectionFactory(connectionFactory);
         return container;
    }
}
When writing the Redis expiration callback listening method, you must inherit KeyExpirationEventMessageListener, which is somewhat similar to MQ message listening.
@Component
public class RedisKeyExpirationListener extends KeyExpirationEventMessageListener {
public RedisKeyExpirationListener(RedisMessageListenerContainer listenerContainer) {
    super(listenerContainer);
}
@Override
public void onMessage(Message message, byte[] pattern) {
      String expiredKey = message.toString();
      System.out.println("监听到key:" + expiredKey + "已过期");
    }
}
The code is now written. It is very simple. Next, test the effect. Add a key to the redis-cli client and set an expiration time of 3 seconds.
set xiaofu 123 ex 3
The expired key was successfully monitored on the console.
The expired key monitored is: xiaofu
4. Quartz scheduled task
Quartz is a very classic task scheduling framework. When Redis and RabbitMQ were not widely used, The function of canceling orders without payment over time is implemented by scheduled tasks.
Import Quartz dependencies
<dependency>
   <groupId>org.springframework.boot</groupId>
   <artifactId>spring-boot-starter-quartz</artifactId>
</dependency>
>在启动类中使用@EnableScheduling注解开启定时任务功能。
```java
@SpringBootApplication
@EnableScheduling
public class DelayQueueApplication {
    public static void main(String[] args) {
        SpringApplication.run(DelayQueueApplication.class, args);
    }
}
Write scheduled tasks
@Slf4j
@Component
public class QuartzDemo {
    /**
     * 每隔五秒开启一次任务
     */
    @Scheduled(cron = "0/5 * * * * ? ")
    public void process(){
        log.info("--------------定时任务测试--------------");
    }
}
5. DelayQueue delay queue
JDK provides a set of APIs for implementing delay queues, located at DelayQueue under the Java.util.concurrent package.
DelayQueue是一个BlockingQueue(无界阻塞)队列,它本质就是封装了一个PriorityQueue(优先队列),PriorityQueue内部使用完全二叉堆(不知道的自行了解哈)来实现队列元素排序,我们在向DelayQueue队列中添加元素时,会给元素一个Delay(延迟时间)作为排序条件,队列中最小的元素会优先放在队首。队列中的元素只有到了Delay时间才允许从队列中取出。队列中可以放基本数据类型或自定义实体类,在存放基本数据类型时,优先队列中元素默认升序排列,自定义实体类就需要我们根据类属性值比较计算了。 先简单实现一下看看效果,添加三个order入队DelayQueue,分别设置订单在当前时间的5秒、10秒、15秒后取消。
要实现DelayQueue延时队列,队中元素要implements Delayed 接口,这哥接口里只有一个getDelay方法,用于设置延期时间。在Order类中,compareTo方法的作用是对队列中的元素进行排列。
public class Order implements Delayed {
/**
 * 延迟时间
 */
@JsonFormat(locale = "zh", timezone = "GMT+8", pattern = "yyyy-MM-dd HH:mm:ss")
private long time;
String name;
public Order(String name, long time, TimeUnit unit) {
    this.name = name;
    this.time = System.currentTimeMillis() + (time > 0 ? unit.toMillis(time) : 0);
}
@Override
public long getDelay(TimeUnit unit) {
    return time - System.currentTimeMillis();
}
@Override
public int compareTo(Delayed o) {
    Order Order = (Order) o;
    long diff = this.time - Order.time;
    if (diff <= 0) {
        return -1;
    } else {
        return 1;
    }
}
}
DelayQueue的put方法是线程安全的,因为put方法内部使用了ReentrantLock锁进行线程同步。DelayQueue还提供了两种出队的方法poll()和take() , poll()为非阻塞获取,没有到期的元素直接返回null;take()阻塞方式获取,没有到期的元素线程将会等待。
public class DelayQueueDemo {
public static void main(String[] args) throws InterruptedException {
    Order Order1 = new Order("Order1", 5, TimeUnit.SECONDS);
    Order Order2 = new Order("Order2", 10, TimeUnit.SECONDS);
    Order Order3 = new Order("Order3", 15, TimeUnit.SECONDS);
    DelayQueue<Order> delayQueue = new DelayQueue<>();
    delayQueue.put(Order1);
    delayQueue.put(Order2);
    delayQueue.put(Order3);
    System.out.println("订单延迟队列开始时间:" + LocalDateTime.now().format(DateTimeFormatter.ofPattern("yyyy-MM-dd HH:mm:ss")));
    while (delayQueue.size() != 0) {
        /**
         * 取队列头部元素是否过期
         */
        Order task = delayQueue.poll();
        if (task != null) {
            System.out.format("订单:{%s}被取消, 取消时间:{%s}\n", task.name,
            LocalDateTime.now().format(DateTimeFormatter.ofPattern("yyyy-MM-dd HH:mm:ss")));
        }
        Thread.sleep(1000);
    }
}
}
上边只是简单的实现入队与出队的操作,实际开发中会有专门的线程,负责消息的入队与消费。
执行后看到结果如下,Order1、Order2、Order3 分别在 5秒、10秒、15秒后被执行,至此就用DelayQueue实现了延时队列。
订单延迟队列开始时间:2020-05-06 14:59:09
订单:{Order1}被取消, 取消时间:{2020-05-06 14:59:14}
订单:{Order2}被取消, 取消时间:{2020-05-06 14:59:19}
订单:{Order3}被取消, 取消时间:{2020-05-06 14:59:24}
6、RabbitMQ 延时队列
利用 RabbitMQ 做延时队列是比较常见的一种方式,而实际上RabbitMQ 自身并没有直接支持提供延迟队列功能,而是通过 RabbitMQ 消息队列的 TTL和 DXL这两个属性间接实现的。
先来认识一下 TTL和 DXL两个概念:
Time To Live(TTL) :
TTL 顾名思义:指的是消息的存活时间,RabbitMQ可以通过x-message-tt参数来设置指定Queue(队列)和 Message(消息)上消息的存活时间,它的值是一个非负整数,单位为微秒。
RabbitMQ 可以从两种维度设置消息过期时间,分别是队列和消息本身
设置队列过期时间,那么队列中所有消息都具有相同的过期时间。可以在队列中为每条消息单独设置过期时间,即使每个消息的TTL不同也可以实现。若队列和队列中消息的TTL同时被设置,则TTL的值以两者中较小的那个为准。如果队列中的消息存储时间超过了预设的TTL过期时间,那么它就会变成Dead Letter(死信)。
Dead Letter Exchanges(DLX)
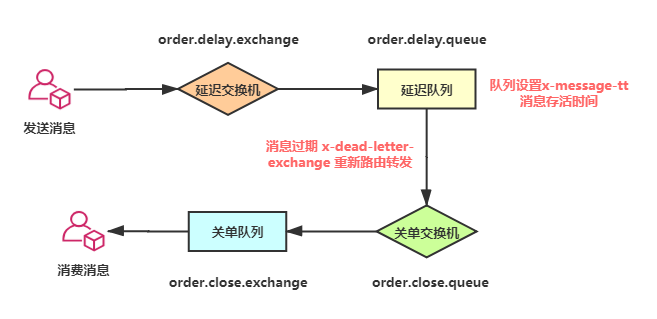
DLX即死信交换机,绑定在死信交换机上的即死信队列。RabbitMQ的 Queue(队列)可以配置两个参数x-dead-letter-exchange 和 x-dead-letter-routing-key(可选),一旦队列内出现了Dead Letter(死信),则按照这两个参数可以将消息重新路由到另一个Exchange(交换机),让消息重新被消费。
x-dead-letter-exchange:队列中出现Dead Letter后将Dead Letter重新路由转发到指定 exchange(交换机)。
x-dead-letter-routing-key:指定routing-key发送,一般为要指定转发的队列。
队列出现Dead Letter的情况有:
消息或者队列的TTL过期
队列达到最大长度
消息被消费端拒绝(basic.reject or basic.nack)
下边结合一张图看看如何实现超30分钟未支付关单功能,我们将订单消息A0001发送到延迟队列order.delay.queue,并设置x-message-tt消息存活时间为30分钟,当到达30分钟后订单消息A0001成为了Dead Letter(死信),延迟队列检测到有死信,通过配置x-dead-letter-exchange,将死信重新转发到能正常消费的关单队列,直接监听关单队列处理关单逻辑即可。

发送消息时指定消息延迟的时间
public void send(String delayTimes) {
    amqpTemplate.convertAndSend("order.pay.exchange", "order.pay.queue","大家好我是延迟数据", message -> {
      // 设置延迟毫秒值
      message.getMessageProperties().setExpiration(String.valueOf(delayTimes));
      return message;
    });
  }
}
设置延迟队列出现死信后的转发规则
/**
   * 延时队列
   */
  @Bean(name = "order.delay.queue")
  public Queue getMessageQueue() {
    return QueueBuilder
        .durable(RabbitConstant.DEAD_LETTER_QUEUE)
        // 配置到期后转发的交换
        .withArgument("x-dead-letter-exchange", "order.close.exchange")
        // 配置到期后转发的路由键
        .withArgument("x-dead-letter-routing-key", "order.close.queue")
        .build();
  }
7、时间轮
前面几种实现延迟队列的方法相对简单,比较易于理解。相比之下,时间轮算法稍微有点抽象。kafka、netty都有基于时间轮算法实现延时队列,下边主要实践Netty的延时队列讲一下时间轮是什么原理。
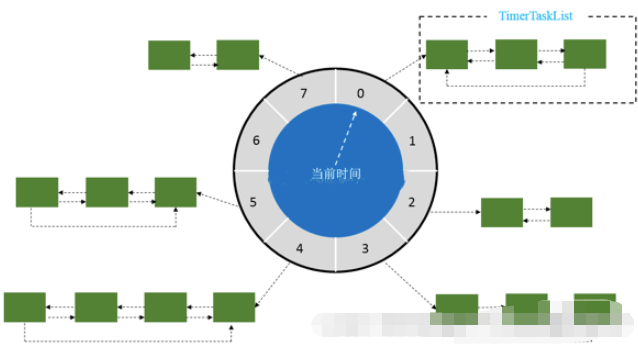
先来看一张时间轮的原理图,解读一下时间轮的几个基本概念

wheel :时间轮,图中的圆盘可以看作是钟表的刻度。举个例子,如果一圈round的长度为24秒,共分成8个刻度,那么每个刻度代表3秒。那么时间精度就是 3秒。时间长度 / 刻度数值越大,精度越大。
当添加一个定时、延时任务A,假如会延迟25秒后才会执行,可时间轮一圈round 的长度才24秒,那么此时会根据时间轮长度和刻度得到一个圈数 round和对应的指针位置 index,也是就任务A会绕一圈指向0格子上,此时时间轮会记录该任务的round和 index信息。指针处于0格,当 round=0 且 index=0 时不会执行任务A,因为 round=0 不符合条件。
所以每一个格子代表的是一些时间,比如1秒和25秒 都会指向0格子上,而任务则放在每个格子对应的链表中,这点和HashMap的数据有些类似。
Netty构建延时队列主要用HashedWheelTimer,HashedWheelTimer底层数据结构依然是使用DelayedQueue,只是采用时间轮的算法来实现。
下面我们用Netty 简单实现延时队列,HashedWheelTimer构造函数比较多,解释一下各参数的含义。
ThreadFactory :表示用于生成工作线程,一般采用线程池;
tickDuration和unit:每格的时间间隔,默认100ms;
ticksPerWheel:一圈下来有几格,默认512,而如果传入数值的不是2的N次方,则会调整为大于等于该参数的一个2的N次方数值,有利于优化hash值的计算。
public HashedWheelTimer(ThreadFactory threadFactory, long tickDuration, TimeUnit unit, int ticksPerWheel) {
    this(threadFactory, tickDuration, unit, ticksPerWheel, true);
  }
TimerTask:一个定时任务的实现接口,其中run方法包装了定时任务的逻辑。
Timeout:一个定时任务提交到Timer之后返回的句柄,通过这个句柄外部可以取消这个定时任务,并对定时任务的状态进行一些基本的判断。 Timer:是HashedWheelTimer实现的父接口,仅定义了如何提交定时任务和如何停止整个定时机制。
public class NettyDelayQueue {
  public static void main(String[] args) {
    final Timer timer = new HashedWheelTimer(Executors.defaultThreadFactory(), 5, TimeUnit.SECONDS, 2);
    //定时任务
    TimerTask task1 = new TimerTask() {
      public void run(Timeout timeout) throws Exception {
        System.out.println("order1 5s 后执行 ");
        timer.newTimeout(this, 5, TimeUnit.SECONDS);//结束时候再次注册
      }
    };
    timer.newTimeout(task1, 5, TimeUnit.SECONDS);
    TimerTask task2 = new TimerTask() {
      public void run(Timeout timeout) throws Exception {
        System.out.println("order2 10s 后执行");
        timer.newTimeout(this, 10, TimeUnit.SECONDS);//结束时候再注册
      }
    };
    timer.newTimeout(task2, 10, TimeUnit.SECONDS);
    //延迟任务
    timer.newTimeout(new TimerTask() {
      public void run(Timeout timeout) throws Exception {
        System.out.println("order3 15s 后执行一次");
      }
    }, 15, TimeUnit.SECONDS);
  }
}
从执行的结果看,order3、order3延时任务只执行了一次,而order2、order1为定时任务,按照不同的周期重复执行。
order1 5s 后执行
order2 10s 后执行
order3 15s 后执行一次
order1 5s 后执行
order2 10s 后执行
The above is the detailed content of What is the method for implementing delay queue in Redis?. For more information, please follow other related articles on the PHP Chinese website!

