


0. Development environment
IDE: IntelliJ IDEA 2017.1 x64
jdk: 1.8.0_91
Spring Boot :2.1.1.RELEASE
1. Simple scheduled tasks
For some relatively simple scheduled tasks, such as executing a fixed method at a fixed time interval, just annotate @Scheduled on the standard Java method
package cn.wbnull.springbootdemo.schedule;

import cn.wbnull.springbootdemo.util.DateUtils;
import cn.wbnull.springbootdemo.util.LoggerUtils;
import org.springframework.scheduling.annotation.Scheduled;
import org.springframework.stereotype.Component;

@Component
public class ScheduledTask {

    @Scheduled(cron = "0/10 * * * * ?") //每10秒执行一次
    public void scheduledTaskByCorn() {
        LoggerUtils.info("定时任务开始 ByCorn:" + DateUtils.dateFormat());
        scheduledTask();
        LoggerUtils.info("定时任务结束 ByCorn:" + DateUtils.dateFormat());
    }

    @Scheduled(fixedRate = 10000) //每10秒执行一次
    public void scheduledTaskByFixedRate() {
        LoggerUtils.info("定时任务开始 ByFixedRate:" + DateUtils.dateFormat());
        scheduledTask();
        LoggerUtils.info("定时任务结束 ByFixedRate:" + DateUtils.dateFormat());
    }

    @Scheduled(fixedDelay = 10000) //每10秒执行一次
    public void scheduledTaskByFixedDelay() {
        LoggerUtils.info("定时任务开始 ByFixedDelay:" + DateUtils.dateFormat());
        scheduledTask();
        LoggerUtils.info("定时任务结束 ByFixedDelay:" + DateUtils.dateFormat());
    }

    private void scheduledTask() {
        try {
            Thread.sleep(5000);
        } catch (InterruptedException e) {
            e.printStackTrace();
        }
    }
}
Then add the annotation @EnableScheduling to the project startup class to indicate that scheduled tasks are enabled
package cn.wbnull.springbootdemo;

import org.springframework.boot.SpringApplication;
import org.springframework.boot.autoconfigure.SpringBootApplication;
import org.springframework.scheduling.annotation.EnableScheduling;

@SpringBootApplication
@EnableScheduling
public class SpringBootDemoApplication {

    public static void main(String[] args) {
        SpringApplication.run(SpringBootDemoApplication.class, args);
    }
}
Here because we have created three scheduled tasks in the ScheduledTask class, @Scheduled does not execute concurrently by default, so Let’s comment out the others first and test them separately.
1.1 @Scheduled(cron = “0/10 * * * * ?”)
package cn.wbnull.springbootdemo.schedule;

import cn.wbnull.springbootdemo.util.DateUtils;
import cn.wbnull.springbootdemo.util.LoggerUtils;
import org.springframework.scheduling.annotation.Scheduled;
import org.springframework.stereotype.Component;

@Component
public class ScheduledTask {

    @Scheduled(cron = "0/10 * * * * ?") //每10秒执行一次
    public void scheduledTaskByCorn() {
        LoggerUtils.info("定时任务开始 ByCorn:" + DateUtils.dateFormat());
        scheduledTask();
        LoggerUtils.info("定时任务结束 ByCorn:" + DateUtils.dateFormat());
    }

    private void scheduledTask() {
        try {
            Thread.sleep(5000);
        } catch (InterruptedException e) {
            e.printStackTrace();
        }
    }
}
Start the project, the running results are as follows
[INFO][2019 -02-18 16:08:40,095]||The scheduled task starts ByCorn: 2019-02-18 16:08:40
[INFO][2019-02-18 16:08:45,097]||The scheduled task ends ByCorn:2019-02-18 16:08:45
[INFO][2019-02-18 16:08:50,001]||Scheduled task startsByCorn:2019-02-18 16:08:50
[INFO][2019-02-18 16:08:55,003]||Timed task ended ByCorn: 2019-02-18 16:08:55
[INFO][2019-02-18 16:09:00,002] ||The scheduled task started ByCorn: 2019-02-18 16:09:00
[INFO][2019-02-18 16:09:05,004]||The scheduled task ended ByCorn: 2019-02-18 16:09 :05
[INFO][2019-02-18 16:09:10,001]||Scheduled task starts ByCorn: 2019-02-18 16:09:10
[INFO][2019-02-18 16 :09:15,003]||The scheduled task ends ByCorn: 2019-02-18 16:09:15
[INFO][2019-02-18 16:09:20,001]||The scheduled task starts ByCorn: 2019-02 -18 16:09:20
[INFO][2019-02-18 16:09:25,002]||Timed task ends ByCorn: 2019-02-18 16:09:25
[INFO][2019 -02-18 16:09:30,001]||The scheduled task starts ByCorn: 2019-02-18 16:09:30
[INFO][2019-02-18 16:09:35,002]||The scheduled task ends ByCorn: 2019-02-18 16:09:35
Let’s change the thread sleep time in the scheduledTask method so that the sleep time is greater than the scheduled task interval Thread.sleep(12000);, and then start project and view the running results.
[INFO][2019-02-18 16:14:20,080]||Scheduled task started ByCorn: 2019-02-18 16:14:20
[INFO][2019- 02-18 16:14:32,081]||The scheduled task ends ByCorn: 2019-02-18 16:14:32
[INFO][2019-02-18 16:14:40,001]||The scheduled task starts ByCorn :2019-02-18 16:14:40
[INFO][2019-02-18 16:14:52,002]||Timed task endsByCorn:2019-02-18 16:14:52
[ INFO][2019-02-18 16:15:00,000]||Scheduled task started ByCorn: 2019-02-18 16:15:00
[INFO][2019-02-18 16:15:12,002]| | Scheduled task ends ByCorn: 2019-02-18 16:15:12
We can see that for cron expressions, if the business code execution time is less than the scheduled task interval, then the scheduled task The task is executed every 10 seconds and is not affected by the business code. No matter how long the business code is executed, the scheduled task is executed once every 10 seconds;
If the business code execution time is greater than the scheduled task interval, the scheduled task defaults to There is no concurrency, so until the 10 seconds after the execution of the business code is completed, the scheduled task is executed every 10 seconds and is not affected by the business code.
Note: The scheduled task controlled by @Scheduled(cron = "0/10 * * * * ?") is executed every 10 seconds, that is, within one minute, if the current If the number of seconds can be divided evenly by 10, then the scheduled task will be executed, or it can be understood as starting from 0 seconds every minute, executing the next time after 10 seconds, and starting from 0 seconds after one minute of execution. That is, it will only be executed at 10s, 20s, 30s... If you configure a scheduled task @Scheduled(cron = "0/7 * * * * ?"), it will only be executed at 0s, 7s, 14s... .
1.2 @Scheduled(fixedRate = 10000)
package cn.wbnull.springbootdemo.schedule;

import cn.wbnull.springbootdemo.util.DateUtils;
import cn.wbnull.springbootdemo.util.LoggerUtils;
import org.springframework.scheduling.annotation.Scheduled;
import org.springframework.stereotype.Component;

@Component
public class ScheduledTask {

    @Scheduled(fixedRate = 10000) //每10秒执行一次
    public void scheduledTaskByFixedRate() {
        LoggerUtils.info("定时任务开始 ByFixedRate:" + DateUtils.dateFormat());
        scheduledTask();
        LoggerUtils.info("定时任务结束 ByFixedRate:" + DateUtils.dateFormat());
    }

    private void scheduledTask() {
        try {
            Thread.sleep(12000);
        } catch (InterruptedException e) {
            e.printStackTrace();
        }
    }
}
Start the project and the running results are as follows
[INFO][2019-02-18 17:33:18,235 ]||The scheduled task started ByFixedRate: 2019-02-18 17:33:18
[INFO][2019-02-18 17:33:23,239]||The scheduled task ended ByFixedRate: 2019-02-18 17: 33:23
[INFO][2019-02-18 17:33:28,191]||Scheduled task starts ByFixedRate: 2019-02-18 17:33:28
[INFO][2019-02-18 17:33:33,195]||The scheduled task ends ByFixedRate: 2019-02-18 17:33:33
[INFO][2019-02-18 17:33:38,189]||The scheduled task starts ByFixedRate: 2019- 02-18 17:33:38
[INFO][2019-02-18 17:33:43,191]||Timed task endsByFixedRate: 2019-02-18 17:33:43
[INFO][ 2019-02-18 17:33:48,184]|| Scheduled task starts ByFixedRate: 2019-02-18 17:33:48
[INFO][2019-02-18 17:33:53,186]|| Scheduled task EndByFixedRate: 2019-02-18 17:33:53
[INFO][2019-02-18 17:33:58,190]||Timed task startsByFixedRate: 2019-02-18 17:33:58
[INFO][2019-02-18 17:34:03,193]||Scheduled task ends ByFixedRate: 2019-02-18 17:34:03
Let’s change the thread in the scheduledTask method Set the sleep time to be greater than the scheduled task interval Thread.sleep(12000);, then start the project and check the running results.
[INFO][2019-02-18 17:31:30,122]||定时任务开始 ByFixedRate:2019-02-18 17:31:30
[INFO][2019-02-18 17:31:42,122]||定时任务结束 ByFixedRate:2019-02-18 17:31:42
[INFO][2019-02-18 17:31:42,123]||定时任务开始 ByFixedRate:2019-02-18 17:31:42
[INFO][2019-02-18 17:31:54,123]||定时任务结束 ByFixedRate:2019-02-18 17:31:54
[INFO][2019-02-18 17:31:54,124]||定时任务开始 ByFixedRate:2019-02-18 17:31:54
[INFO][2019-02-18 17:32:06,127]||定时任务结束 ByFixedRate:2019-02-18 17:32:06
[INFO][2019-02-18 17:32:06,127]||定时任务开始 ByFixedRate:2019-02-18 17:32:06
[INFO][2019-02-18 17:32:18,134]||定时任务结束 ByFixedRate:2019-02-18 17:32:18
对于fixedRate 来说,如果业务代码执行时间小于定时任务间隔时间,那么定时任务每10秒执行一次,且不受业务代码影响,无论业务代码执行多久,定时任务都是10秒执行一次;
如果业务代码执行时间大于定时任务间隔时间,则定时任务循环执行。
1.3 @Scheduled(fixedDelay = 10000)
package cn.wbnull.springbootdemo.schedule;

import cn.wbnull.springbootdemo.util.DateUtils;
import cn.wbnull.springbootdemo.util.LoggerUtils;
import org.springframework.scheduling.annotation.Scheduled;
import org.springframework.stereotype.Component;

@Component
public class ScheduledTask {

    @Scheduled(fixedDelay = 10000) //每10秒执行一次
    public void scheduledTaskByFixedDelay() {
        LoggerUtils.info("定时任务开始 ByFixedDelay:" + DateUtils.dateFormat());
        scheduledTask();
        LoggerUtils.info("定时任务结束 ByFixedDelay:" + DateUtils.dateFormat());
    }

    private void scheduledTask() {
        try {
            Thread.sleep(5000);
        } catch (InterruptedException e) {
            e.printStackTrace();
        }
    }
}
启动项目,运行结果如下
[INFO][2019-02-18 17:45:30,784]||定时任务开始 ByFixedDelay:2019-02-18 17:45:30
[INFO][2019-02-18 17:45:35,792]||定时任务结束 ByFixedDelay:2019-02-18 17:45:35
[INFO][2019-02-18 17:45:45,803]||定时任务开始 ByFixedDelay:2019-02-18 17:45:45
[INFO][2019-02-18 17:45:50,812]||定时任务结束 ByFixedDelay:2019-02-18 17:45:50
[INFO][2019-02-18 17:46:00,814]||定时任务开始 ByFixedDelay:2019-02-18 17:46:00
[INFO][2019-02-18 17:46:05,817]||定时任务结束 ByFixedDelay:2019-02-18 17:46:05
[INFO][2019-02-18 17:46:15,821]||定时任务开始 ByFixedDelay:2019-02-18 17:46:15
[INFO][2019-02-18 17:46:20,825]||定时任务结束 ByFixedDelay:2019-02-18 17:46:20
[INFO][2019-02-18 17:46:30,829]||定时任务开始 ByFixedDelay:2019-02-18 17:46:30
[INFO][2019-02-18 17:46:35,834]||定时任务结束 ByFixedDelay:2019-02-18 17:46:35
我们再改下scheduledTask方法中线程休眠时间,使休眠时间大于定时任务间隔时间Thread.sleep(12000);,然后启动项目,查看运行结果。
[INFO][2019-02-18 17:47:06,871]||定时任务开始 ByFixedDelay:2019-02-18 17:47:06
[INFO][2019-02-18 17:47:18,879]||定时任务结束 ByFixedDelay:2019-02-18 17:47:18
[INFO][2019-02-18 17:47:28,890]||定时任务开始 ByFixedDelay:2019-02-18 17:47:28
[INFO][2019-02-18 17:47:40,896]||定时任务结束 ByFixedDelay:2019-02-18 17:47:40
[INFO][2019-02-18 17:47:50,903]||定时任务开始 ByFixedDelay:2019-02-18 17:47:50
[INFO][2019-02-18 17:48:02,911]||定时任务结束 ByFixedDelay:2019-02-18 17:48:02
[INFO][2019-02-18 17:48:12,917]||定时任务开始 ByFixedDelay:2019-02-18 17:48:12
[INFO][2019-02-18 17:48:24,924]||定时任务结束 ByFixedDelay:2019-02-18 17:48:24
对于fixedDelay 来说,不管业务代码执行时间与定时任务间隔时间熟长熟短,定时任务都会等业务代码执行完成后再开启新一轮定时。
不过,一般大家在使用定时任务时,都是定时任务时间间隔大于业务代码执行时间。
1.4 多说一点
对于固定时间执行的定时任务,比如每天凌晨4点执行,只能使用cron表达式的方式
2. corn表达式
2.1 corn表达式格式
corn表达式格式:秒 分 时 日 月 星期 年(可选)
| 字段名 | 允许的值 | 允许的特殊字符 |
|---|---|---|
| 秒 | 0-59 | , - * / |
| 分 | 0-59 | , - * / |
| 时 | 0-23 | , - * / |
| 日 | 1-31 | , - * ? / L W C |
| 月 | 1-12 或 JAN-DEC | , - * / |
| 星期 | 1-7 或 SUN-SAT | , - * ? / L C # |
| 年(可选) | 空 或 1970-2099 | , - * / |
释义:
1、*:通配符,表示该字段可以接收任意值。
2、? :表示不确定的值,或不关心它为何值,仅在日期和星期中使用,当其中一个设置了条件时,另外一个用"?" 来表示"任何值"。
3、,:表示多个值,附加一个生效的值。
4、-:表示一个指定的范围
5、/:指定一个值的增量值。例n/m表示从n开始,每次增加m
6、L:用在日期表示当月的最后一天,用在星期"L"单独使用时就等于"7"或"SAT",如果和数字联合使用表示该月最后一个星期X。例如,"0L"表示该月最后一个星期日。
7、W:指定离给定日期最近的工作日(周一到周五),可以用"LW"表示该月最后一个工作日。例如,"10W"表示这个月离10号最近的工作日
8、C:表示和calendar联系后计算过的值。例如:用在日期中,"5C"表示该月第5天或之后包括calendar的第一天;用在星期中,"5C"表示这周四或之后包括calendar的第 一天。
9、#:表示该月第几个星期X。例6#3表示该月第三个周五。
2.2 示例值
0 * * * * ? 每分钟触发
0 0 * * * ? 每小时整触发
0 0 4 * * ? 每天凌晨4点触发
0 15 10 * * ? 每天早上10:15触发
*/5 * * * * ? 每隔5秒触发
0 */5 * * * ? 每隔5分钟触发
0 0 4 1 * ? 每月1号凌晨4点触发
0 0 4 L * ? 每月最后一天凌晨3点触发
0 0 3 ? * L 每周星期六凌晨3点触发
0 11,22,33 * * * ? 每小时11分、22分、33分触发
3. 配置定时任务
对于上面那些简单的定时任务,定时任务的corn表达式写死在代码里,如果要改动表达式,需要修改代码,重新打包发布,比较麻烦。因此,我们可以把corn表达式配置在配置文件中,然后程序读取配置,当需要修改表达式时,只需要修改配置文件即可。
application.yml增加配置
demo:
  corn: 0/11 * * * * ?
定时任务
package cn.wbnull.springbootdemo.schedule;

import cn.wbnull.springbootdemo.util.DateUtils;
import cn.wbnull.springbootdemo.util.LoggerUtils;
import org.springframework.scheduling.annotation.Scheduled;
import org.springframework.stereotype.Component;

@Component
public class ScheduledTask {

    @Scheduled(cron = "${demo.corn}")
    public void scheduledTaskByConfig() {
        LoggerUtils.info("定时任务 ByConfig:" + DateUtils.dateFormat());
    }
}
启动项目,运行结果如下
[INFO][2019-02-18 23:47:33,047]||定时任务 ByConfig:2019-02-18 23:47:33
[INFO][2019-02-18 23:47:44,003]||定时任务 ByConfig:2019-02-18 23:47:44
[INFO][2019-02-18 23:47:55,009]||定时任务 ByConfig:2019-02-18 23:47:55
[INFO][2019-02-18 23:48:00,008]||定时任务 ByConfig:2019-02-18 23:48:00
[INFO][2019-02-18 23:48:11,009]||定时任务 ByConfig:2019-02-18 23:48:11
[INFO][2019-02-18 23:48:22,009]||定时任务 ByConfig:2019-02-18 23:48:22
[INFO][2019-02-18 23:48:33,009]||定时任务 ByConfig:2019-02-18 23:48:33
修改application.yml配置
demo:
  corn: 0/23 * * * * ?
启动项目,运行结果如下
[INFO][2019-02-18 23:52:23,089]||定时任务 ByConfig:2019-02-18 23:52:23
[INFO][2019-02-18 23:52:46,008]||定时任务 ByConfig:2019-02-18 23:52:46
[INFO][2019-02-18 23:53:00,009]||定时任务 ByConfig:2019-02-18 23:53:00
[INFO][2019-02-18 23:53:23,002]||定时任务 ByConfig:2019-02-18 23:53:23
[INFO][2019-02-18 23:53:46,009]||定时任务 ByConfig:2019-02-18 23:53:46
定时任务根据配置文件动态变化。
4. 动态修改定时任务
对于有些情况,我们需要在代码中,通过方法动态修改定时任务corn表达式
application.yml配置
demo:
  corn: 0/7 * * * * ?
  cornV2: 0/22 * * * * ?
新建ScheduledTaskV2.java
package cn.wbnull.springbootdemo.schedule;

import cn.wbnull.springbootdemo.util.DateUtils;
import cn.wbnull.springbootdemo.util.LoggerUtils;
import org.springframework.beans.factory.annotation.Value;
import org.springframework.scheduling.annotation.SchedulingConfigurer;
import org.springframework.scheduling.config.ScheduledTaskRegistrar;
import org.springframework.scheduling.support.CronTrigger;
import org.springframework.stereotype.Component;

@Component
public class ScheduledTaskV2 implements SchedulingConfigurer {

    @Value("${demo.corn}")
    private String corn;
    @Value("${demo.cornV2}")
    private String cornV2;

    private int tag = 0;

    @Override
    public void configureTasks(ScheduledTaskRegistrar scheduledTaskRegistrar) {
        scheduledTaskRegistrar.addTriggerTask(() -> {
            LoggerUtils.info("定时任务V2:" + DateUtils.dateFormat());
        }, (triggerContext) -> {
            CronTrigger cronTrigger;
            if (tag % 2 == 0) {
                LoggerUtils.info("定时任务V2动态修改corn表达式:" + corn + "," + DateUtils.dateFormat());
                cronTrigger = new CronTrigger(corn);
                tag++;
            } else {
                LoggerUtils.info("定时任务V2动态修改corn表达式:" + cornV2 + "," + DateUtils.dateFormat());
                cronTrigger = new CronTrigger(cornV2);
                tag++;
            }

            return cronTrigger.nextExecutionTime(triggerContext);
        });
    }
}
启动项目,运行结果如下
[INFO][2019-02-19 00:19:49,011]||定时任务V2:2019-02-19 00:19:49
[INFO][2019-02-19 00:19:49,011]||定时任务V2动态修改corn表达式:0/22 * * * * ?,2019-02-19 00:19:49
[INFO][2019-02-19 00:20:00,007]||定时任务V2:2019-02-19 00:20:00
[INFO][2019-02-19 00:20:00,007]||定时任务V2动态修改corn表达式:0/7 * * * * ?,2019-02-19 00:20:00
[INFO][2019-02-19 00:20:07,006]||定时任务V2:2019-02-19 00:20:07
[INFO][2019-02-19 00:20:07,006]||定时任务V2动态修改corn表达式:0/22 * * * * ?,2019-02-19 00:20:07
[INFO][2019-02-19 00:20:22,008]||定时任务V2:2019-02-19 00:20:22
[INFO][2019-02-19 00:20:22,008]||定时任务V2动态修改corn表达式:0/7 * * * * ?,2019-02-19 00:20:22
[INFO][2019-02-19 00:20:28,010]||定时任务V2:2019-02-19 00:20:28
[INFO][2019-02-19 00:20:28,010]||定时任务V2动态修改corn表达式:0/22 * * * * ?,2019-02-19 00:20:28
[INFO][2019-02-19 00:20:44,003]||定时任务V2:2019-02-19 00:20:44
[INFO][2019-02-19 00:20:44,003]||定时任务V2动态修改corn表达式:0/7 * * * * ?,2019-02-19 00:20:44
[INFO][2019-02-19 00:20:49,004]||定时任务V2:2019-02-19 00:20:49
[INFO][2019-02-19 00:20:49,004]||定时任务V2动态修改corn表达式:0/22 * * * * ?,2019-02-19 00:20:49
[INFO][2019-02-19 00:21:00,011]||定时任务V2:2019-02-19 00:21:00
[INFO][2019-02-19 00:21:00,011]||定时任务V2动态修改corn表达式:0/7 * * * * ?,2019-02-19 00:21:00
[INFO][2019-02-19 00:21:07,011]||定时任务V2:2019-02-19 00:21:07
[INFO][2019-02-19 00:21:07,011]||定时任务V2动态修改corn表达式:0/22 * * * * ?,2019-02-19 00:21:07
成功通过代码动态修改corn表达式且运行结果正确。
5. 并发执行定时任务
回到我们 1. 简单定时任务 中创建的三个定时任务,当时因为@Scheduled默认是不并发执行的,所以我们先注释掉了其他定时任务,分别进行的测试。
那我们实际开发中,确实创建了多个定时任务,且想并发执行时,该怎么做呢?
定时任务类添加注解@EnableAsync,需并发执行的定时任务方法添加注解@Async
新建定时任务类ScheduledTaskV3
package cn.wbnull.springbootdemo.schedule;

import cn.wbnull.springbootdemo.util.DateUtils;
import cn.wbnull.springbootdemo.util.LoggerUtils;
import org.springframework.scheduling.annotation.Async;
import org.springframework.scheduling.annotation.EnableAsync;
import org.springframework.scheduling.annotation.Scheduled;
import org.springframework.stereotype.Component;

@Component
@EnableAsync
public class ScheduledTaskV3 {

    @Scheduled(cron = "0/7 * * * * ?")
    @Async
    public void scheduledTaskV1() {
        LoggerUtils.info("定时任务V3,定时任务1开始:" + DateUtils.dateFormat());
        scheduledTask();
        LoggerUtils.info("定时任务V3,定时任务1结束:" + DateUtils.dateFormat());
    }

    @Scheduled(cron = "0/10 * * * * ?")
    @Async
    public void scheduledTaskV2() {
        LoggerUtils.info("定时任务V3,定时任务2开始:" + DateUtils.dateFormat());
        scheduledTask();
        LoggerUtils.info("定时任务V3,定时任务2结束:" + DateUtils.dateFormat());
    }

    @Scheduled(cron = "0/22 * * * * ?")
    @Async
    public void scheduledTaskV3() {
        LoggerUtils.info("定时任务V3,定时任务3开始:" + DateUtils.dateFormat());
        scheduledTask();
        LoggerUtils.info("定时任务V3,定时任务3结束:" + DateUtils.dateFormat());
    }

    private void scheduledTask() {
        try {
            Thread.sleep(5000);
        } catch (InterruptedException e) {
            e.printStackTrace();
        }
    }
}
启动项目,运行结果如下
[INFO][2019-02-19 00:36:21,077]||定时任务V3,定时任务1开始:2019-02-19 00:36:21
[INFO][2019-02-19 00:36:22,003]||定时任务V3,定时任务3开始:2019-02-19 00:36:22
[INFO][2019-02-19 00:36:26,078]||定时任务V3,定时任务1结束:2019-02-19 00:36:26
[INFO][2019-02-19 00:36:27,006]||定时任务V3,定时任务3结束:2019-02-19 00:36:27
[INFO][2019-02-19 00:36:28,003]||定时任务V3,定时任务1开始:2019-02-19 00:36:28
[INFO][2019-02-19 00:36:30,003]||定时任务V3,定时任务2开始:2019-02-19 00:36:30
[INFO][2019-02-19 00:36:33,003]||定时任务V3,定时任务1结束:2019-02-19 00:36:33
[INFO][2019-02-19 00:36:35,004]||定时任务V3,定时任务1开始:2019-02-19 00:36:35
[INFO][2019-02-19 00:36:35,005]||定时任务V3,定时任务2结束:2019-02-19 00:36:35
[INFO][2019-02-19 00:36:40,003]||定时任务V3,定时任务2开始:2019-02-19 00:36:40
[INFO][2019-02-19 00:36:40,005]||定时任务V3,定时任务1结束:2019-02-19 00:36:40
[INFO][2019-02-19 00:36:42,001]||定时任务V3,定时任务1开始:2019-02-19 00:36:42
[INFO][2019-02-19 00:36:44,003]||定时任务V3,定时任务3开始:2019-02-19 00:36:44
[INFO][2019-02-19 00:36:45,004]||定时任务V3,定时任务2结束:2019-02-19 00:36:45
[INFO][2019-02-19 00:36:47,002]||定时任务V3,定时任务1结束:2019-02-19 00:36:47
[INFO][2019-02-19 00:36:49,002]||定时任务V3,定时任务1开始:2019-02-19 00:36:49
[INFO][2019-02-19 00:36:49,004]||定时任务V3,定时任务3结束:2019-02-19 00:36:49
[INFO][2019-02-19 00:36:50,001]||定时任务V3,定时任务2开始:2019-02-19 00:36:50
定时任务能够并发执行。
The above is the detailed content of How SpringBoot uses Schedule to implement scheduled tasks. For more information, please follow other related articles on the PHP Chinese website!

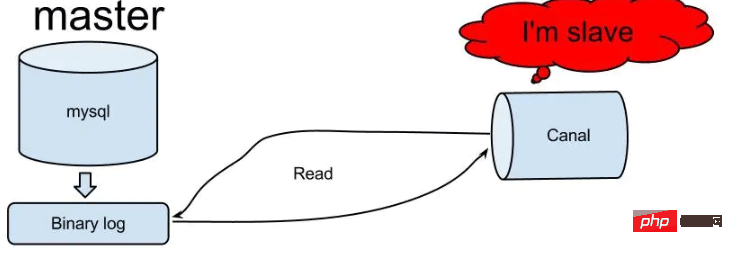 怎么使用SpringBoot+Canal实现数据库实时监控May 10, 2023 pm 06:25 PM
Canal工作原理Canal模拟MySQLslave的交互协议,伪装自己为MySQLslave,向MySQLmaster发送dump协议MySQLmaster收到dump请求,开始推送binarylog给slave(也就是Canal)Canal解析binarylog对象(原始为byte流)MySQL打开binlog模式在MySQL配置文件my.cnf设置如下信息:[mysqld]#打开binloglog-bin=mysql-bin#选择ROW(行)模式binlog-format=ROW#配置My
 Spring Boot怎么使用SSE方式向前端推送数据May 10, 2023 pm 05:31 PM
前言SSE简单的来说就是服务器主动向前端推送数据的一种技术,它是单向的,也就是说前端是不能向服务器发送数据的。SSE适用于消息推送,监控等只需要服务器推送数据的场景中,下面是使用SpringBoot来实现一个简单的模拟向前端推动进度数据,前端页面接受后展示进度条。服务端在SpringBoot中使用时需要注意,最好使用SpringWeb提供的SseEmitter这个类来进行操作,我在刚开始时使用网上说的将Content-Type设置为text-stream这种方式发现每次前端每次都会重新创建接。最
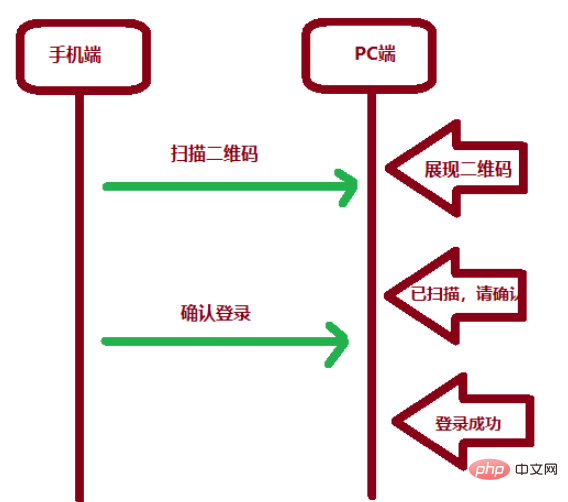 SpringBoot怎么实现二维码扫码登录May 10, 2023 pm 08:25 PM
一、手机扫二维码登录的原理二维码扫码登录是一种基于OAuth3.0协议的授权登录方式。在这种方式下,应用程序不需要获取用户的用户名和密码,只需要获取用户的授权即可。二维码扫码登录主要有以下几个步骤:应用程序生成一个二维码,并将该二维码展示给用户。用户使用扫码工具扫描该二维码,并在授权页面中授权。用户授权后,应用程序会获取一个授权码。应用程序使用该授权码向授权服务器请求访问令牌。授权服务器返回一个访问令牌给应用程序。应用程序使用该访问令牌访问资源服务器。通过以上步骤,二维码扫码登录可以实现用户的快
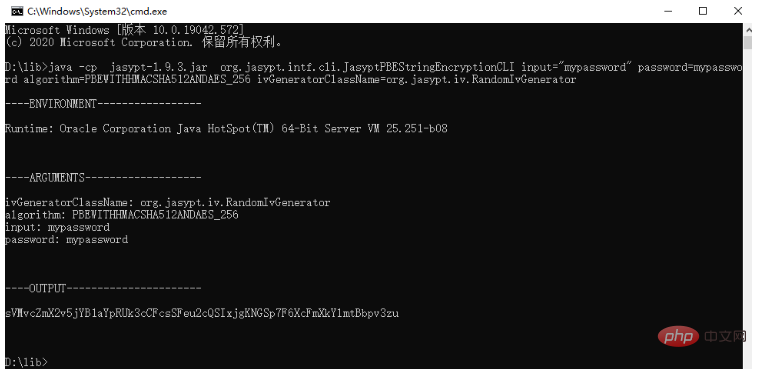 spring boot怎么对敏感信息进行加解密May 10, 2023 pm 02:46 PM
我们使用jasypt最新版本对敏感信息进行加解密。1.在项目pom文件中加入如下依赖:com.github.ulisesbocchiojasypt-spring-boot-starter3.0.32.创建加解密公用类:packagecom.myproject.common.utils;importorg.jasypt.encryption.pbe.PooledPBEStringEncryptor;importorg.jasypt.encryption.pbe.config.SimpleStrin
 SpringBoot/Spring AOP默认动态代理方式是什么May 10, 2023 pm 03:52 PM
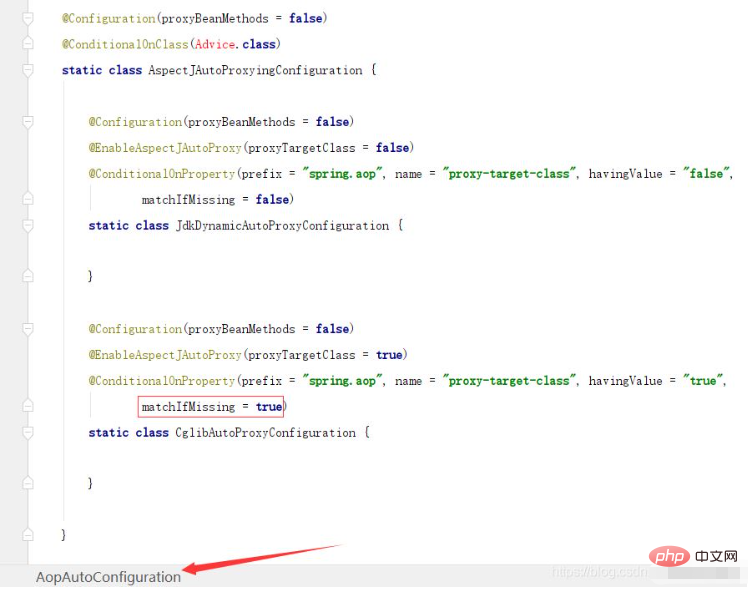
1.springboot2.x及以上版本在SpringBoot2.xAOP中会默认使用Cglib来实现,但是Spring5中默认还是使用jdk动态代理。SpringAOP默认使用JDK动态代理,如果对象没有实现接口,则使用CGLIB代理。当然,也可以强制使用CGLIB代理。在SpringBoot中,通过AopAutoConfiguration来自动装配AOP.2.Springboot1.xSpringboot1.xAOP默认还是使用JDK动态代理的3.SpringBoot2.x为何默认使用Cgl
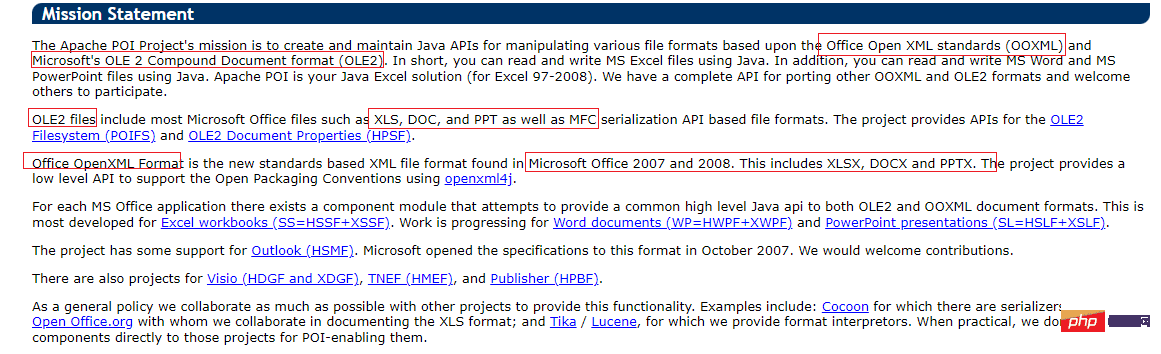 使用Java SpringBoot集成POI实现Word文档导出Apr 21, 2023 pm 12:19 PM
知识准备需要理解ApachePOI遵循的标准(OfficeOpenXML(OOXML)标准和微软的OLE2复合文档格式(OLE2)),这将对应着API的依赖包。什么是POIApachePOI是用Java编写的免费开源的跨平台的JavaAPI,ApachePOI提供API给Java程序对MicrosoftOffice格式档案读和写的功能。POI为“PoorObfuscationImplementation”的首字母缩写,意为“简洁版的模糊实现”。ApachePOI是创建和维护操作各种符合Offic
 springboot怎么整合shiro实现多验证登录功能May 10, 2023 pm 04:19 PM
1.首先新建一个shiroConfigshiro的配置类,代码如下:@ConfigurationpublicclassSpringShiroConfig{/***@paramrealms这儿使用接口集合是为了实现多验证登录时使用的*@return*/@BeanpublicSecurityManagersecurityManager(Collectionrealms){DefaultWebSecurityManagersManager=newDefaultWebSecurityManager();
 Springboot如何实现视频上传及压缩功能May 10, 2023 pm 05:16 PM
一、定义视频上传请求接口publicAjaxResultvideoUploadFile(MultipartFilefile){try{if(null==file||file.isEmpty()){returnAjaxResult.error("文件为空");}StringossFilePrefix=StringUtils.genUUID();StringfileName=ossFilePrefix+"-"+file.getOriginalFilename(


Hot AI Tools

Undresser.AI Undress
AI-powered app for creating realistic nude photos

AI Clothes Remover
Online AI tool for removing clothes from photos.

Undress AI Tool
Undress images for free

Clothoff.io
AI clothes remover

AI Hentai Generator
Generate AI Hentai for free.

Hot Article
Hot Tools

Dreamweaver CS6
Visual web development tools

SecLists
SecLists is the ultimate security tester's companion. It is a collection of various types of lists that are frequently used during security assessments, all in one place. SecLists helps make security testing more efficient and productive by conveniently providing all the lists a security tester might need. List types include usernames, passwords, URLs, fuzzing payloads, sensitive data patterns, web shells, and more. The tester can simply pull this repository onto a new test machine and he will have access to every type of list he needs.

Safe Exam Browser
Safe Exam Browser is a secure browser environment for taking online exams securely. This software turns any computer into a secure workstation. It controls access to any utility and prevents students from using unauthorized resources.

EditPlus Chinese cracked version
Small size, syntax highlighting, does not support code prompt function

mPDF
mPDF is a PHP library that can generate PDF files from UTF-8 encoded HTML. The original author, Ian Back, wrote mPDF to output PDF files "on the fly" from his website and handle different languages. It is slower than original scripts like HTML2FPDF and produces larger files when using Unicode fonts, but supports CSS styles etc. and has a lot of enhancements. Supports almost all languages, including RTL (Arabic and Hebrew) and CJK (Chinese, Japanese and Korean). Supports nested block-level elements (such as P, DIV),

