


Before that, let’s take a look at what effect we want to have:
We want the pictures to automatically switch after a "certain period of time". There are small squares in the lower right corner that look like numbers 1, 2, 3, and 4. These numbers automatically appear based on the number of pictures when the mouse passes over them. The color of the numbers has certain changes;
Let’s take a look at how to implement it.
Step one: write a simple html page first
<!DOCTYPE html PUBLIC "-//W3C//DTD XHTML 1.0 Transitional//EN" "http://www.w3.org/TR/xhtml1/DTD/xhtml1-transitional.dtd">
<html>
<head>
  <meta http-equiv="Content-Type" content="text/html; charset=utf-8" />
  <script type="text/javascript" src="../js/jquery.js" ></script>
  <script type="text/javascript" src="scrollPic.js" ></script>
  <link rel="stylesheet" href="scrollPic.css">
</head>
<body>
  <div class="pic-slider-io">
    <ul>
      <li><img  src="/static/imghwm/default1.png"  data-src="images/1.jpg"  class="lazy" / alt="jQuery realizes the effect of switching pictures in and out_jquery" ></li>
      <li><img  src="/static/imghwm/default1.png"  data-src="images/2.jpg"  class="lazy" / alt="jQuery realizes the effect of switching pictures in and out_jquery" ></li>
      <li><img  src="/static/imghwm/default1.png"  data-src="images/3.jpg"  class="lazy" / alt="jQuery realizes the effect of switching pictures in and out_jquery" ></li>
      <li><img  src="/static/imghwm/default1.png"  data-src="images/4.jpg"  class="lazy" / alt="jQuery realizes the effect of switching pictures in and out_jquery" ></li>
    </ul>
  </div>
</body>
</html>
Page code analysis: First create scrollPic.html, scrollPic.js, scrollPic.css. Without further ado, first create the three basic files required; then introduce them into the html in the head section, where note
src="../js/jquery.js"
The meaning of this code, "../" means to jump out of the upper-level directory, and then search for the jquery.js file in the js folder;
In the html page, we add a div with class 'pic-slider-io' in the body. There is a ul in the div. There are four pictures under the li. Note: The pictures are named in advance, which is 1.jpg. 2.jpg... Convenient for writing scrollPic.js;
First look at the page style that has done nothing at this time:

You can see that the image is tiled on the page in its original size and displayed on the page in the default ul li mode;
Now we're going to put it in the lower left corner;
Step 2: Write css styles to control it
First control the display of div:
.pic-slider-io{
  height : 200px;  //设置div的高为200px;
  width : 800px;  //设置div的宽为800px;
  float : letf;   //float 属性定义元素在哪个方向浮动。以往这个属性总应用于图像,使文本围绕在图像周围,不过在 CSS 中,任何元素都可以浮动。浮动元素会生成一个块级框,而不论它本身是何种元素。
  position : relative;  //position 属性规定元素的定位类型.这个属性定义建立元素布局所用的定位机制。任何元素都可以定位,不过绝对或固定元素会生成一个块级框,而不论该元素本身是什么类型。相对定                //位元素会相对于它在正常流中的默认位置偏移。relative 生成相对定位的元素,相对于其正常位置进行定位。
  overflow : hidden; //overflow 属性规定当内容溢出元素框时发生的事情.hidden 内容会被修剪,并且其余内容是不可见的。
}
Take a look at the page style:

See that all the images are together. The image itself is larger than the width and height of the div, so overflow: hidden will not display other overflows. However, this is definitely not what we want, so don’t rush to continue;
Then, we now control the style of ul:
.pic-slider-io ul{
  margin : 0px; //设置上下左右的外边距都为0;
  padding : 0px;//设置上下左右的内边距都为0;  注意:margin,padding的设置是:上,右,下,左;如margin : 2px,4px,5px,8px;分别对应的是上,右,下,左;
  height : auto;  //自适应高度,浏览器自动计算
  width : 100%;  //宽度为100%
  list-style-type : none;     //把li的点去掉
  float : left;
  display : block;  //此元素将显示为块级元素,此元素前后会带有换行符
  position : absolute;//生成绝对定位的元素,相对于 static 定位以外的第一个父元素进行定位。
  top : 0;
  left : 0;
  z-index : 98;//z-index 属性设置元素的堆叠顺序。拥有更高堆叠顺序的元素总是会处于堆叠顺序较低的元素的前面。
}
At this time, the image will no longer be displayed. What you see on the page is that the dot in the upper left corner has been removed;
Again, we control the style of li:
.pic-slider-io ul li {
  height: auto;
  width: 100%;
  float: left;
  padding: 0px;
  margin: 0px;
  overflow: hidden;
  z-index:1; //这个li层就比ul那个叠层更高
}
The setting of this style is mainly to make the stack of li higher than ul, which is equivalent to floating on top of ul;
Finally, let’s take a look at the style of img:
.pic-slider-io ul li img{
  width: 100%;
   z-index:1;//设置图片和li在同一层上,这个应该没问题吧
}
Now let’s see what the page looks like:

See, after styling, the entire image is displayed;
Step 3: Write scrollPic.js
When writing js, we need to add the picture number display in the lower right corner. We write the css to be added in advance as follows:
.pic-page-btn {//这是在父div中的子div样式,用于显示在右下角的数字承载模块
  float: left;
  width: auto;
  height: 30px;
  position: absolute;
  bottom: 20px;
  right: 20px;
  z-index: 99; //他的叠层比父级div还要高,把这个按钮样式放在图片之上
}
.pic-page-btn span{ //这个是设置子div的数字样式
  height: 30px;
  width: 30px;
  background-color: #999;
  display: block;
  float: left;
  line-height: 30px;
  text-align: center;
  color: #FFF;
  margin-right: 10px;
  cursor:pointer;
}
.pic-page-btn .current {//这是将要设置鼠标滑过改变其背景颜色
  background-color: #1D5D76;
}
Next, let’s take a look at the writing of js. This is not a video, so I won’t explain it step by step. I have commented all the explanations in the js code
js code:
$(function(){
  $.scrollPic = function (options){ //定义了一个scrollPic函数,有一个传参,用于调用;
     /************************开始整个默认插件参数讲解*******************************/
    //整个defaults以花括号包含的是默认的参数,调用此插件的只需要修改ele,Time,autoscroll即可;
    var defaults={
      ele: '.pic-slider-io',   //pic-slider-io是一个class,css中定义了其样式;
      Time : '2000',      //Time是定义了滑动的时间;
      autoscroll : true    //autoscroll设为true表示自动切换图片;
    };
    /************************结束整个默认插件参数讲解*******************************/

    //$.extend({},defaults, option)有{}主要是为了创建一个新对象,保留对象的默认值。
    var opts = $.extend({}, defaults, options);

    //$(opts.ele)可以理解为取这个执行,与$('.class1').click();类似表示,然后理解为赋值给PicObject;
    //或者这样理解,$(opts.ele)就是$('.pic-slider-io'),只不过(.pic-slider-io是个class作为参数,所以要(opts.ele)来表示);
    var PicObject = $(opts.ele);

    //PicObject.find('ul'),这个可以理解成$(opts.ele).find('ul'),因为opts.ele其实就是取得的一个class,
    //相当于$('.pic-slider-io').find('ul');然后赋值给scrollList,所以整个就用scrollList来表示他;
    var scrollList = PicObject.find('ul');

    //同理scrollList.find('li')可以表示为$('.pic-slider-io').find('ul').find('li');所以这个是一层一层来查找的如果你看到html就会更加清晰;
    var listLi = scrollList.find('li');

    //图片的命名是1.jpg,2.jpg,这样的,index是用来表示图片的名字的初始化赋值为0;
    var index = 0;

    //这是定义一个picTimer(自动切换函数)的函数;
    var picTimer;

    //一个li中包含一个图片,所以这是查找有多少个图片,赋值给len;
    var len = PicObject.find('li').length;

    /*****************开始自动切换函数************************/
    function picTimer(){
      showPic(index);//调用showPic(index)函数(在下面)
      index++;
      if(index == len){//如果index的值等于len,就表示从第一张图片到最后一张图片切换完了,然后是index赋值为0重新开始
        index=0;
      }
    }
    /*****************结束自动切换函数************************/


    //setInterval() 方法可按照指定的周期(以毫秒计)来调用函数或计算表达式。
    //setInterval() 方法会不停地调用函数,直到 clearInterval() 被调用或窗口被关闭
    //此判断为如果autoscroll为true,则不停的调用picTimer函数,以Time的速度调用
    if(opts.autoscroll){
      var time = setInterval(picTimer,opts.Time);
    }


    /*****************开始动画函数************************/
    function showPic(index){//定义动画函数
      //listLi是找到第一个li,然后隐藏他,listLi在var listLi = scrollList.find('li');已经介绍了
      listLi.hide();
      //fadeIn() 方法使用淡入效果来显示被选元素,假如该元素是隐藏的。siblings()方法是遍历。
      listLi.eq(index).fadeIn(500).siblings().hide();
      //找到paging对应的css样式,如果与当前的index一致,则添加class为current的css样式,否则就移除。
      PicObject.find(paging).eq(index).addClass('current').siblings().removeClass('current');
    }
    /*****************结束动画函数************************/

    //这是在class为pic-slider-io的div中添加一个class为pic-page-btn的子div。
    //主要是设置右下角数字的承载
    PicObject.append('<div class="pic-page-btn"></div>');

    //在这个class为pic-page-btn的子div中添加图片张数对应的数字个数,1,2,3,,,,,
    //从这可以看出来,数字不是自己一个个添得,是根据li的个数,也就是图片的个数自动生成的
    for( i=1;i<=len;i++){
      PicObject.find('.pic-page-btn').append('<span>'+i+'</span>');
    }

    //这个就是和上面讲listLi一样的
    var paging = PicObject.find('.pic-page-btn span');

    //为相应的右下角的数字改变其背景颜色
    paging.eq(index).addClass('current');

  }
});
Here we are almost done switching images,
Then let’s call the default one in html and take a look:
Calling method:
<script type="text/javascript">
$(function(){
    $.scrollPic();
  });
</script>
Look at the interface display:

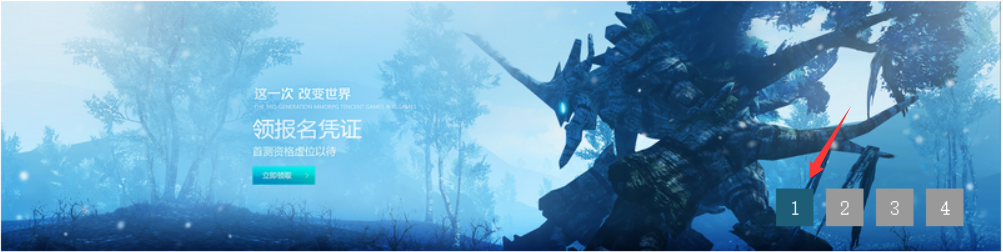
Look at the arrow, indicating that the picture can be automatically switched;
But we also have the ability to switch pictures when the mouse slides over 1, 2, 3, and 4 in the lower right corner, so we just add an event to js:
  //鼠标经过1、2、3、4的效果
    PicObject.find(paging).mouseover(function(){
      index = PicObject.find(paging).index($(this));
      showPic(index); //调用showPic(index)函数。
    });
    //鼠标经过1、2、3、4的效果

    //清除计时器
    //当鼠标悬浮在1,2,3,4上面的时候,就相当于要切换图片了
    //所以我们就要清除计时器,重新来过了
    PicObject.hover(function(){
      clearInterval(time);//这个是相对于setInterva()的;
    },function(){
      if(opts.autoscroll){
        time = setInterval(picTimer,opts.Time);
      }else{
        clearInterval(time);
      }
    });
Add this code to js, don’t say where to add it! Add to
paging.eq(index).addClass('current');
It’ll be fine later;
In this way, the entire image switching plug-in is completed;
If you need to call a function, you can modify ele, Timer, autoscroll.
Take a look at using the plugin with parameters:
<script type="text/javascript">
 $(function(){
    $.scrollPic({
      ele: '.pic-slider-io',  //插件应用div
      Time:'3000',     //自动切换时间
      autoscroll:true,    //设置是否自动渐变
   });
  });
</script>
Okay, the description of the entire plug-in is complete. I hope everyone can learn from it. If there are any shortcomings, I hope you can understand! (Finally, when writing the entire js, it is best to add a semicolon at the front of $(function(){}); to prevent conflicts with other js)

 jquery实现多少秒后隐藏图片Apr 20, 2022 pm 05:33 PM
实现方法:1、用“$("img").delay(毫秒数).fadeOut()”语句,delay()设置延迟秒数;2、用“setTimeout(function(){ $("img").hide(); },毫秒值);”语句,通过定时器来延迟。
 jquery怎么修改min-height样式Apr 20, 2022 pm 12:19 PM
修改方法:1、用css()设置新样式,语法“$(元素).css("min-height","新值")”;2、用attr(),通过设置style属性来添加新样式,语法“$(元素).attr("style","min-height:新值")”。
 axios与jquery的区别是什么Apr 20, 2022 pm 06:18 PM
区别:1、axios是一个异步请求框架,用于封装底层的XMLHttpRequest,而jquery是一个JavaScript库,只是顺便封装了dom操作;2、axios是基于承诺对象的,可以用承诺对象中的方法,而jquery不基于承诺对象。
 jquery怎么在body中增加元素Apr 22, 2022 am 11:13 AM
增加元素的方法:1、用append(),语法“$("body").append(新元素)”,可向body内部的末尾处增加元素;2、用prepend(),语法“$("body").prepend(新元素)”,可向body内部的开始处增加元素。
 jquery中apply()方法怎么用Apr 24, 2022 pm 05:35 PM
在jquery中,apply()方法用于改变this指向,使用另一个对象替换当前对象,是应用某一对象的一个方法,语法为“apply(thisobj,[argarray])”;参数argarray表示的是以数组的形式进行传递。
 jquery怎么删除div内所有子元素Apr 21, 2022 pm 07:08 PM
删除方法:1、用empty(),语法“$("div").empty();”,可删除所有子节点和内容;2、用children()和remove(),语法“$("div").children().remove();”,只删除子元素,不删除内容。
 jquery怎么去掉只读属性Apr 20, 2022 pm 07:55 PM
去掉方法:1、用“$(selector).removeAttr("readonly")”语句删除readonly属性;2、用“$(selector).attr("readonly",false)”将readonly属性的值设置为false。
 jquery on()有几个参数Apr 21, 2022 am 11:29 AM
on()方法有4个参数:1、第一个参数不可省略,规定要从被选元素添加的一个或多个事件或命名空间;2、第二个参数可省略,规定元素的事件处理程序;3、第三个参数可省略,规定传递到函数的额外数据;4、第四个参数可省略,规定当事件发生时运行的函数。


Hot AI Tools

Undresser.AI Undress
AI-powered app for creating realistic nude photos

AI Clothes Remover
Online AI tool for removing clothes from photos.

Undress AI Tool
Undress images for free

Clothoff.io
AI clothes remover

AI Hentai Generator
Generate AI Hentai for free.

Hot Article
Hot Tools

Zend Studio 13.0.1
Powerful PHP integrated development environment

SublimeText3 Chinese version
Chinese version, very easy to use

SublimeText3 Linux new version
SublimeText3 Linux latest version

Notepad++7.3.1
Easy-to-use and free code editor

Dreamweaver CS6
Visual web development tools

