 Java
Java javaTutorial
 How to solve the problem of using SpringBoot ApplicationListener event listening interface
Let’s reproduce the problem. Look at the code below to see if there is a problem and how to solve it:
@RequestMapping("verify")
@RestController
@DependsOn({"DingAppInfoService","CloudChatAppInfoService"})
public class LoginAction {
    @Qualifier("ElderSonService")
    @Autowired
    private ElderSonService elderSonService;
    @Qualifier("EmployeeService")
    @Autowired
    private EmployeeService employeeService;
    @Qualifier("UserThreadPoolTaskExecutor")
    @Autowired
    private ThreadPoolTaskExecutor userThreadPoolTaskExecutor;
    private static AuthRequest ding_request = null;
    private static RongCloud cloud_chat = null;
    private static TokenResult register = null;
    private static final ThreadLocal<String> USER_TYPE = new ThreadLocal<>();
    /**
     * 注意不能在bean的生命周期方法上添注@CheckAppContext注解
     */
    @PostConstruct
    public void beforeVerifySetContext() {
        AppContext.fillLoginContext();
        Assert.hasText(AppContext.getAppLoginDingId(), "初始化app_login_ding_id错误");
        Assert.hasText(AppContext.getAppLoginDingSecret(), "初始化app_login_ding_secret错误");
        Assert.hasText(AppContext.getAppLoginReturnUrl(), "初始化app_login_return_url错误");
        Assert.hasText(AppContext.getCloudChatKey(), "初始化cloud_chat_key错误");
        Assert.hasText(AppContext.getCloudChatSecret(), "初始化cloud_chat_secret错误");
        if (!(StringUtils.hasText(AppContext.getCloudNetUri()) || StringUtils.hasText(AppContext.getCloudNetUriReserve()))) {
            throw new IllegalArgumentException("初始化cloud_net_uri与cloud_net_uri_reserve错误");
        }
        ding_request = new AuthDingTalkRequest(
                AuthConfig.builder().
                        clientId(AppContext.getAppLoginDingId()).
                        clientSecret(AppContext.getAppLoginDingSecret()).
                        redirectUri(AppContext.getAppLoginReturnUrl()).build());
        cloud_chat = RongCloud.getInstance(AppContext.getCloudChatKey(), AppContext.getCloudChatSecret());
    }
.....以下API方法无所影响......
}
What may be puzzling is the code of the initialization method in the controller component:
    public static void fillLoginContext() {
        DingAppInfo appInfo = SpringContextHolder.getBean(DingAppInfoService.class).findAppInfo(APP_CODE);
        setDingVerifyInfo(appInfo);
        CloudChatAppInfo cloudChatAppInfo = SpringContextHolder.getBean(CloudChatAppInfoService.class).findAppInfo(APP_CODE);
        setCloudChatInfo(cloudChatAppInfo);
    }
   public static void setDingVerifyInfo(DingAppInfo dingAppInfo){
        if (dingAppInfo.checkKeyWordIsNotNull(dingAppInfo)) {
            put(APP_LOGIN_DING_ID, dingAppInfo.getApp_id());
            put(APP_LOGIN_DING_SECRET, dingAppInfo.getApp_secret());
            put(APP_LOGIN_RETURN_URL, dingAppInfo.getApp_return_url());
        }
    }
    public static void setCloudChatInfo(CloudChatAppInfo cloudChatAppInfo){
        if (cloudChatAppInfo.checkKeyWordIsNotNull(cloudChatAppInfo)){
            put(CLOUD_CHAT_KEY,cloudChatAppInfo.getCloud_key());
            put(CLOUD_CHAT_SECRET,cloudChatAppInfo.getCloud_secret());
            put(CLOUD_NET_URI,cloudChatAppInfo.getCloud_net_uri());
            put(CLOUD_NET_URI_RESERVE,cloudChatAppInfo.getCloud_net_uri_reserve());
        }
    }
You can find here that actually pouring some project customized data into the local thread ThreadLocal
Solution idea (actually this is not the solution, but it can also be done at the cost of high performance):
Design a listener and a publisher in the method of request entry Perform aspect processing. The aspect checks the AppContext object data. If it is empty, the event will be published. If it is not empty, enter the method:
Event prototype:
public class AppContextStatusEvent extends ApplicationEvent {
    public AppContextStatusEvent(Object source) {
        super(source);
    }
    public AppContextStatusEvent(Object source, Clock clock) {
        super(source, clock);
    }
}
Listener:
@Component
public class AppContextListener implements ApplicationListener<AppContextStatusEvent> {
    @Override
    public void onApplicationEvent(AppContextStatusEvent event) {
        if ("FillAppContext".equals(event.getSource())) {
            AppContext.fillLoginContext();
        } else if ("CheckAppContextLogin".equals(event.getSource())) {
            boolean checkContext = AppContext.checkLoginContext();
            if (!checkContext) {
                AppContext.fillLoginContext();
            }
        }
    }
}
Publisher (aspect class):
@Aspect
@Component("AppContextAopAutoSetting")
public class AppContextAopAutoSetting {
    @Before("@annotation(com.lww.live.ApplicationListener.CheckAppContextLogin)")
    public void CheckContextIsNull(JoinPoint joinPoint){
        System.out.println("-----------aop---------CheckAppContextLogin---------start-----");
        MethodSignature signature = (MethodSignature) joinPoint.getSignature();
        boolean value = signature.getMethod().getAnnotation(CheckAppContextLogin.class).value();
        if (value){
            boolean checkContext = AppContext.checkLoginContext();
            if (!checkContext){
                SpringContextHolder.pushEvent(new AppContextStatusEvent("FillAppContext"));
            }
        }
    }
    @After("@annotation(com.lww.live.ApplicationListener.CheckAppContextLogin)")
    public void CheckContextIsNull(){
        System.out.println("-----------aop---------CheckAppContextLogin---------end-----");
        SpringContextHolder.pushEvent(new AppContextStatusEvent("CheckAppContextLogin"));
    }
}
Then the AOP aspect class captures the annotation:
@Inherited
@Documented
@Target(ElementType.METHOD)
@Retention(RetentionPolicy.RUNTIME)
public @interface CheckAppContextLogin {
    boolean value() default false;
    String info() default "";
}
It is not difficult to find that we check first in the pre- and post-enhancement methods of the aspect. AppContext data integrity, and then fill in the data. In this way, it can be achieved if we annotate @CheckAppContextLogin on every request method. However, the problem is that other data except the filled methods are too difficult to maintain, the cost of aspect hijacking agents is too high, and the frequency of checking data is too high.
Correct solution:
Divide according to the business function of the data, because it mainly realizes the filling of two objects. Even if these data are lost, the member variables of the same controller component They are all the same object, and they are all initialized during initialization, so subsequent switching requests will not affect their ability to implement business:
 private static AuthRequest ding_request = null;
 private static RongCloud cloud_chat = null;
We can ask the front end to pass us the current user in the interceptor The user type and unique identifier are used to encapsulate the user-customized data for each request (to reduce the method chain library check operation called within the request):
public boolean preHandle(HttpServletRequest request, HttpServletResponse response, Object handler) throws Exception {
        String token = (String) request.getSession().getAttribute("token");
        String user_type = (String) request.getSession().getAttribute("user_type");
        if (StringUtils.hasText(token) && StringUtils.hasText(user_type)) {
            Context context = new Context();
            if (Objects.equals(user_type, "elder_son")) {
                ElderSon elderSon = elderSonService.getElderSonByElderSonId(token);
                context.setContextByElderSon(elderSon);
                return true;
            } else if (Objects.equals(user_type, "employee")) {
                Employee employee = employeeService.getEmployeeById(token);
                context.setContextByEmployee(employee);
                return true;
            }
        } else if (StringUtils.hasText(user_type)) {
            response.sendRedirect("/verify/login?user_type=" + user_type);
            return false;
        }
        return false;
    }
Finally, don’t forget to remove the ThreadLocal reference:
 @Override
    public void afterCompletion(HttpServletRequest request, HttpServletResponse response, Object handler, Exception ex) throws Exception {
        AppContext.clear();
        HandlerInterceptor.super.afterCompletion(request, response, handler, ex);
    }
So the actual scenario is actually solved, the core is the business, and the code simplicity is just an incidental requirement.
The above is the detailed content of How to solve the problem of using SpringBoot ApplicationListener event listening interface. For more information, please follow other related articles on the PHP Chinese website!
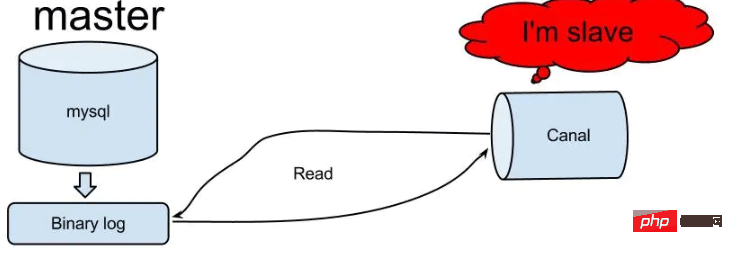 怎么使用SpringBoot+Canal实现数据库实时监控May 10, 2023 pm 06:25 PM
Canal工作原理Canal模拟MySQLslave的交互协议,伪装自己为MySQLslave,向MySQLmaster发送dump协议MySQLmaster收到dump请求,开始推送binarylog给slave(也就是Canal)Canal解析binarylog对象(原始为byte流)MySQL打开binlog模式在MySQL配置文件my.cnf设置如下信息:[mysqld]#打开binloglog-bin=mysql-bin#选择ROW(行)模式binlog-format=ROW#配置My
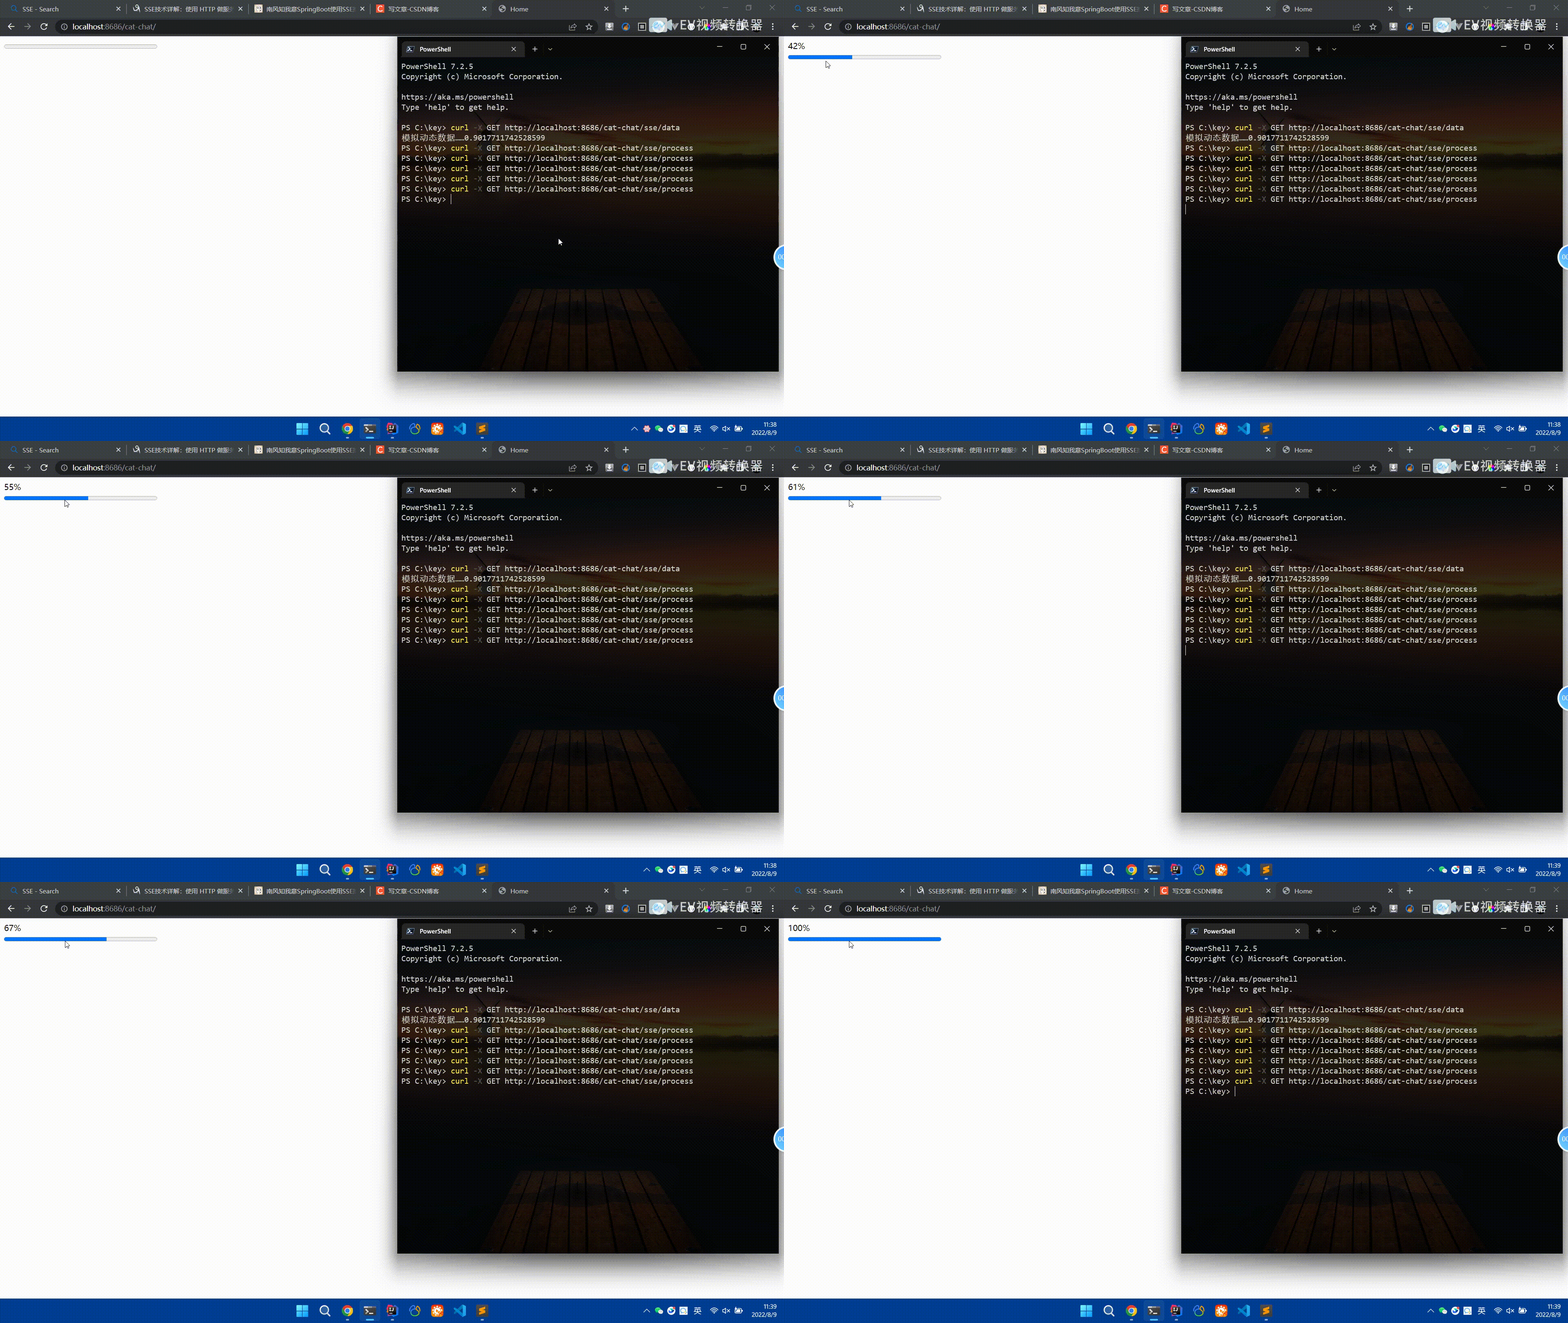 Spring Boot怎么使用SSE方式向前端推送数据May 10, 2023 pm 05:31 PM
前言SSE简单的来说就是服务器主动向前端推送数据的一种技术,它是单向的,也就是说前端是不能向服务器发送数据的。SSE适用于消息推送,监控等只需要服务器推送数据的场景中,下面是使用SpringBoot来实现一个简单的模拟向前端推动进度数据,前端页面接受后展示进度条。服务端在SpringBoot中使用时需要注意,最好使用SpringWeb提供的SseEmitter这个类来进行操作,我在刚开始时使用网上说的将Content-Type设置为text-stream这种方式发现每次前端每次都会重新创建接。最
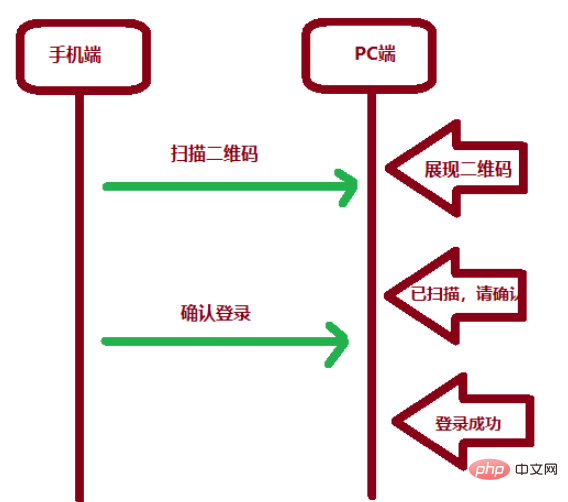 SpringBoot怎么实现二维码扫码登录May 10, 2023 pm 08:25 PM
一、手机扫二维码登录的原理二维码扫码登录是一种基于OAuth3.0协议的授权登录方式。在这种方式下,应用程序不需要获取用户的用户名和密码,只需要获取用户的授权即可。二维码扫码登录主要有以下几个步骤:应用程序生成一个二维码,并将该二维码展示给用户。用户使用扫码工具扫描该二维码,并在授权页面中授权。用户授权后,应用程序会获取一个授权码。应用程序使用该授权码向授权服务器请求访问令牌。授权服务器返回一个访问令牌给应用程序。应用程序使用该访问令牌访问资源服务器。通过以上步骤,二维码扫码登录可以实现用户的快
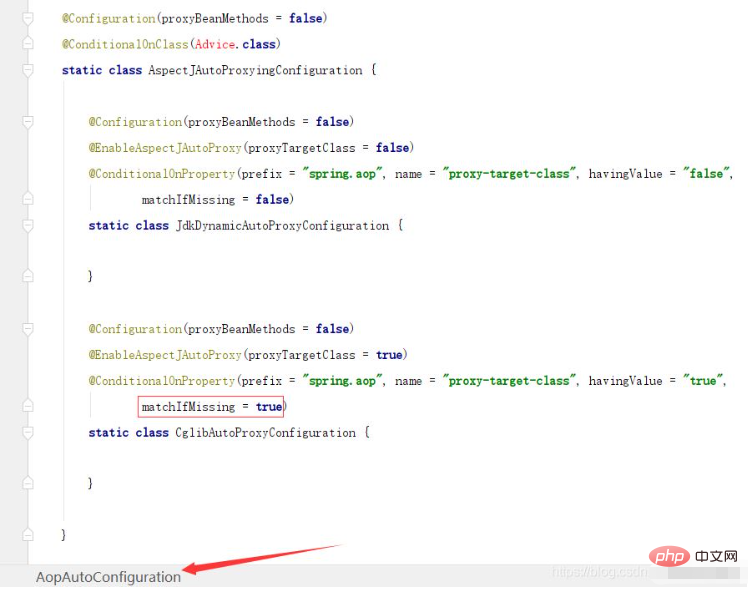 SpringBoot/Spring AOP默认动态代理方式是什么May 10, 2023 pm 03:52 PM
1.springboot2.x及以上版本在SpringBoot2.xAOP中会默认使用Cglib来实现,但是Spring5中默认还是使用jdk动态代理。SpringAOP默认使用JDK动态代理,如果对象没有实现接口,则使用CGLIB代理。当然,也可以强制使用CGLIB代理。在SpringBoot中,通过AopAutoConfiguration来自动装配AOP.2.Springboot1.xSpringboot1.xAOP默认还是使用JDK动态代理的3.SpringBoot2.x为何默认使用Cgl
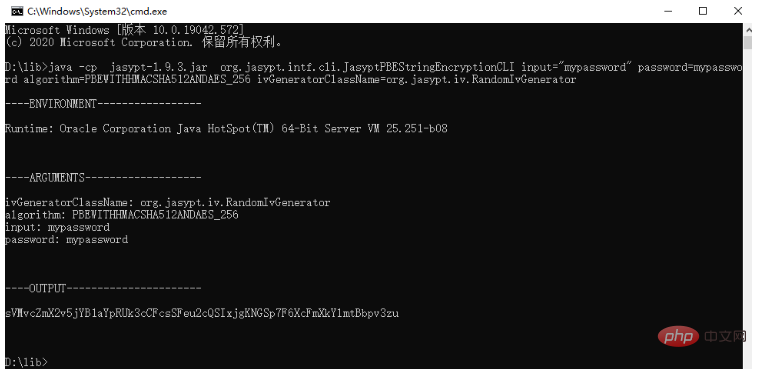 spring boot怎么对敏感信息进行加解密May 10, 2023 pm 02:46 PM
我们使用jasypt最新版本对敏感信息进行加解密。1.在项目pom文件中加入如下依赖:com.github.ulisesbocchiojasypt-spring-boot-starter3.0.32.创建加解密公用类:packagecom.myproject.common.utils;importorg.jasypt.encryption.pbe.PooledPBEStringEncryptor;importorg.jasypt.encryption.pbe.config.SimpleStrin
 使用Java SpringBoot集成POI实现Word文档导出Apr 21, 2023 pm 12:19 PM
知识准备需要理解ApachePOI遵循的标准(OfficeOpenXML(OOXML)标准和微软的OLE2复合文档格式(OLE2)),这将对应着API的依赖包。什么是POIApachePOI是用Java编写的免费开源的跨平台的JavaAPI,ApachePOI提供API给Java程序对MicrosoftOffice格式档案读和写的功能。POI为“PoorObfuscationImplementation”的首字母缩写,意为“简洁版的模糊实现”。ApachePOI是创建和维护操作各种符合Offic
 springboot怎么整合shiro实现多验证登录功能May 10, 2023 pm 04:19 PM
1.首先新建一个shiroConfigshiro的配置类,代码如下:@ConfigurationpublicclassSpringShiroConfig{/***@paramrealms这儿使用接口集合是为了实现多验证登录时使用的*@return*/@BeanpublicSecurityManagersecurityManager(Collectionrealms){DefaultWebSecurityManagersManager=newDefaultWebSecurityManager();
 SpringBoot项目打包发布到外部tomcat遇到的问题怎么解决May 10, 2023 pm 05:49 PM
先说遇到问题的情景:初次尝试使用springboot框架写了个小web项目,在IntellijIDEA中能正常启动运行。使用maven运行install,生成war包,发布到本机的tomcat下,出现异常,主要的异常信息是.......LifeCycleException。经各种搜索,找到答案。springboot因为内嵌tomcat容器,所以可以通过打包为jar包的方法将项目发布,但是如何将springboot项目打包成可发布到tomcat中的war包项目呢?1.既然需要打包成war包项目,首


Hot AI Tools

Undresser.AI Undress
AI-powered app for creating realistic nude photos

AI Clothes Remover
Online AI tool for removing clothes from photos.

Undress AI Tool
Undress images for free

Clothoff.io
AI clothes remover

AI Hentai Generator
Generate AI Hentai for free.

Hot Article

Hot Tools

Dreamweaver CS6
Visual web development tools

ZendStudio 13.5.1 Mac
Powerful PHP integrated development environment

Atom editor mac version download
The most popular open source editor

SublimeText3 Mac version
God-level code editing software (SublimeText3)

Safe Exam Browser
Safe Exam Browser is a secure browser environment for taking online exams securely. This software turns any computer into a secure workstation. It controls access to any utility and prevents students from using unauthorized resources.


