


Overview
List animation and status animation are both ways to increase user experience. When adding data or removing data from a list, if you add it directly, The sudden display is a bit abrupt, and the user may not know that data has been added at this time. The same is true for removing data from the list. The user may not know which piece of data has been removed. Interesting animations are very attractive and can help users focus on new and removed data, so adding animations can improve the user experience. This is list animation, and state animation refers to the change from one state to another. If you change it directly, it will look stiff, but it will be much better if you add animation to slowly transition.
Example analysis
List animation
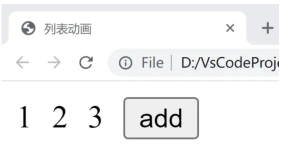
As shown in the picture above, we want to display a list of numbers. There is a button on the right, click The button will perform an animation to increase the number. The code is as follows:
<!DOCTYPE html>
<html lang="en">
<head>
<meta charset="UTF-8">
<meta http-equiv="X-UA-Compatible" content="IE=edge">
<meta name="viewport" content="width=device-width, initial-scale=1.0">
<title>列表动画</title>
<style>
.list-item{
display: inline-block;
margin-right: 10px;
}
.v-enter-from{
opacity: 0;
transform: translateY(30px);
}
.v-enter-active{
transition: all 1s ease-in;
}
.v-enter-to{
opacity: 1;
transform: translateY(0px);
}
.v-move{
transition: 2.5s ease-in;
}
</style>
<script src="https://unpkg.com/vue@next"></script>
</head>
<body>
<div id="root"></div>
</body>
<script>
const app = Vue.createApp({
data() {
return {
list:[1,2,3]
}
},
methods: {
handleClick(){
this.list.unshift(this.list.length+1);
}
},
template:
`
<div>
<transition-group>
<span class="list-item" v-for = "item in list" :key="item">{{item}}</span>
</transition-group>
<button @click="handleClick">add</button>
</div>
`
});
const vm = app.mount('#root');
</script> We first use CSS to define the animation effect of the list. This effect is similar to the animation definition mentioned before. I won’t go into details here. After defining the animation, we use a span displays our list of numbers, and then the most important thing is that we use the <transition-group></transition-group> tag to wrap the part we want to animate. When we click the button, the js function is executed to add a number to the list with the length of the list plus one. Readers can view the animation effect by running it.
State animation

State animation is relatively simple, that is, adding some transition values from one state to another, mainly controlling the content through data. Display, for example, changing from 1 to 10. If 1 directly changes to 10, it will look very stiff, but adding other numbers in the middle, such as 2, 3, 4... and finally changing to 10 will be much better. Code As follows:
<!DOCTYPE html>
<html lang="en">
<head>
<meta charset="UTF-8">
<meta http-equiv="X-UA-Compatible" content="IE=edge">
<meta name="viewport" content="width=device-width, initial-scale=1.0">
<title>状态动画</title>
<script src="https://unpkg.com/vue@next"></script>
</head>
<body>
<div id="root"></div>
</body>
<script>
// 状态动画:通过数据控制内容的展示
const app = Vue.createApp({
data() {
return {
number:1,
animateNumber: 1
}
},
methods: {
handleClick(){
this.number =10;
if(this.animateNumber<this.number){
const animation = setInterval(()=>{
this.animateNumber += 1;
if(this.animateNumber === 10){
clearInterval(animation)
}
},100);
}
}
},
template:
`
<div>
<div>{{animateNumber}}</div>
<button @click="handleClick">do</button>
</div>
`
});
const vm = app.mount('#root');
</script>The list animation is relatively simple. When we click the execute button, we use the js function to modify the currently displayed value every 100 milliseconds until the value becomes the value of the final desired state.
The above is the detailed content of How to apply Vue3 list animation and state animation. For more information, please follow other related articles on the PHP Chinese website!

 分享两个可以绘制 Flowable 流程图的Vue前端库Sep 07, 2022 pm 07:59 PM
前端有没有现成的库,可以直接用来绘制 Flowable 流程图的?下面本篇文章就跟小伙伴们介绍一下这两个可以绘制 Flowable 流程图的前端库。
 vue是前端css框架吗Aug 26, 2022 pm 07:37 PM
vue不是前端css框架,而是前端JavaScript框架。Vue是一套用于构建用户界面的渐进式JS框架,是基于MVVM设计模式的前端框架,且专注于View层。Vue.js的优点:1、体积小;2、基于虚拟DOM,有更高的运行效率;3、双向数据绑定,让开发者不用再去操作DOM对象,把更多的精力投入到业务逻辑上;4、生态丰富、学习成本低。
 聊聊Vue3+qrcodejs如何生成二维码并添加文字描述Aug 02, 2022 pm 09:19 PM
Vue3如何更好地使用qrcodejs生成二维码并添加文字描述?下面本篇文章给大家介绍一下Vue3+qrcodejs生成二维码并添加文字描述,希望对大家有所帮助。


 手把手带你了解VUE响应式原理Aug 26, 2022 pm 08:41 PM
本篇文章我们来了解 Vue2.X 响应式原理,然后我们来实现一个 vue 响应式原理(写的内容简单)实现步骤和注释写的很清晰,大家有兴趣可以耐心观看,希望对大家有所帮助!


Hot AI Tools

Undresser.AI Undress
AI-powered app for creating realistic nude photos

AI Clothes Remover
Online AI tool for removing clothes from photos.

Undress AI Tool
Undress images for free

Clothoff.io
AI clothes remover

AI Hentai Generator
Generate AI Hentai for free.

Hot Article
Hot Tools

Dreamweaver CS6
Visual web development tools

ZendStudio 13.5.1 Mac
Powerful PHP integrated development environment

Atom editor mac version download
The most popular open source editor

SublimeText3 Mac version
God-level code editing software (SublimeText3)

Safe Exam Browser
Safe Exam Browser is a secure browser environment for taking online exams securely. This software turns any computer into a secure workstation. It controls access to any utility and prevents students from using unauthorized resources.

