Home >Backend Development >Python Tutorial >Python Web3 Development: Deploying Smart Contracts with Brownie
Python Web3 Development: Deploying Smart Contracts with Brownie
- WBOYWBOYWBOYWBOYWBOYWBOYWBOYWBOYWBOYWBOYWBOYWBOYWBforward
- 2023-05-19 17:34:062030browse

Python is one of the most versatile programming languages: from researchers running their test models to developers using it in heavy production environments, in almost every possible technology domain There are use cases. In today’s guide, we’ll take a look at Brownie, a Python-based tool for writing and deploying smart contracts.
Preparation
- Install Python3
- Ethereum node
- Text editor
- Terminal
What is Brownie?
Smart contract development is mainly dominated by JavaScript-based libraries such as web3.js, ethers.js, Truffle and Hardhat. Python is a general-purpose, highly used language that can also be used for smart contract/web3 development; web3.py is a compelling Python library that caters to web3 needs. The Brownie framework is built on top of web3.py.
Brownie originally means a small rectangular candy, but the Brownie we are talking about today is a Python-based framework for developing and testing smart contracts. Brownie supports both Solidity and Vyper contracts, and it can even provide contract testing through pytest.
To demonstrate the process of writing and deploying smart contracts with Brownie, we will use Brownie-mixes, which is a template project. Specifically, we will use a token mix, which is a template for ERC-20 implementation.
Install dependency packages
Brownie is built on python3, so we need to install it to work with brownie; let's check if python3 is installed on our system. To do this, enter the following into your terminal/cmd.
python3 -V
This command will return the installed version of python3. If it is not installed, please download and install it from the official python website.
Let us create a project directory before installing brownie and make the project directory our current working directory.
mkdir brownieDemo
cd brownieDemo
Now that you have python3 installed on your system, let’s install brownie using pip, Python’s package manager. pip is similar to what npm does for JavaScript. Type the following into your terminal/cmd:
pip3 install eth-brownie
## If the install failS, use the following command for better luck.
sudo pip3 install eth-brownie
To check if Brownie is installed correctly, type brownie into your terminal/cmd and it should give the following output:
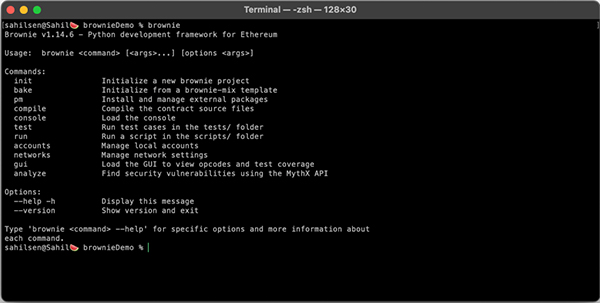
To get the token mix, enter the following into your terminal/cmd:
brownie bake token
This will create a new one in our brownieDemo directory Directory token/.
File structure
First, let us cd into the token directory.
cd token
Now, open the token directory in your text editor. Under the contracts/ folder you will find Token.sol, which is our main contract; you can write your own contract or modify this. Under the scripts/ folder, you will find the token.py script; this script will be used to deploy the contract and needs to be modified according to the contract.
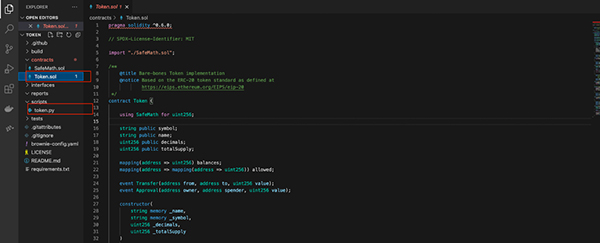
This contract is an ERC-20 contract.
Start our Ethereum node
We will deploy our contracts on the Ropsten testnet rather than running our own node. Please make sure to select Ethereum as the chain and Ropsten as the network at checkout.

Save the HTTP URL. We'll need it in the next step.
Network and Account Settings
We need to set up a QuickNode free node in Brownie. To do this, enter the following into your terminal/cmd.
brownie networks add Ethereum ropstenquicknode host=YOUR_QUICKNODE_URL chainid=3
Replace YOUR_QUICKNODE_URL with the RopstenURL we got in the previous step.
In the above command, Ethereum is the name of the environment and ropstenquicknode is the custom name of the network; you can give your custom network any name.
The next thing we need to do here is create a new wallet using Brownie. To do this, enter the following into your terminal/cmd. You will be asked to set a password for your account.
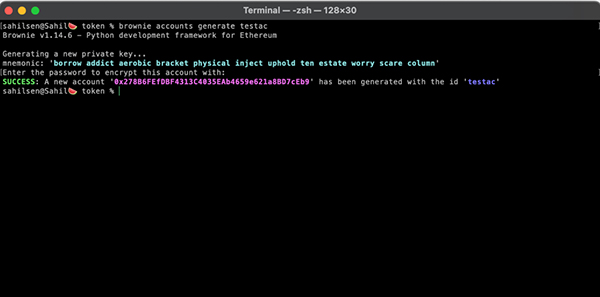
brownie accounts generate testac
This will generate an account and a memorable phrase and save it offline. The name testac is the name of our account. You can choose any name you want.
Copy the account address so we can get some ETH for testing, which will be needed to deploy our contract.
获取ETH测试币
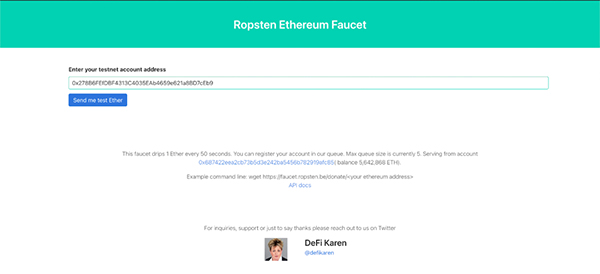
由于我们的合约将被部署在Ropsten测试网,我们需要一些Ropsten测试ETH来支付gas费。前往Ropsten水龙头,将您的地址粘贴在该区域,然后点击 "Send me test Ether"。
部署我们的合约
在部署合约之前,我们需要用以下方法编译它。
brownie compile

现在在你的文本编辑器中打开scripts/token.py,并做如下修改。
#!/usr/bin/python3
from brownie import Token, accounts
def main():
acct = accounts.load('testac')
return Token.deploy("Test Token", "TST", 18, 1e21, {'from': acct})
第6行。我们添加这一行是为了导入我们先前创建的testac账户,并将其存储在acct变量中。
第7行。在这一行,我们编辑了 'From':部分,以获取我们的acct变量。
最后,我们将使用脚本(这里是 scripts/token.py)部署我们的合约。
brownie run token.py --network ropstenquicknode
在上面的命令中,ropstenquicknode是我们之前创建的自定义网络的名称。提示将要求你提供我们之前在建立账户时设置的密码。运行上述命令后,你必须得到交易哈希值,Brownie将等待交易得到确认。一旦交易被确认,它将返回我们的合约在Ropsten测试网上部署的地址。
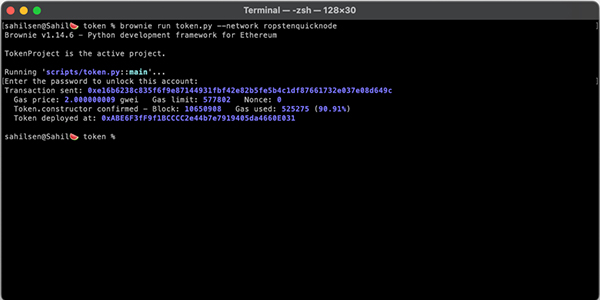
你可以在Ropsten etherscan复制粘贴合约地址,查看已部署的合约。
总结
我们学会了如何导入一个Brownie-mix,添加一个自定义网络,创建一个账户,以及编译和部署一个合约,整个过程中我们都使用了Brownie框架。
The above is the detailed content of Python Web3 Development: Deploying Smart Contracts with Brownie. For more information, please follow other related articles on the PHP Chinese website!


