


Native integration
Create project
To create a Spring Boot project, you only need to add Web dependencies:

After the project is successfully created, add Shiro-related dependencies. The dependencies in the complete pom.xml file are as follows:
<dependencies>
  <dependency>
    <groupid>org.springframework.boot</groupid>
    <artifactid>spring-boot-starter-web</artifactid>
  </dependency>
  <dependency>
    <groupid>org.apache.shiro</groupid>
    <artifactid>shiro-web</artifactid>
    <version>1.4.0</version>
  </dependency>
  <dependency>
    <groupid>org.apache.shiro</groupid>
    <artifactid>shiro-spring</artifactid>
    <version>1.4.0</version>
  </dependency>
</dependencies>
Create Realm
Next we will customize the core component Realm:
public class MyRealm extends AuthorizingRealm {
  @Override
  protected AuthorizationInfo doGetAuthorizationInfo(PrincipalCollection principals) {
    return null;
  }
  @Override
  protected AuthenticationInfo doGetAuthenticationInfo(AuthenticationToken token) throws AuthenticationException {
    String username = (String) token.getPrincipal();
    if (!"javaboy".equals(username)) {
      throw new UnknownAccountException("账户不存在!");
    }
    return new SimpleAuthenticationInfo(username, "123", getName());
  }
}
Just implement simple authentication operations in Realm without authorization. The specific writing method of authorization is the same as Shiro in SSM, so I won’t go into details. The authentication here means that the username must be javaboy and the user password must be 123. If these conditions are met, you can log in successfully!
Configuring Shiro
Next, configure Shiro:
@Configuration
public class ShiroConfig {
  @Bean
  MyRealm myRealm() {
    return new MyRealm();
  }

  @Bean
  SecurityManager securityManager() {
    DefaultWebSecurityManager manager = new DefaultWebSecurityManager();
    manager.setRealm(myRealm());
    return manager;
  }

  @Bean
  ShiroFilterFactoryBean shiroFilterFactoryBean() {
    ShiroFilterFactoryBean bean = new ShiroFilterFactoryBean();
    bean.setSecurityManager(securityManager());
    bean.setLoginUrl("/login");
    bean.setSuccessUrl("/index");
    bean.setUnauthorizedUrl("/unauthorizedurl");
    Map<string> map = new LinkedHashMap();
    map.put("/doLogin", "anon");
    map.put("/**", "authc");
    bean.setFilterChainDefinitionMap(map);
    return bean;
  }
}</string>
Configuring Shiro here mainly configures 3 Beans:
First you need to provide an instance of Realm.
When configuring Realm, you need to set it in SecurityManager.
Configure a ShiroFilterFactoryBean and specify path interception rules, etc. in ShiroFilterFactoryBean.
Configure login and test interfaces.
Among them, ShiroFilterFactoryBean has slightly more configurations, and the configuration meaning is as follows:
setSecurityManager means specifying SecurityManager.
setLoginUrl indicates the specified login page.
setSuccessUrl indicates the specified login success page.
The path interception rules are configured in the next Map. Note that they must be in order.
After these things are configured, configure the login Controller:
@RestController
public class LoginController {
  @PostMapping("/doLogin")
  public void doLogin(String username, String password) {
    Subject subject = SecurityUtils.getSubject();
    try {
      subject.login(new UsernamePasswordToken(username, password));
      System.out.println("登录成功!");
    } catch (AuthenticationException e) {
      e.printStackTrace();
      System.out.println("登录失败!");
    }
  }
  @GetMapping("/hello")
  public String hello() {
    return "hello";
  }
  @GetMapping("/login")
  public String login() {
    return "please login!";
  }
}
When testing, first access the /hello interface. Since you are not logged in, it will automatically jump Go to the /login interface:

Then call the /doLogin interface to complete the login:

Visit the /hello interface again. Can be accessed successfully:

Use Shiro Starter
The above configuration method is actually equivalent to configuring the XML in SSM Get Spring Boot and rewrite it in Java code. In addition to this method, we can also directly use the Starter officially provided by Shiro.
Create the project, the same as above
After the creation is successful, add shiro-spring-boot-web-starter. This dependency can replace the previous shiro -web and shiro-spring two dependencies, the pom.xml file is as follows:
<dependencies>
  <dependency>
    <groupid>org.springframework.boot</groupid>
    <artifactid>spring-boot-starter-web</artifactid>
  </dependency>
  <dependency>
    <groupid>org.apache.shiro</groupid>
    <artifactid>shiro-spring-boot-web-starter</artifactid>
    <version>1.4.0</version>
  </dependency>
</dependencies>
Create Realm
The Realm and It’s the same as before, so I won’t go into details.
Configure the basic information of Shiro
Next, configure the basic information of Shiro in application.properties:
shiro.sessionManager.sessionIdCookieEnabled=true
shiro.sessionManager.sessionIdUrlRewritingEnabled=true
shiro.unauthorizedUrl=/unauthorizedurl
shiro.web.enabled=true
shiro.successUrl=/index
shiro.loginUrl=/login
Configuration explanation:
The first line indicates whether it is allowed to put the sessionId in the cookie
The second line indicates whether it is allowed to put the sessionId in the Url address block
The third line indicates the default jump path when accessing an unauthorized page
The fourth line indicates enabling shiro
The fifth line indicates the jump page for successful login
The sixth line indicates the login page
Configure ShiroConfig
@Configuration
public class ShiroConfig {
  @Bean
  MyRealm myRealm() {
    return new MyRealm();
  }
  @Bean
  DefaultWebSecurityManager securityManager() {
    DefaultWebSecurityManager manager = new DefaultWebSecurityManager();
    manager.setRealm(myRealm());
    return manager;
  }
  @Bean
  ShiroFilterChainDefinition shiroFilterChainDefinition() {
    DefaultShiroFilterChainDefinition definition = new DefaultShiroFilterChainDefinition();
    definition.addPathDefinition("/doLogin", "anon");
    definition.addPathDefinition("/**", "authc");
    return definition;
  }
}
The above is the detailed content of How to integrate Shiro in SpringBoot. For more information, please follow other related articles on the PHP Chinese website!

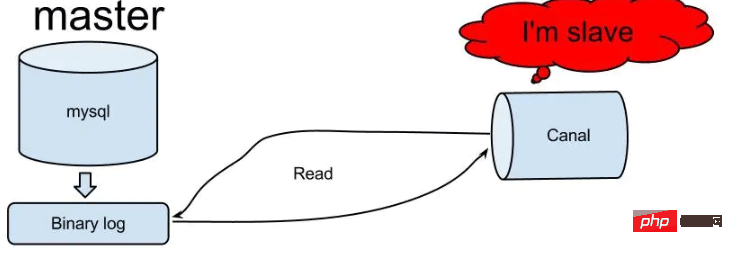 怎么使用SpringBoot+Canal实现数据库实时监控May 10, 2023 pm 06:25 PM
Canal工作原理Canal模拟MySQLslave的交互协议,伪装自己为MySQLslave,向MySQLmaster发送dump协议MySQLmaster收到dump请求,开始推送binarylog给slave(也就是Canal)Canal解析binarylog对象(原始为byte流)MySQL打开binlog模式在MySQL配置文件my.cnf设置如下信息:[mysqld]#打开binloglog-bin=mysql-bin#选择ROW(行)模式binlog-format=ROW#配置My
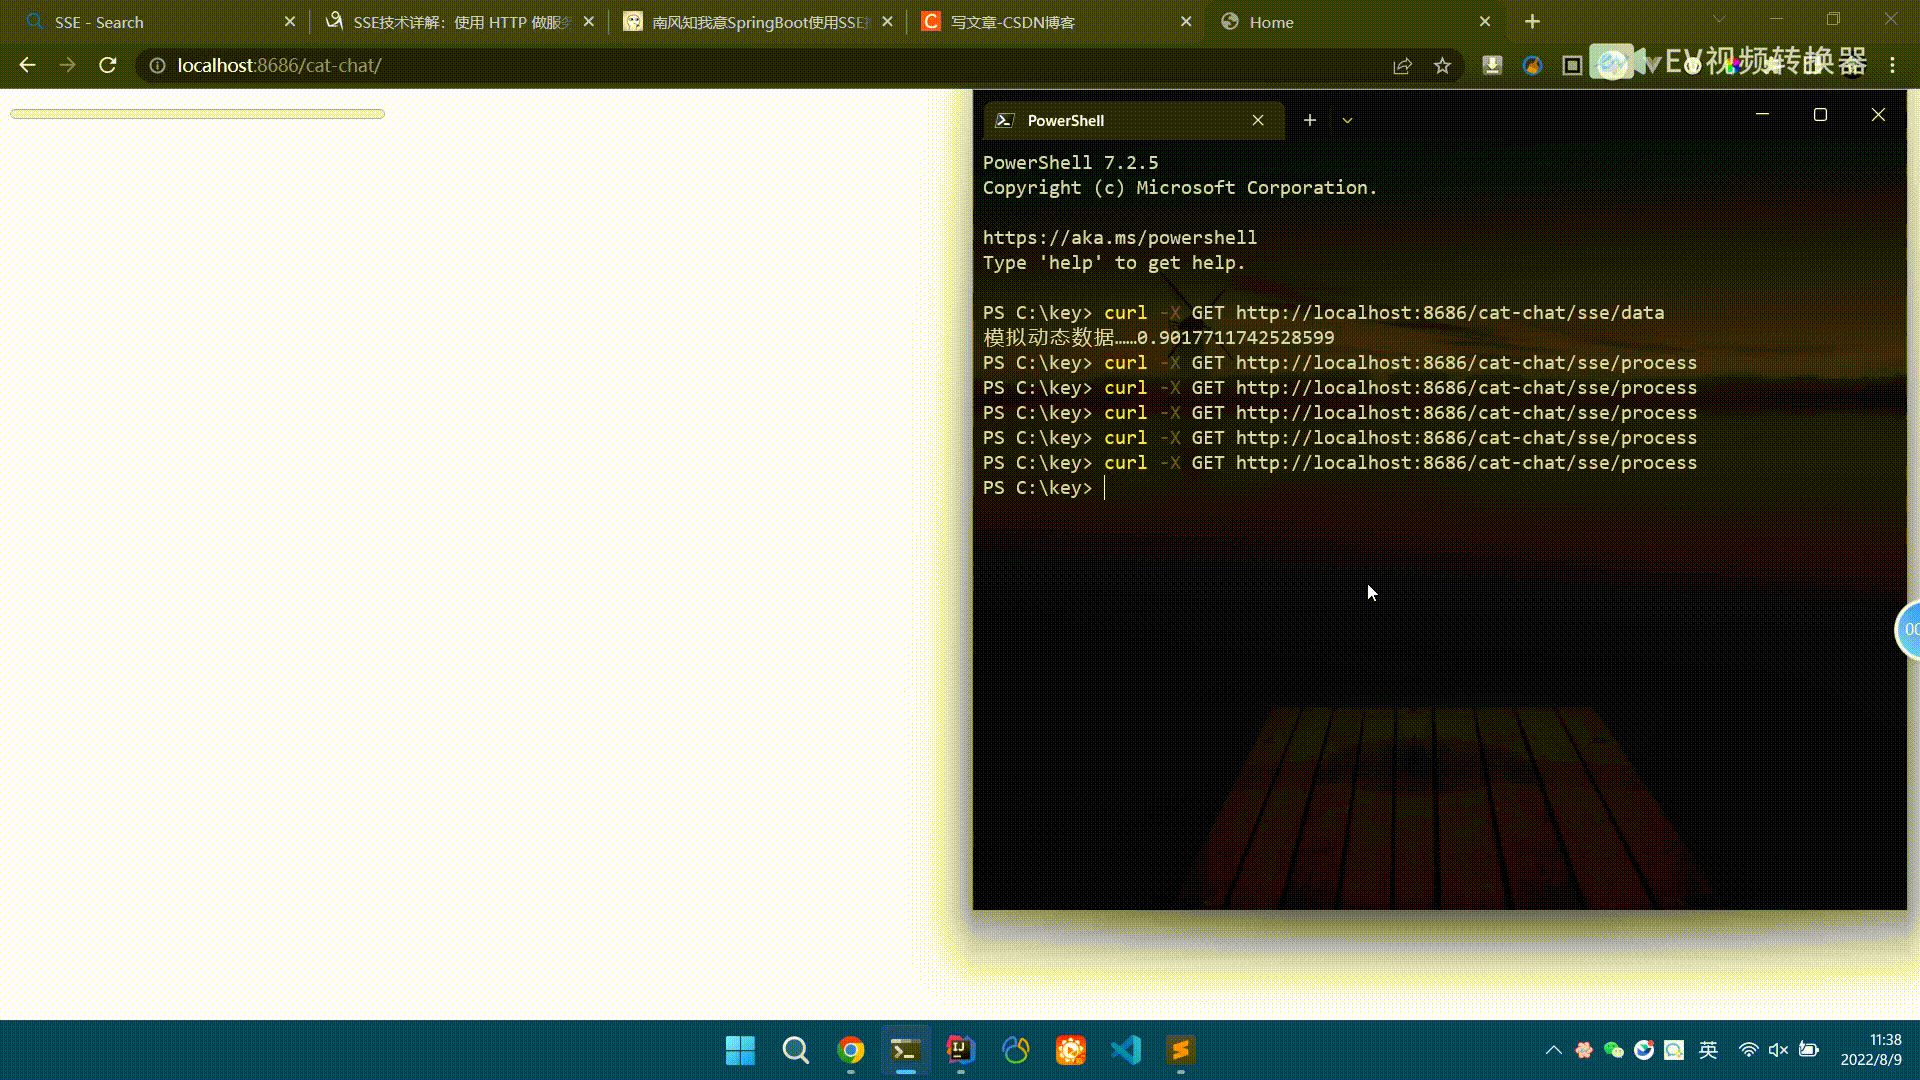 Spring Boot怎么使用SSE方式向前端推送数据May 10, 2023 pm 05:31 PM
前言SSE简单的来说就是服务器主动向前端推送数据的一种技术,它是单向的,也就是说前端是不能向服务器发送数据的。SSE适用于消息推送,监控等只需要服务器推送数据的场景中,下面是使用SpringBoot来实现一个简单的模拟向前端推动进度数据,前端页面接受后展示进度条。服务端在SpringBoot中使用时需要注意,最好使用SpringWeb提供的SseEmitter这个类来进行操作,我在刚开始时使用网上说的将Content-Type设置为text-stream这种方式发现每次前端每次都会重新创建接。最
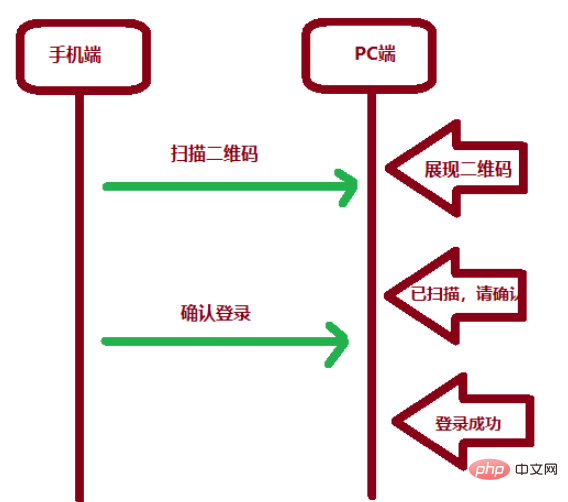 SpringBoot怎么实现二维码扫码登录May 10, 2023 pm 08:25 PM
一、手机扫二维码登录的原理二维码扫码登录是一种基于OAuth3.0协议的授权登录方式。在这种方式下,应用程序不需要获取用户的用户名和密码,只需要获取用户的授权即可。二维码扫码登录主要有以下几个步骤:应用程序生成一个二维码,并将该二维码展示给用户。用户使用扫码工具扫描该二维码,并在授权页面中授权。用户授权后,应用程序会获取一个授权码。应用程序使用该授权码向授权服务器请求访问令牌。授权服务器返回一个访问令牌给应用程序。应用程序使用该访问令牌访问资源服务器。通过以上步骤,二维码扫码登录可以实现用户的快
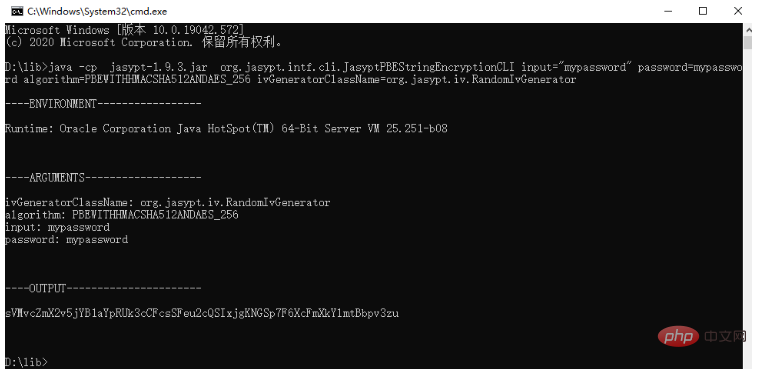 spring boot怎么对敏感信息进行加解密May 10, 2023 pm 02:46 PM
我们使用jasypt最新版本对敏感信息进行加解密。1.在项目pom文件中加入如下依赖:com.github.ulisesbocchiojasypt-spring-boot-starter3.0.32.创建加解密公用类:packagecom.myproject.common.utils;importorg.jasypt.encryption.pbe.PooledPBEStringEncryptor;importorg.jasypt.encryption.pbe.config.SimpleStrin
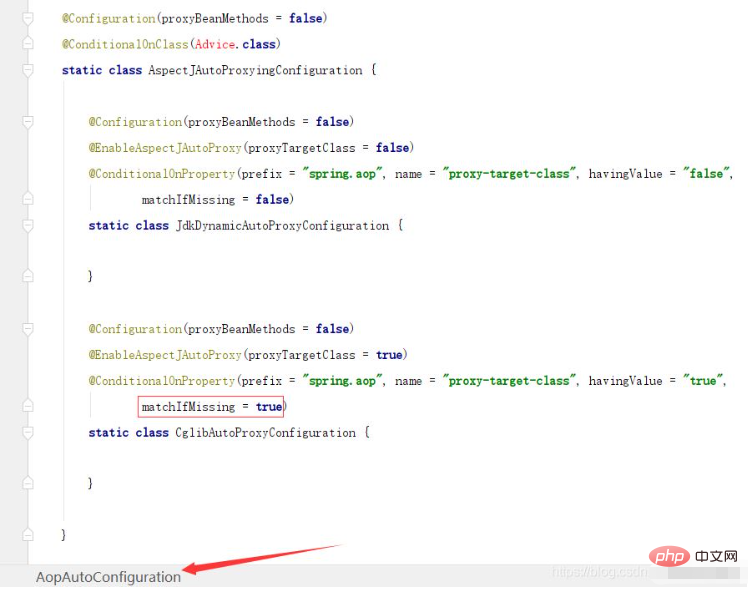 SpringBoot/Spring AOP默认动态代理方式是什么May 10, 2023 pm 03:52 PM
1.springboot2.x及以上版本在SpringBoot2.xAOP中会默认使用Cglib来实现,但是Spring5中默认还是使用jdk动态代理。SpringAOP默认使用JDK动态代理,如果对象没有实现接口,则使用CGLIB代理。当然,也可以强制使用CGLIB代理。在SpringBoot中,通过AopAutoConfiguration来自动装配AOP.2.Springboot1.xSpringboot1.xAOP默认还是使用JDK动态代理的3.SpringBoot2.x为何默认使用Cgl
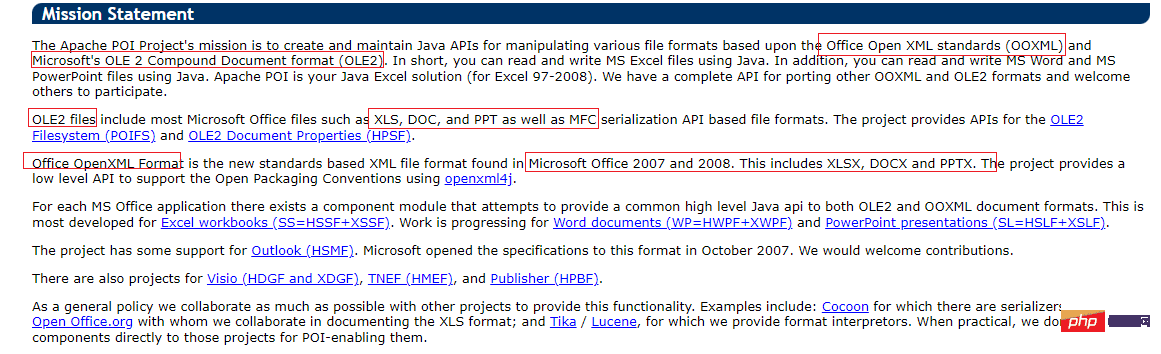 使用Java SpringBoot集成POI实现Word文档导出Apr 21, 2023 pm 12:19 PM
知识准备需要理解ApachePOI遵循的标准(OfficeOpenXML(OOXML)标准和微软的OLE2复合文档格式(OLE2)),这将对应着API的依赖包。什么是POIApachePOI是用Java编写的免费开源的跨平台的JavaAPI,ApachePOI提供API给Java程序对MicrosoftOffice格式档案读和写的功能。POI为“PoorObfuscationImplementation”的首字母缩写,意为“简洁版的模糊实现”。ApachePOI是创建和维护操作各种符合Offic
 springboot怎么整合shiro实现多验证登录功能May 10, 2023 pm 04:19 PM
1.首先新建一个shiroConfigshiro的配置类,代码如下:@ConfigurationpublicclassSpringShiroConfig{/***@paramrealms这儿使用接口集合是为了实现多验证登录时使用的*@return*/@BeanpublicSecurityManagersecurityManager(Collectionrealms){DefaultWebSecurityManagersManager=newDefaultWebSecurityManager();
 Springboot如何实现视频上传及压缩功能May 10, 2023 pm 05:16 PM
一、定义视频上传请求接口publicAjaxResultvideoUploadFile(MultipartFilefile){try{if(null==file||file.isEmpty()){returnAjaxResult.error("文件为空");}StringossFilePrefix=StringUtils.genUUID();StringfileName=ossFilePrefix+"-"+file.getOriginalFilename(


Hot AI Tools

Undresser.AI Undress
AI-powered app for creating realistic nude photos

AI Clothes Remover
Online AI tool for removing clothes from photos.

Undress AI Tool
Undress images for free

Clothoff.io
AI clothes remover

AI Hentai Generator
Generate AI Hentai for free.

Hot Article
Hot Tools

Dreamweaver CS6
Visual web development tools

SecLists
SecLists is the ultimate security tester's companion. It is a collection of various types of lists that are frequently used during security assessments, all in one place. SecLists helps make security testing more efficient and productive by conveniently providing all the lists a security tester might need. List types include usernames, passwords, URLs, fuzzing payloads, sensitive data patterns, web shells, and more. The tester can simply pull this repository onto a new test machine and he will have access to every type of list he needs.

MantisBT
Mantis is an easy-to-deploy web-based defect tracking tool designed to aid in product defect tracking. It requires PHP, MySQL and a web server. Check out our demo and hosting services.

mPDF
mPDF is a PHP library that can generate PDF files from UTF-8 encoded HTML. The original author, Ian Back, wrote mPDF to output PDF files "on the fly" from his website and handle different languages. It is slower than original scripts like HTML2FPDF and produces larger files when using Unicode fonts, but supports CSS styles etc. and has a lot of enhancements. Supports almost all languages, including RTL (Arabic and Hebrew) and CJK (Chinese, Japanese and Korean). Supports nested block-level elements (such as P, DIV),

ZendStudio 13.5.1 Mac
Powerful PHP integrated development environment

